I just received my Brewpi Spark v2 and connected it via usb to my Raspberry Pi 3 B. I did the whole Installing BrewPi thing here Software Install Guide It is all running and I can see the temperature of the probe I plugged into the Spark. Now, how do I access the settings and programs for the Spark? I’ve got VNC and Putty up and running on my laptop and I can access my Rpi there. How do I change settings for the Spark? How do I set schedules?
There isn’t much documentation on what to do next. Seems like every step I move forward with this setup, I need to do hours of searching and question asking to get the information I need. I feel the amount of money I’ve already shelled out for this setup, there should be well documented info on how to proceed. Even a pamphlet or booklet shipped with the Spark would be great for beginners like myself.
Sorry if I’m coming across as rude, but I’m getting slightly frustrated. How is a beginner like myself supposed to get into this? I almost didn’t go this route due to the lack of solid, easy to find directions to get going. All the instructions I do read are either way outdated, or at the bottom, say that more information will be uploaded soon (but those posts as well are very old and dont apply to the last few revisions of components)
I have typed my IP address of my Rpi into a web browser and this comes up:
Debian Logo Apache2 Debian Default Page
It works!
This is the default welcome page used to test the correct operation of the Apache2 server after installation on Debian systems. If you can read this page, it means that the Apache HTTP server installed at this site is working properly. You should replace this file (located at /var/www/html/index.html) before continuing to operate your HTTP server.
If you are a normal user of this web site and don’t know what this page is about, this probably means that the site is currently unavailable due to maintenance. If the problem persists, please contact the site’s administrator.
Configuration Overview
Debian’s Apache2 default configuration is different from the upstream default configuration, and split into several files optimized for interaction with Debian tools. The configuration system is fully documented in /usr/share/doc/apache2/README.Debian.gz. Refer to this for the full documentation. Documentation for the web server itself can be found by accessing the manual if the apache2-doc package was installed on this server.
The configuration layout for an Apache2 web server installation on Debian systems is as follows:
/etc/apache2/
|-- apache2.conf
| -- ports.conf |-- mods-enabled | |-- *.load |– *.conf
|-- conf-enabled
| -- *.conf |-- sites-enabled |– *.conf
apache2.conf is the main configuration file. It puts the pieces together by including all remaining configuration files when starting up the web server.
ports.conf is always included from the main configuration file. It is used to determine the listening ports for incoming connections, and this file can be customized anytime.
Configuration files in the mods-enabled/, conf-enabled/ and sites-enabled/ directories contain particular configuration snippets which manage modules, global configuration fragments, or virtual host configurations, respectively.
They are activated by symlinking available configuration files from their respective *-available/ counterparts. These should be managed by using our helpers a2enmod, a2dismod, a2ensite, a2dissite, and a2enconf, a2disconf . See their respective man pages for detailed information.
The binary is called apache2. Due to the use of environment variables, in the default configuration, apache2 needs to be started/stopped with /etc/init.d/apache2 or apache2ctl. Calling /usr/bin/apache2 directly will not work with the default configuration.
Document Roots
By default, Debian does not allow access through the web browser to any file apart of those located in /var/www, public_html directories (when enabled) and /usr/share (for web applications). If your site is using a web document root located elsewhere (such as in /srv) you may need to whitelist your document root directory in /etc/apache2/apache2.conf.
The default Debian document root is /var/www/html. You can make your own virtual hosts under /var/www. This is different to previous releases which provides better security out of the box.
Reporting Problems
Please use the reportbug tool to report bugs in the Apache2 package with Debian. However, check existing bug reports before reporting a new bug.
Please report bugs specific to modules (such as PHP and others) to respective packages, not to the web server itself.
Very simple. Just access the IP address of you RPi in a browser eg in the address bar type 192.168.1.123 (or what ever the IP address is). You can prefix with http:// if you like.
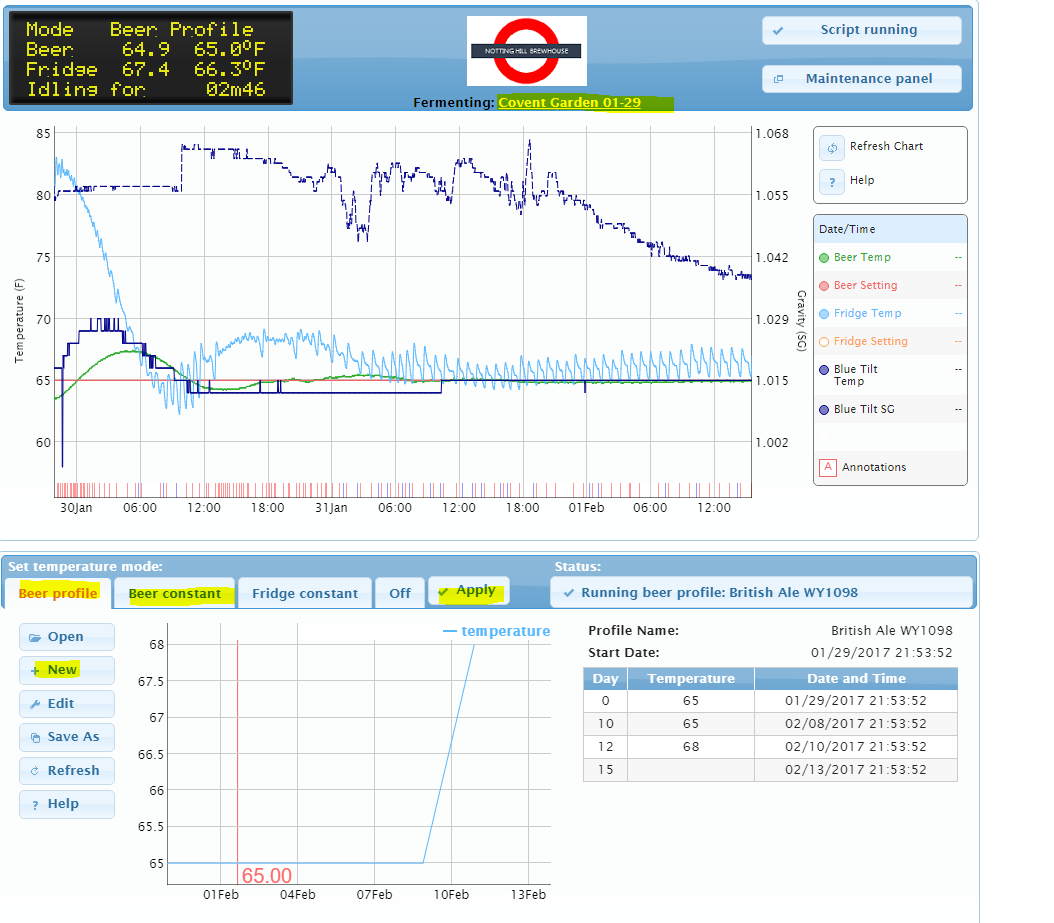
That should bring up a screen like below (please excuse the addition Tilt hydromemter info that you will not have in your standard version). Click in the brew name (in this case Covent Garden 01-29) to start a new brew. In the lower section Click on ‘Beer Constant’, enter a temperature and then on ‘Apply’ to start temperature control. If you prefer to have a scheduled profile click on the ‘Beer profile’ and then ‘+ New’ to set up your profile. On the right enter day 0 and start temp, then the end point of that temperature. The the following point determines the steepness of the change in temperature. Note that in my example I have two days to climb from 65 to 68. Gove the profile a name and then save it so you can use it again. Then click on apply and BrewPi will follow your profile. You will be astounded how close it does follow. The biggest deviation occurs at the inflection points and is also dependent on the steepness of your change curve.
Feel free to contact me if you have more questions
Stefan
Sorry missed that. It means you have not completed the installation of BrewPi (correctly?). BrewPi uses Apache (which is what you see) to display the control screen that I sent you. Go back and check that you have carried out each and every step from the Install Guide. It is confusing and frustrating sometimes, but believe it or not, I was total Linux noob when I started on this adventure too. I do have the background of some computer knowledge from other areas, so it helped understand what I was doing in each step but I could not vary from the straight and narrow because I would be totally lost. And with the straight and narrow, I mean following the instructions. You need to be sure that each is entered exactly as in the Guide. A little tip here if you are using Putty, I found that you can ‘Paste’ by using a right click in the Putty window at the point you need the text to be entered.
Good luck, keep at it, you will get there in the end and it is well worth it. BrewPi is a great tool
Stefan
As you can see in the instructions it can be run again, try re-running it. And watch for error messages. Things sometime flash by, but you might catch an error. Hopefully though no errors and BrewPi starts up after the (re-)install
Much thanks. Once I get home, I’ll uninstall it and try again. If I remember right, it said something about not finding a folder when I installed it. I’ll check later. Maybe once I get my build completed, I’ll do a full write up with pictures and such and hopefully someone could make it a sticky somewhere as a guide for beginners.
I am sure that Elco would appreciate help with documentation. Not that you do not really need to uninstall, you can just re-run the commands that I sent you. That should do it for you. IF that does not work then you can think about reloading your SD card with NOOBS, and starting from scratch. But there is also a process for that, since you need to wipe your SD card clean, removing the Linux partitions that the installtion placed on the card. The Forum has that process or you can go to RaspberryPi.com and find it there too. You probably need to go there anyway to download the NOOBS zip file. Warning, that file is quite large so hopefully you have a decent internet speed. Alternatively, if your work has a good internet connection, and they allow it, do the download at work. But I will keep my fingers crossed for you that you do not need to go that far.
All the best, let me know how you go. And as I said before, don’t give up, it is really worth it
Stefan
*** Updating BrewPi web interface repository ***
The path ‘/var/www/html’ does not seem to be a valid git repository
What path did you install the BrewPi web interface scripts to?
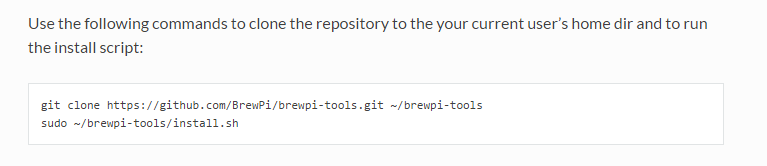
Thats after running through this copying and pasting to putty this:
Alright, I did the clone thing you gave me, and now it works. What was the issue with the process I used originally that the clone thing had to be inputted?
BTW, NottingHill, How does the Tilt work with muslin bags of hops (or anything else, like oak cubes, or cocoa nibs) in the fermenter? Do they prohibit the free floating and thus give inaccurate readings of the device?
I think when it asked about where to install the web interface files, you give it a directory name (y or yes) instead of accepting the default by pressing ‘enter’. So the files didn’t end up in the right place for apache to find them.
Sorry this was so difficult to do, I know the documentation needs a lot of work. You have made it clear I need to raise the priority on that.
I’m currently trying to type up the whole process that I did to get everything running. So hopefully I can get it done and posted up here for people to use.