Hey guys great work so far Bob and Elco. I was discouraged by the Brewblox UI, but feel I have an OK handle on it now. I do have a few very basic question that I hope I don’t sound dumb asking. How do you set a ferm temp for a beer? Should this be done in the cool pid, the heat pid, the beer pid, should you use either the fermentation profile or the beer pid? If you turn one on are there scenarios that the others should be disabled? Secondly what is the easiest way to turn the ferment temp control off? Disable all pids perhaps?
2 Likes
If you want beer constant mode, make sure you have everything enabled, and then set the beer Setpoint setting.
You can access it through the beer PID: the top pencil button.
To use a profile, add points in the Setpoint Profile widget: it will override its target setpoint.
Easiest way to stop all control is to disable heat and cool PWMs.
2 Likes
Hi Elco, Bob and everyone.
Let me begin by saying that i was a legacy Brewpi user, having bought the Arduino version back in 2014. Elco has done an amazing job and i’ve brewed a lot of successful batches with it and my modified fridge.
This year ive decided to upgrade to the Spark version which is, indeed, a lot more advanced than the legacy one.
I have to congratulate Elco and Bob for the ton of work they have put up with Spark and BrewBlox. I have installed the software on a fresh Pi without incidents and have read a bit of the technical documentation regarding blocks, PID, PWM, etc., connected the fridge (actuators, sensors) to the Spark and installed the “Classic Arrangement” via the interface.
BrewBlox is indeed a powerful environment to control basically anything and i see a lot of potential in it. However, im struggling with the UI which you guys have already said are working on improving it.
In my opinion, it seems to be too much of a “Dev” UI with too much widgets with information which is not usefull for a day-to-day use on a brewery. Granted that if you know by heart the mechanics of a PID algorithm you know how the system is performing, but as a brewer, i couldn’t care less. Its an additional unneeded worry for a brewday that can get stressful very quickly if something goes wrong. If you must have a manual nearby to quickly adjust a parameter… Its just not optimal.
Dont get me wrong, this information should be displayed but, maybe, on an advanced dashboard or something.
I loved the simplicity of BrewPi and the ease you could start/stop a fermentation and log process with the touch of one button. Maybe you guys can also do this but with simplified widgets that “aggregate” blocks and stop all PWMs, for instance. In a nutshell, a simplified UI more dedicated to get the job done and the technology doing it, hidden on the background. Again, for the control freaks, with an “Advanced” visualization option. A look more like Brumat by Siemens would be a dream!
Obviously, take this as constructive criticism and since i have a small Brewing R&D company, i will be more than gladly to help improving and testing BrewBlox.
Finally i have some questions and an issue im having with the latest Edge version:
As i stated, ive installed BrewBlox, sensors, actuators, and the “Classic Arrangement” dashboard. Everything went ok with the fridge starting to cool right away (another thing to fix). I could access the dashboard and the graphic and widgets were all working.
-
How do we tell if BrewBlox is logging information? For example, the graph data? Also there seems to not exist a master “start/stop” process button.
-
My fridge has a fan actuator. I just cant figure how to implement it on the process of the classic arrangement. I wish that the fan be turned on during cooling and heating and that it stays on for 5-10 min after cool/heating is turned off. Is it possible? How? The form of implementing relations between blocks is a bit unintuitive. I think this could also be simplified…
-
Since the initial installation, ive turned off the Spark and the Pi and a day or two later, turned them back on. Ive noticed that the “Fermentation Dashboard” was gone, with only the “Home Dashboard” on the list. The blocks are all there tough, which is a bit odd. Does anyone know what happened?
-
Which is the proper shutdown procedure of the system? Execute first “brewblox-ctl down” and then “shutdown” to avoid any data loss?
Sorry for the long post and i really hope to be brewing with BrewBlox very shortly 
Best regards
2 Likes
Hi,
Happy to hear the system is working well.
The new step view widget could be used to implement the start/stop button for all actuators you describe.We’ll be adding a preconfigured step view to the setup generated by the classic wizard as soon as we’re satisfied that the step view is working as intended.
A major feature is that you can use the same controller to manage multiple unrelated processes. While we may implement a “stop everything” button, we’re somewhat reluctant to add the corresponding “start everything” button.
Medium-term planning is to add a dashboard that manages a control loop without you having to manage all components of it. This should somewhat resemble your description of a simplified UI to get the job done on brew days.
As to your specific questions:
-
If the service is running, it’s logging information. It may leave out some fields (values for disabled blocks), but by default logging is always on. To prevent database flooding, we only keep averaged values (1m, 10m, 1h, 6h periods) for data older than a day.
-
There is a feature in development to accomplish exactly this. Technically it can already be done using a clever combination of Blocks and settings, but we’re very much entering “advanced usage” territory there.
Do you have a preference for how relations should be set? We have multiple plans lined up, but ideas are always welcome. -
This sounds like an issue with the database in the front end. Dashboards and widgets are stored separately from blocks and block names. For performance reasons we also first store values locally in the browser, and then synchronize with the remote database in the background.
Disappearing dashboards sound like the synchronization failed. This can technically happen, but should’ve displayed a clear error message. I’ll look into that. -
Pretty much. To avoid SD card issues on the Raspberry Pi, it is advisable you use
shutdown -hinstead of the regular shutdown though. This make it:
brewblox-ctl down
shutdown -h now
Thanks for the feedback! Most of our efforts right now are aimed at making the system simpler to use. Both positive and negative feedback are very helpful.
Hi Bob, thanks for your reply!
Following up:
-
On the legacy BrewPi, there was a Button to start/stop logging and choose a name of the “brew” (file). Isnt it possible to implement the same on BrewBlox? This would eliminate the problem of db flooding…
First, the block relations.
It seems there are blocks that can be condensed in one. For example, an actuator can be on/off (a relay) or PWM (for example, a fan). Why not just create a block with both options and a drop list to choose the actuator? At the moment it seems to be more than one block to achieve this (1.PID -> 2.PWM -> 3.ACTUATOR). As for the the blocks input/output relations, have you guys considered something similar to the interface of NodeRED or even Blockly? I use a domotics software (Domoticz) that has Blockly implemented to “program” events based on sensor readings, actuators, etc, and its pretty much straightforward…
Now the FAN (or something else)
This could be an updated actuator block that has its input triggered with the same condition that triggers the “cool pin” block (as on the example). As for the time, this could be achieved with an “on delay” (it would only turn on after a set time) and an “off delay” for the opposite.
Can this scenario that happened to me be related to power off the Spark/Pi without running the “brewblox-ctl down” command? And how can i restore the “fermentation dashboard”? delete the created blocks, rename the actuators and run the wizard again?
On the weekend im going to take another look at the system to see if i can come up with more ideias.
Thanks again Bob!
1 Like
Based on some napkin math assuming our current settings and 5 Spark controllers full of blocks (+/- 80) it’d be some years before size becomes an issue on a 32GB SD card. Your SD card is more likely to die from constant use first.
You can use the Session View widget to easily view data for specific brews: each session has a start and end date, along with the relevant fields in history.
From the perspective of the firmware the chain is PID -> Analog Actuator -> (maybe) Digital Actuator. The PWM is an analog actuator that has a digital actuator as output, but we may introduce more analog actuators. (Actuator Analog (Mock) already exists, but doesn’t really count).
In the UI we’re already laying the foundations for reducing the number of blocks the user has to deal with.
This is where the concept of Control Loops come in. We want users to interact with the bigger picture (the control loop).
Further down the road, control loops will be integrated with the Process View widget, so you’re looking at a model of a brewery, with values or buttons in appropriate places.
For the foreseeable future, the core system is inherently declarative. Even when using pre-defined steps, the user initiates configuration changes. If someone wants to add Blockly(like) functionality, they’re welcome, but for us it won’t be a priority.
Node-RED looks nice. We already offer static relation diagrams. Making them editable is a logical next step. It’s also a non-trivial amount of work, so I can’t make any guarantees about time frames.
The current design for the Logic Block that would activate your fan is very much like the Mutex. The logic block would use have input(s), a Boolean logic flag, some additional settings, and an output.
Example situation:
- input: HeatPin, CoolPin
- flag: OR
- settings:
remainOn: 5m
- output: FanPin
This would turn on the fan pin if HeatPin and/or CoolPin are active, and only turn it off 5 minutes after the condition became false.
Disclaimer: the timeline on this is soon™, and design changes are very common.
It’s unlikely your dashboard disappeared during Pi shutdown. SD card corruptions usually manifest as weird crashes.
Deleting created blocks and re-running the wizard is one approach. You can also create a new dashboard, and select the “copy to widget” action for each block that you want displayed on it.
Thanks for writing all of that down @Titvs.
The modularity of the control blocks is what makes the system flexible and powerful, but it should not be
the daily use interface. We’re aware of that.
We’re working on more user focused UI widgets that interact with the blocks but have a more abstracted interface suitable for brew day. This will also involve blocks that configure multiple blocks for a specific brewing task.
The very first work towards that is the new step widget in which you can program multiple changes to blocks that should be applied at once. We don’t have presets yet, so we place the burden of knowing what to change on the user. The basics to control a brewery are in place now, so we can shift focus towards UX.
For the fan functionality, I have already started work towards it. IT will be a simple logic block that turns the output on whenever one of its input is active, possibly with a start or stop delay. This block will also be needed to control a pump for a glycol system with single pump and valves branching off to each fermenter.
Regarding logging, we log everything all the time in BrewBlox. So even afterward, you can get your data for a brew. You don’t have to start or stop logging.
With the session widget you can define a session as a start and stop date and a set of data keys. But I don’t like the complexity of the interface myself.
I think we need a global UI concept around brewing processes, like tagging each block to what it belongs (fermentation, mash, etc). This will help to bring some structure to the big pile of interacting things.
3 Likes
Sorry, reading back through posts to work some stuff out and came across this… Do you happen to play Elite: Dangerous? That is the FDEV official line…
I briefly played Elite: Dangerous, but I don’t recall visiting their forum.
I do recall devs for both World of Warcraft and League of Legends using the phrase. I’d imagine gaming forums are more likely to have the required level of informality, even if the sentiment is very common.
1 Like
Hey guys, this “should” be an easy one. I use my laptop to ssh into my pi and then fire up brewblox. I am running the Tilt docker so I have to use brewblox-ctl up to get the server running. But when I close out of the terminal window ( ctrl c) it shuts down the server. To get around this I run it in the background using brewblox-ctl up &, but now I don’t see the tail of the server log. What log can I tail to see that info?
What do you mean by it shuts down the server? The pi and the docker containers will continue to run if you disconnect your SSH session. brewblox-ctl up should just bring up the containers and return to the terminal, not keep any log open.
Do you use the BrewBlox tilt container or a different one?
Hey Elco, yes, I am using the tilt docker build. I did some testing and found that both brewblox-ctl up and docker-compose up work. The UI didn’t seem any different using either one. And both commands also run into a tail. And yes, I can just close the terminal window to close the ssh session and the server will still be running on the pi. But If I want to stay in the ssh session I have to ctrl c to get out of the tail, at which point the server starts it’s graceful shutdown. If I do close the terminal window and then ssh back into my pi I don’t get the tail anymore. So is there a log I can tail that shows the same info I see after starting up the brewblox server?
Brewblox-ctl up runs docker-compose up -d which runs the services detached: you don’t see the log tail, but you can exit the SSH session without exiting the docker containers.
Bringing this post up as it seems to be the most relevant to my current (basic) questions using BrewBlox.
Similar to the OP, I was a legacy BrewPi user and absolutely loved it. I made the jump to BrewBlox to get updated hardware and software that was being supported and updated regularly.
I’m a basic user (fermentation controller only) and would like to consider BrewBlox for a larger installation/implementation but my inability to understand exactly what is being triggered when an Action is run makes me very leery of doing so. For example:
In the legacy BrewPi interface, I selected from fridge setpoint control, beer setpoint control or off. One selection canceled the other - makes sense. I set a target temp for my beer and the system takes over, shifting the setpoint around and toggling the heat/cool outputs as necessary to ramp to the setpoint, not overshoot and maintain to within +/-0.2degF. Very nice.
Now, my BrewBlox has a fermentation process and a series of actions associated with it. I have yet to find the right combination/sequence of these actions to get the same result as the legacy beer setpoint control on my BrewPi. What makes sense to me is to select the ‘constant beer temp’ action, set my target temp, select the ‘enable control’ action then select the ‘enable profile’ action. However, the only way to get a target setpoint to stay (bullseye icon beside temp), I have to use the ‘disable profile’ action. With a batch of beer at 66degF and a beer control setpoint set to 75degF, the heater turned on and stayed on until after the beer temp crossed the 75degF setpoint then it started cooling. Too late, the fridge temp had gone all the way to 115degF and the beer temp overshot the setpoint by 5degF.
Alternately, if I set the actions as above but leave the ‘enable profile’ action going, the target setpoint disappears and the setpoint shifts to 73.4degF with the up/down arrows beside it. I use the beer control action to reset to 75 and it briefly changes but goes back to 73.4.
Earlier in the thread there was mention of a future update to simplify the UI. In the absence of a simplified UI or a just a set of controls that are exclusive to one another, is there a set of instructions on what levers (and in what order) to pull to get BrewBlox to duplicate the functions of the legacy BrewPi system? That would suffice for now.
The Setpoint Profile (“enable profile” action) lets you configure gradual temperature changes. When active, it will override your manual Setpoint setting.
You can view and edit the Setpoint Profile on your dashboard.
To keep a steady temperature, enable control, but keep the profile disabled.
We spend a lot of development efforts on making the system easier to use. This is an iterative and ongoing process: we released multiple major improvements since that post you reference was made.
We have no plans to have parallel simple/advanced UIs. Our approach is to make all settings available, and offer wizards to generate predefined configurations.
You can then ignore or customize settings at will.
Okay. I recall reading about ‘setpoint profiles’ but did not understand that ‘enable profile’ was this function. That extra descriptor could have helped.
My original question still stands, however - legacy BrewPi did a fantastic job with the beer temp mode PID algorithm (the one where the setpoint jumps around). I have to believe that this functionality is built into BrewBlox but I do not know how to enable it. The BrewBlox constant beer temp control action for a 9degF shift overheated the fridge and overshot the setpoint. Am I missing a setting, additional action, etc that makes it behave like the legacy system?
BrewPi used a dynamic setpoint approach: the beer PID set the setting for the fridge setpoint.
In Brewblox, we improved the PID to a point where the dynamic setpoint is no longer required for a fermentation fridge. (They’re still useful for HERMS configurations).
If your temp is overshooting, then the PID settings need some tuning for your hardware.
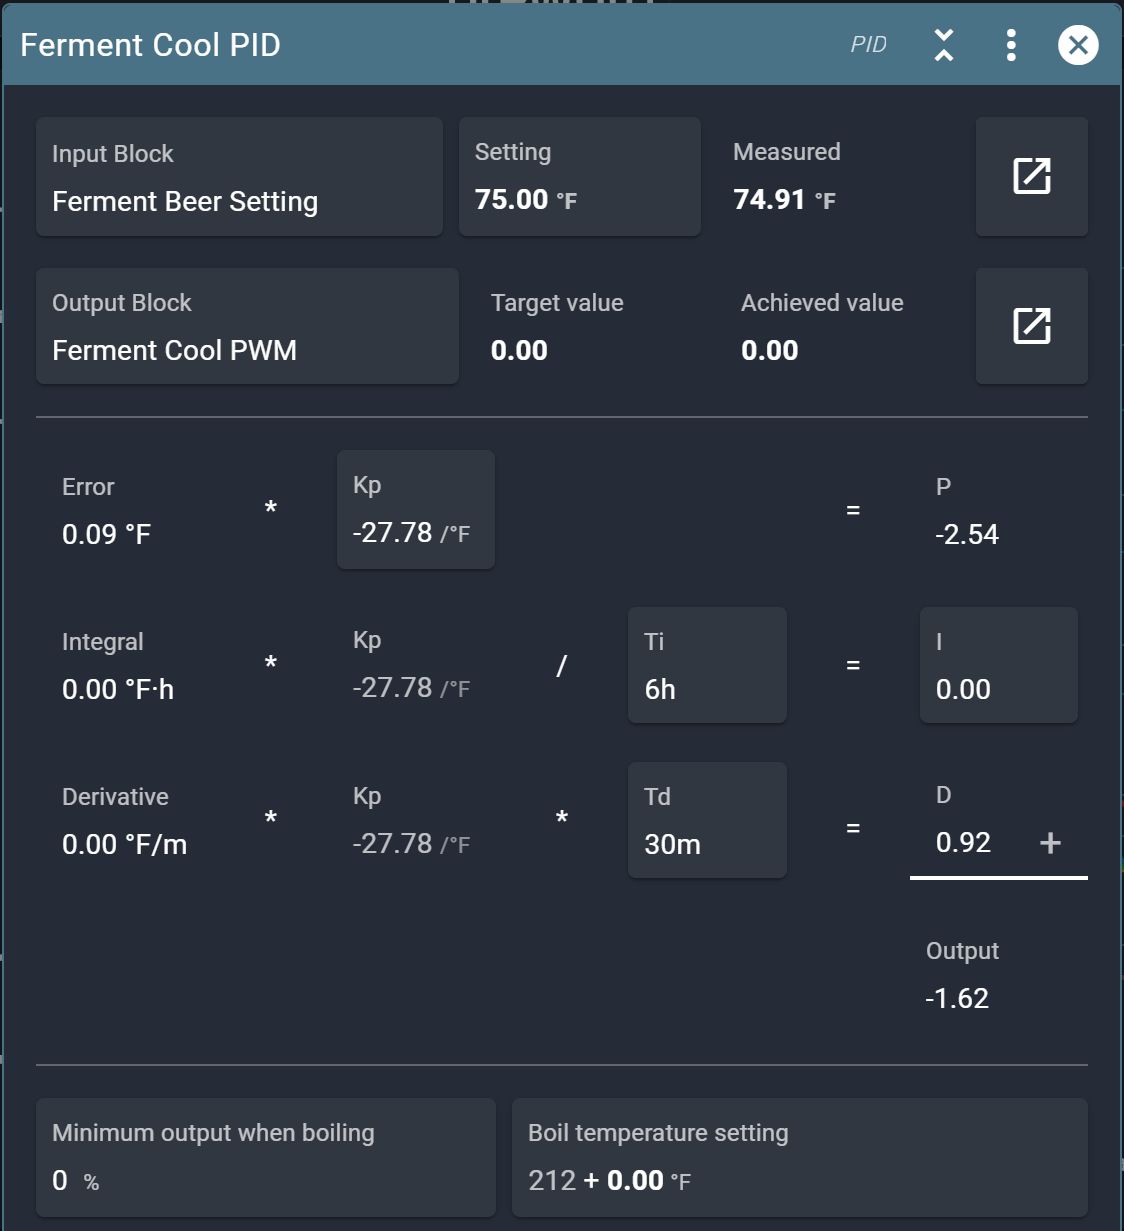
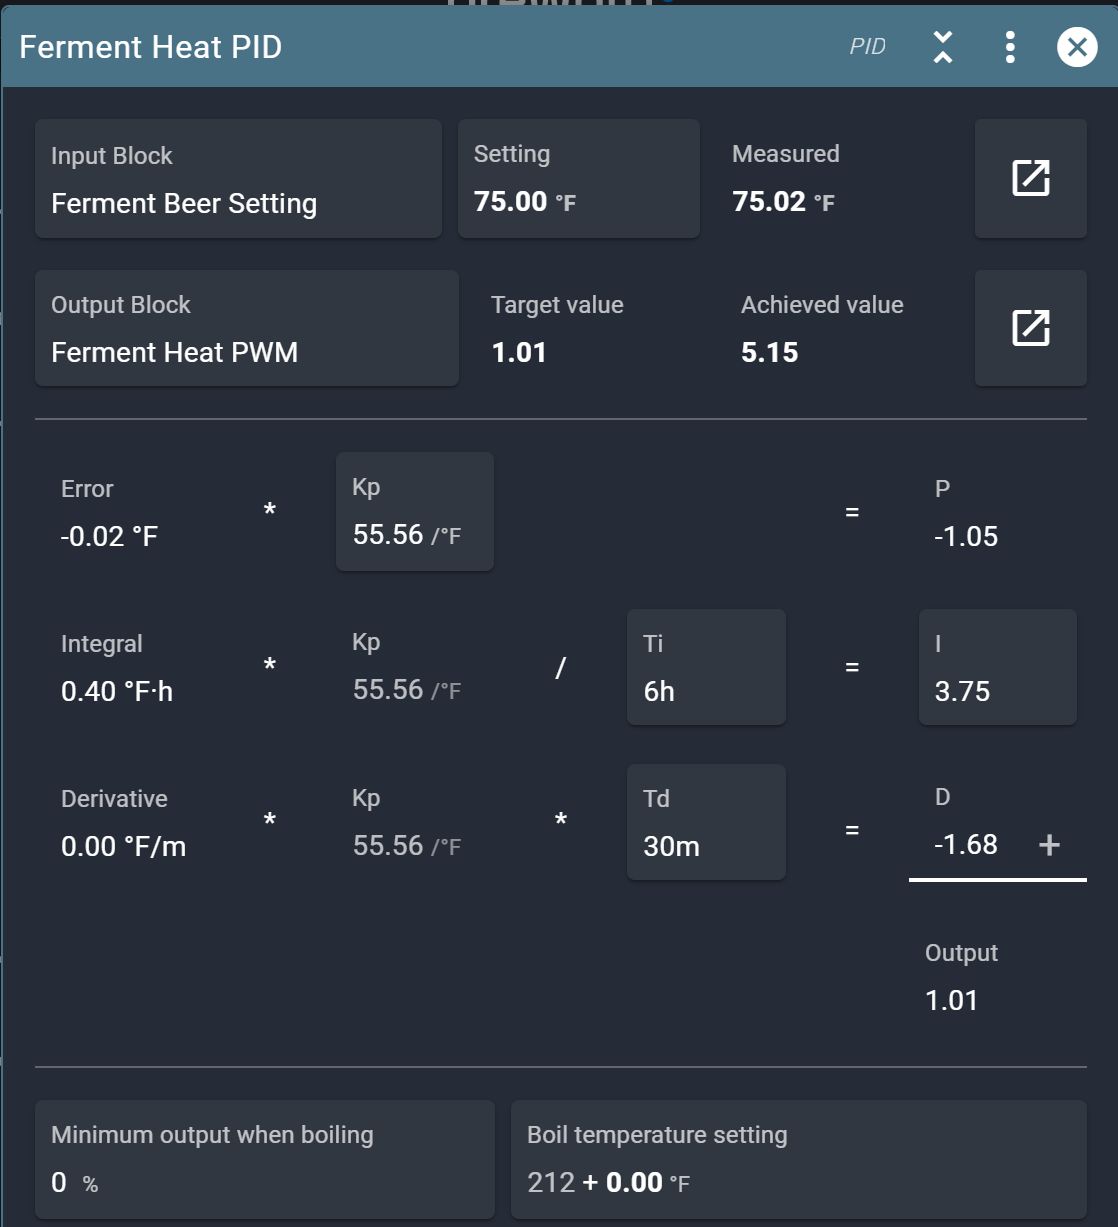
Could you please click on the snowflake/flame icons in your layout to open the heat/cool PIDs, and then in the dialog toolbar show the PID graph?
If you screenshot or export the graphs, we can take a look at what’s going on, and what settings need tweaking.
Okay. The hardware is exactly the same as when I was using it on BrewPi. A TE/peltier cooling device and a fermentation heater mounted to the inside wall of what was an insulated wine chiller. Attached are the screenshots as well as the CSV output of the graph. On the graph, two things jump out - heating continues after beer crosses the 75degF setpoint and the chamber temp goes quite high.
Side note - moving and resizing elements on the dashboard is one of the most frustrating things ever. Dragging vertically goes immediately to the bottom of the page and there is almost no way to move the element one or two blocks vertically.
graph-Ferment Graph-spark-one-downsample_1m.csv (122.9 KB)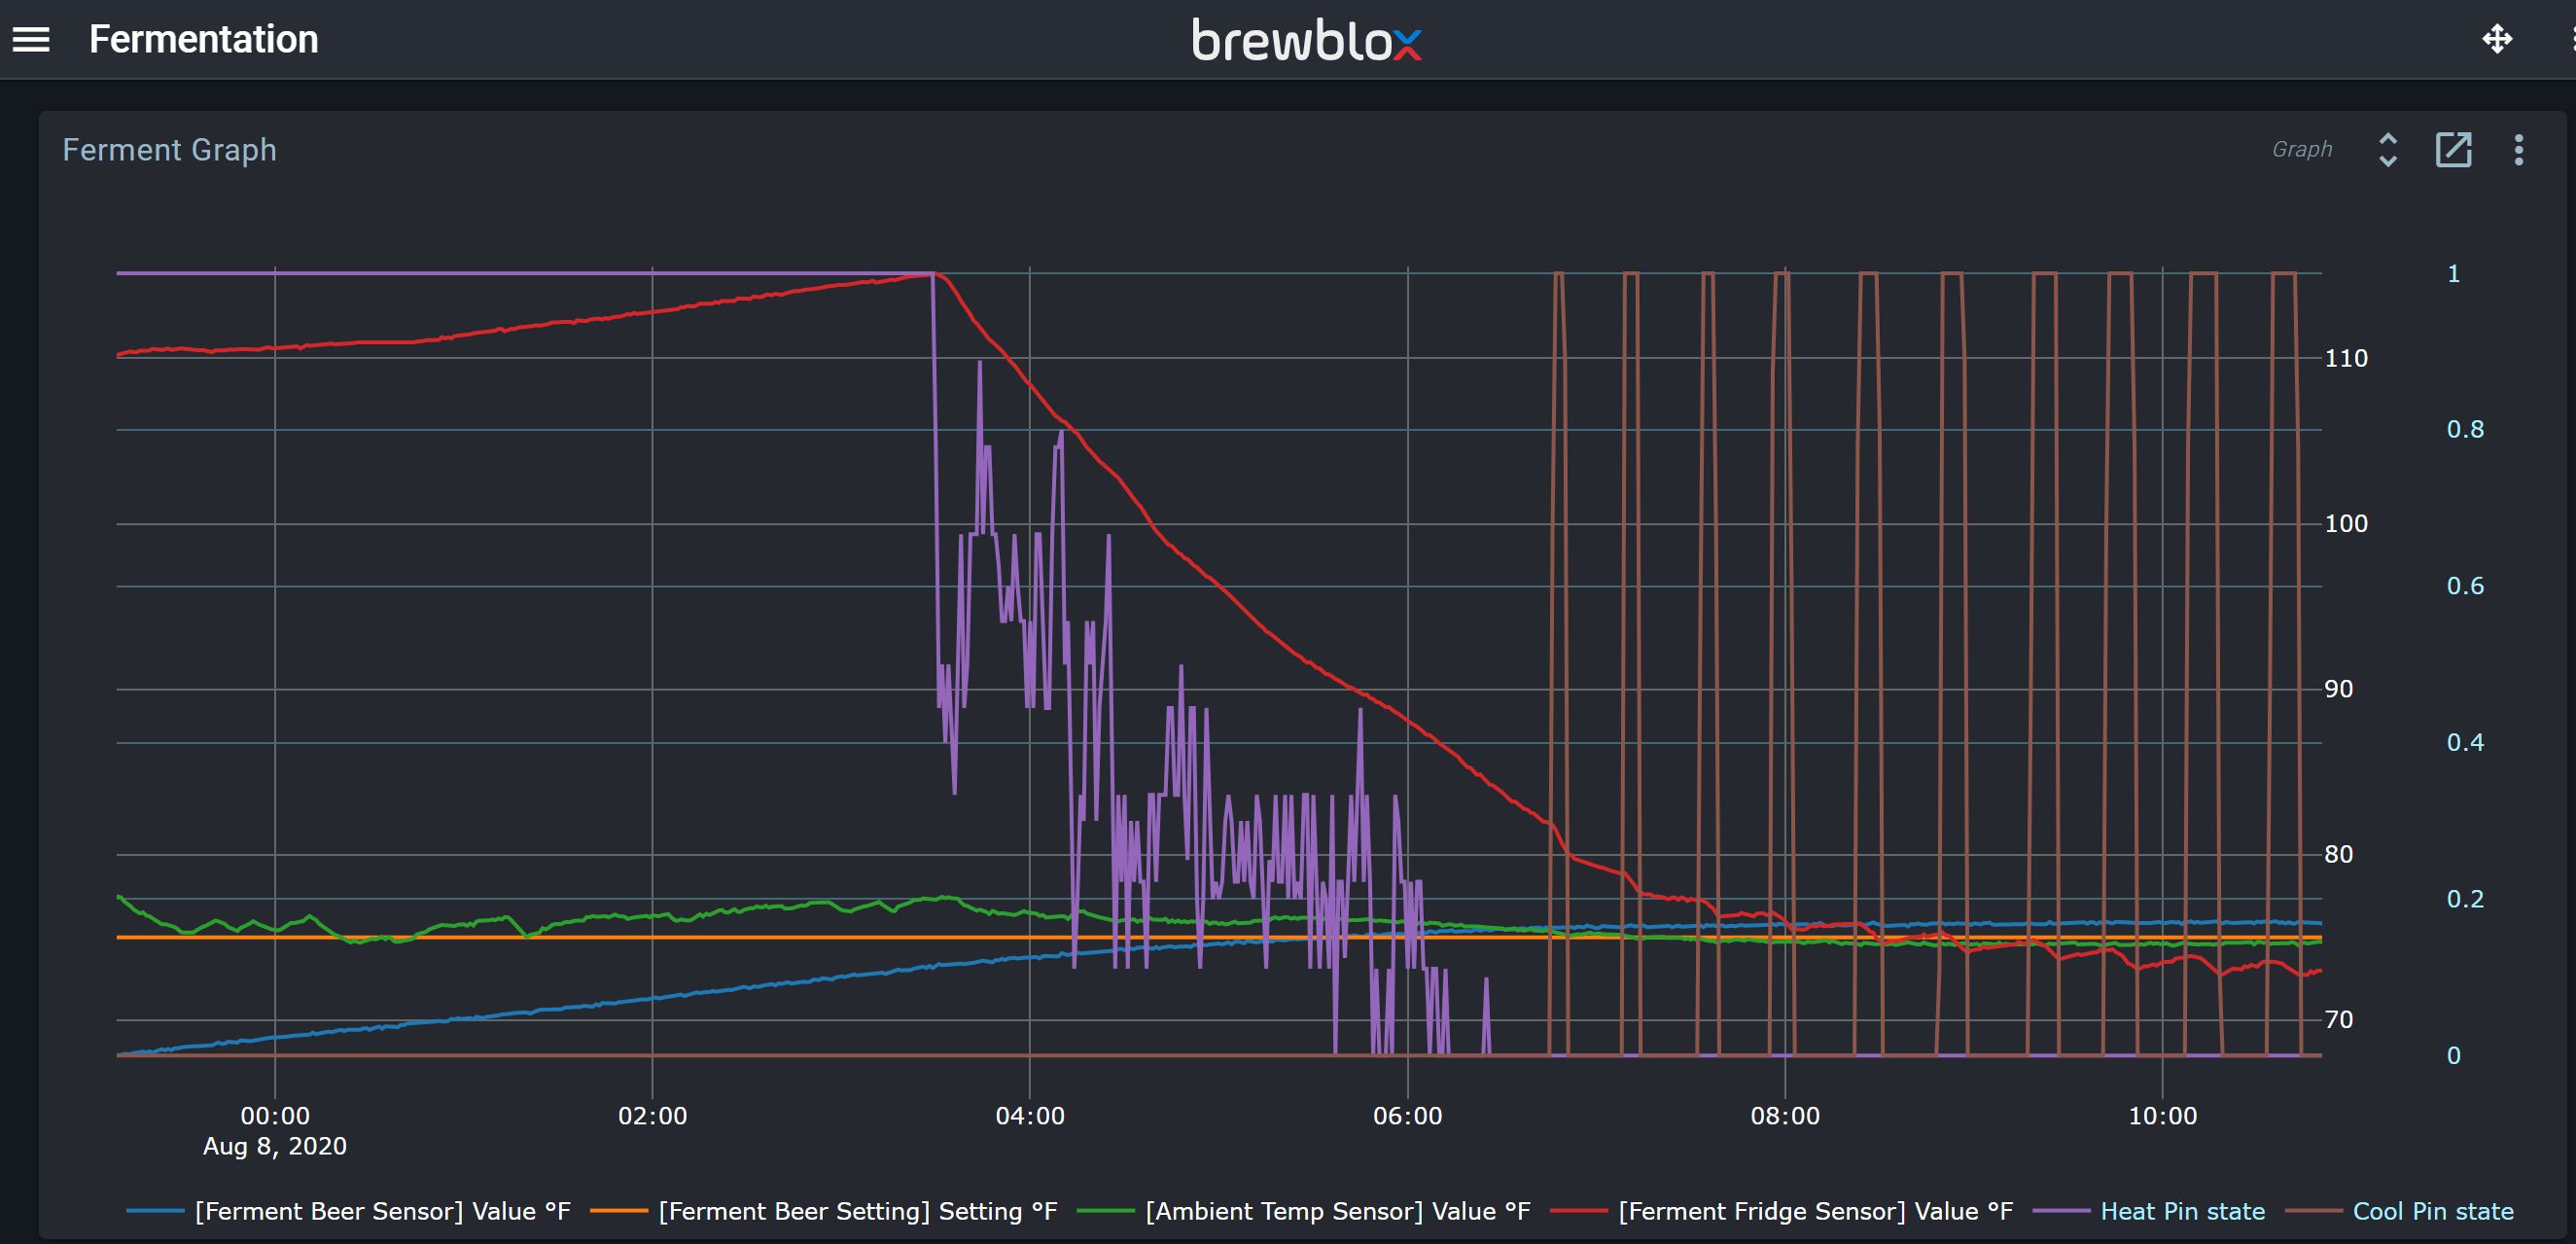
I happened to have fixed the widget dragging issues earlier this week. The changes will be released as part of the new update.
A temporary workaround is to scroll down somewhat first, and then move the widget. The problem occurs when you want to scroll down the page while dragging the widget.
It looks like your heater has a bit of overshoot, and that your cooler has issues maintaining steady state.
We’ll start with the cooler. The default settings are tuned for a fridge compressor, and a peltier element has different requirements.
The most important one is that a compressor requires a significant minimum off time.
For a peltier we can remove these settings.
- go to the Spark service page
- find and select the Ferment Cool Actuator
- go to its Full mode by clicking the vertical <> button in its toolbar
- Edit constraints, and remove the Minimum ON and minimum OFF constraints.
This also means the PWM period can be much faster:
- go to the Spark service page
- find and select the Ferment Cool PWM
- go to its Full mode
- Edit the Period setting, and set it from 30m to 10s
Lastly, we have the PID:
- open the PID from either the builder view or Spark service page
- in Full mode, decrease Ti to 3h.
We start with Ti, as the issue seems to mostly a steady-state problem.
You can see more detailed feedback for the PID by clicking on the three dots in the PID toolbar, and choosing “show in graph”. This will include P/I/D values, and is used to tune the PID.
Thanks for the suggestions and your willingness to help. I had actually decreased minimum on and off constraints for the cooler to 1m when I first deployed BrewBlox. That was something I couldn’t figure out how to do in BrewPi.
I’ll continue to work on tuning the PID settings. I may have grabbed a screen cap of the PID settings from my old BrewPi that might help, but I’m unsure whether those settings are specific to a dynamic setpoint routine.