Not sure what to do with some of the tuning/settings from my old BrewPi config as I set up my same fermentation chamber with Brewblox. Is there a cheat-sheet on how to deal with setting up the PWM and PID settings when looking at our old brewpi config data?
Did I miss (or totally gloss-over) a chapter in the instruction guide?
Setting Kp, Ti, and Td on the PID are straight-forward. Do I need to do anything with regard to the *_infilt and *_dfilt BrewPi values somewhere?
When setting up the PWM in BrewBlox, the Period settings are also straight-forward, but how do I determine what to set the duty-cycle percentage to based on how my BrewPi was tweaked?
Is there some calculation needed using minCoolTime & MinCoolIdleTime? What about the heat PWM duty cycle (for a flat resistor-type wrap-around heater sheet taped to the side of the fridge)?
Does the “deadTime” factor into the BrewBlox settings somewhere?
How about the “beer2Fridge” PID?
There’s no direct cheat sheet for porting your settings. It may be a useful tool for explaining the BrewPi -> BrewBlox switch though, so I’ll make an issue for it.
By default, we recommend running the Fridge wizard to replicate the BrewPi setup. This diagram shows which blocks are used.
Kp, Ti, Td are still functionally the same, but the PID calculations have seen major improvements, so the values may require tuning.
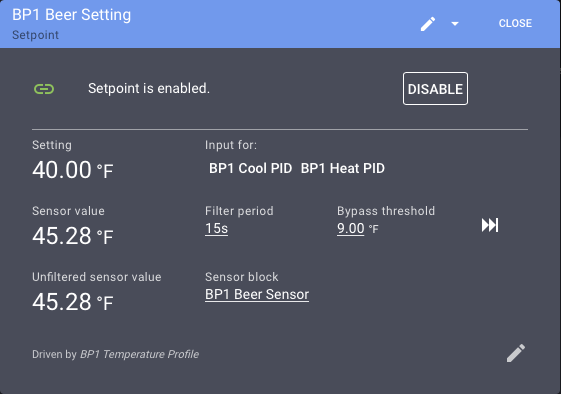
Filters (*_infilt, *_dfilt) have been moved to the Setpoint, and improved. The default settings are optimal for most cases.
PWM period setting should still be the same as it was on your BrewPi. The calculation there is purely based on hardware.
MinCoolTime and MinCoolIdleTime are now the “Minimum On” and “Minimum Off” constraints on the Digital Actuator block.
These are also based on hardware, so BrewPi settings can be used without further adjustment.
deadTime is now “Minimum idle time” in the Mutex block. We recommend setting it to 1.5 or 2 times the longest PWM period, to avoid the other actuator stealing the mutex.
The beer2fridge PID is no longer in the default fridge configuration. We found that after the reworked calculations, the system can keep temperature just as stable when using the beer setpoint as direct input for the cool/head PIDs.
The pros and cons of the beer2fridge configuration are explained here
@Bob_Steers Thanks for the details, this helps a lot.
I ran the Fridge Wizard, though due to other issues, the Photon in the BrewPi was flashed with an earlier version of BrewBlox, then locked up, then reset to the Particle defaults &Tinker app, then re-flashed for the current BrewBlox, so no prior settings available to the wizard…
The cool actuator constraints show min off/on time as 5m/3m respectively whereas my BrewPi settings were 2m each. I’ll leave the BrewBlox defaults for the cool actuator and see how things go.
BrewPi dead time was 3600s which is 3x the 20m period on the PWMs, Mutex Min Idle defaults to 45m. settings panel recommends specifically 1.5x, you say 1.5-2x… so I’ll lower it to 40m (2x) based on your recommendation. Not sure how 5m either way will really effect real-world here…
Thanks again for your rapid responses and uber-helpful explanations!
The recommendation for staggering the Mutex wait time and minimum off constraints came after we noticed the following edge case:
Cooler turns on. The fridge compressor has a long minimum off time (say: 30m).
Mutex lockout also is 30m.
Temperature is roughly at setting, so the system decides that the heater should have a low PWM duty.
Lockout and minimum off time end at the same moment.
The heater grabs the mutex exactly when it becomes available. It only stays on for a second or so, but immediately forces the cooler to wait for another 30m.
To prevent this scenario, specific values are less important than making sure the mutex wait isn’t exactly the same as the min off constraint. 1.5x is a nice and simple recommendation.
If you don’t see strange behaviour where the cooler stays off way too long, then everything turned out fine.
How would you recommend I set the PWM duty cycle % for the fridge (kegerator fridge used as ferm chamber) and the heater (basically an off-brand “fermwrap” taped vertically to the side of the fridge)?
The default settings applied by the wizard assume a pretty comparable setup, so you can stick with them for now.
Tuning the system based on how quickly it cools/heats is generally best done in the PIDs. It’s often best to put a water-filled keg in there, and let the system do its thing for a few hours. At that point you have the data to make corrections.
defaults: good to know.
Water-filled keg: yep, that’s what’s in there now. Same process as when starting out with the BrewPi ages ago. Figured I’d start with the values that were working before and tweak from there.
Moved to BrewBlox because I couldn’t get the tilt working with the more recent iterations of BrewPi since move to Docker and various code update diffs… New BrewBlox integration was easy and made me happy. Lack of stability with the tilt service, frustrating, though understand it’s always a work-in-progress. Level of complexity with BrewBlox, understandable and appreciated, but also frustrating.
I think things need a bit of adjustment… not quite sure how though. The system definitely isn’t reacting as quickly as it was as a brewpi.
Any recommendations?
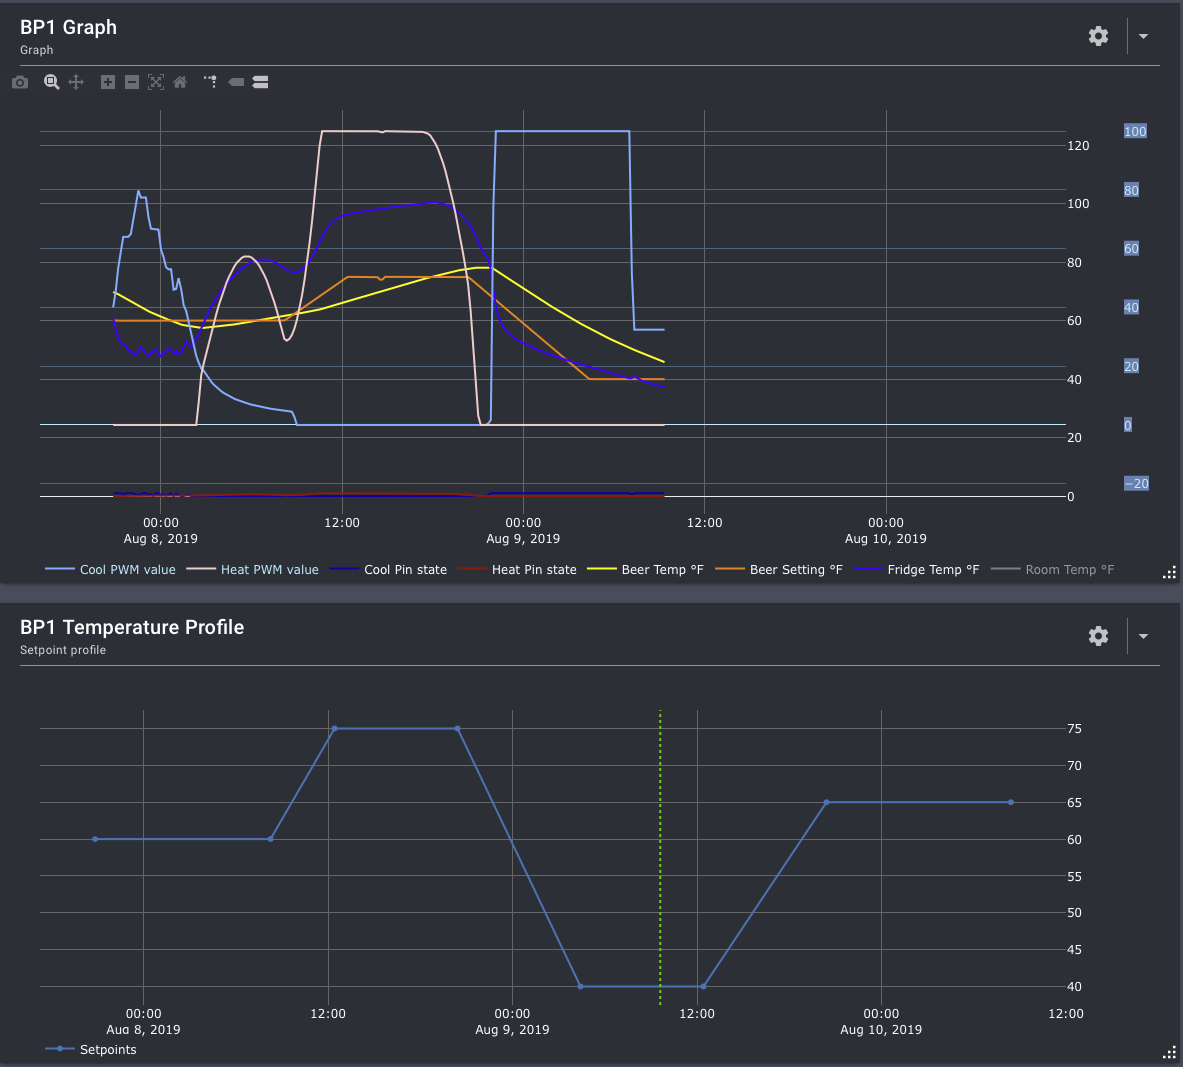
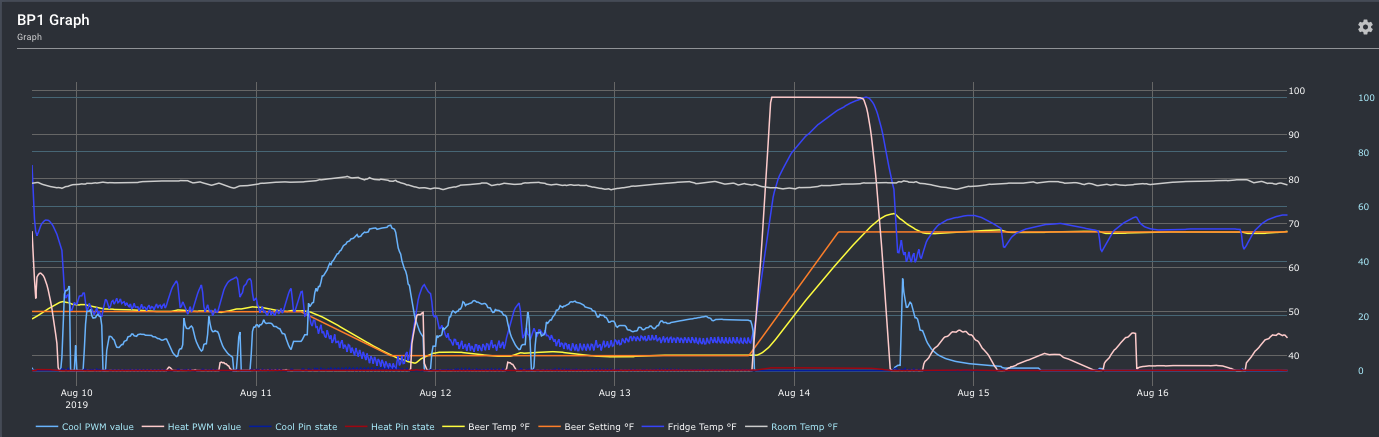
In your graphed scenario, it looks like your profile may be a bit aggressive.
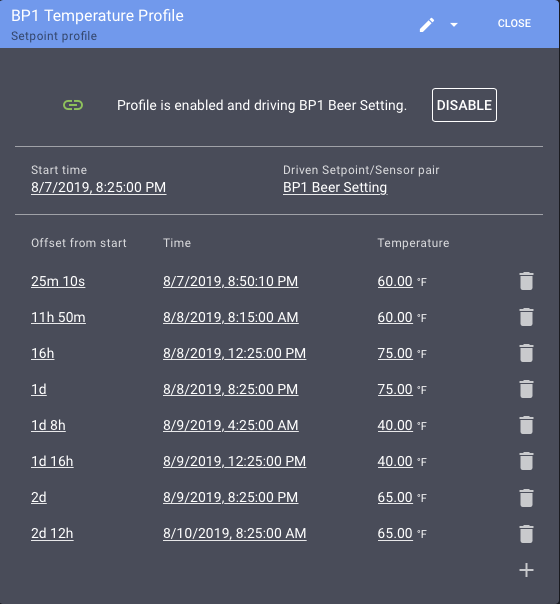
At 8:15 setting goes 15F up.
Heater responds roughly at the same time, and maxes out at 100% somewhere around 10.
The system appears to have some overshoot at around 7PM
At 8:25 the setting starts dropping to 40F.
As soon as the mutex wait time expires the cooler kicks in at 100%. The setting drops slightly quicker than the cooler can adjust the beer temp, so it remains at 100%.
At 4:25 the setting reached 40F, and somewhere around 7 the fridge temp drops below that, and cooler scales back to 30% to avoid overshoot.
You could tweak the mutex lockout a bit for a quicker response when using a profile, but other than that, this mostly demonstrated the effectiveness of your heater and cooler at full power.
The heater did appear to have some overshoot, but you may want to confirm that with a more stable profile.
You can also zoom in on specific periods by clicking and dragging in the graph.
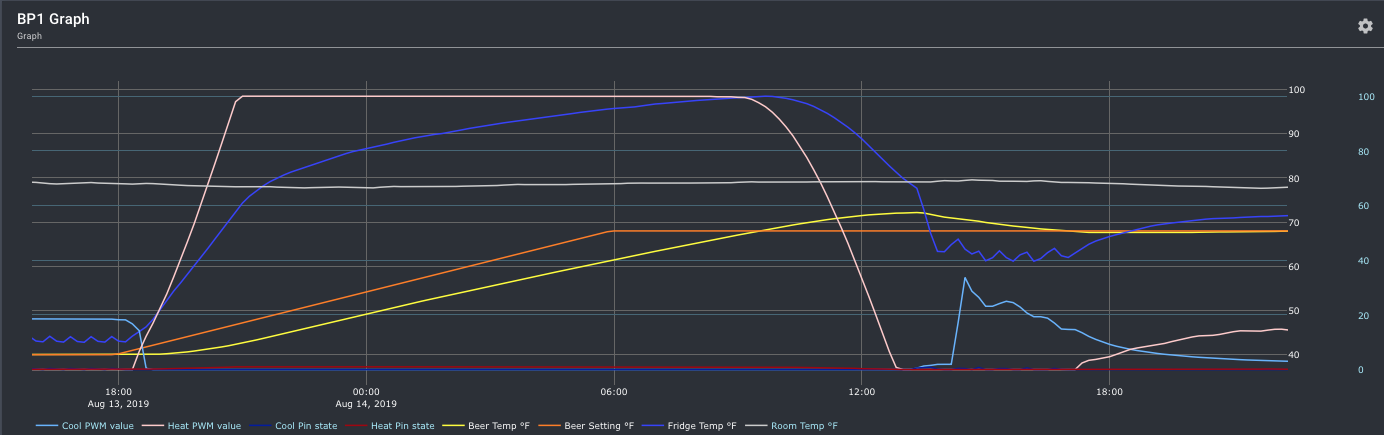
Ok, ran a longer less-aggressive profile.
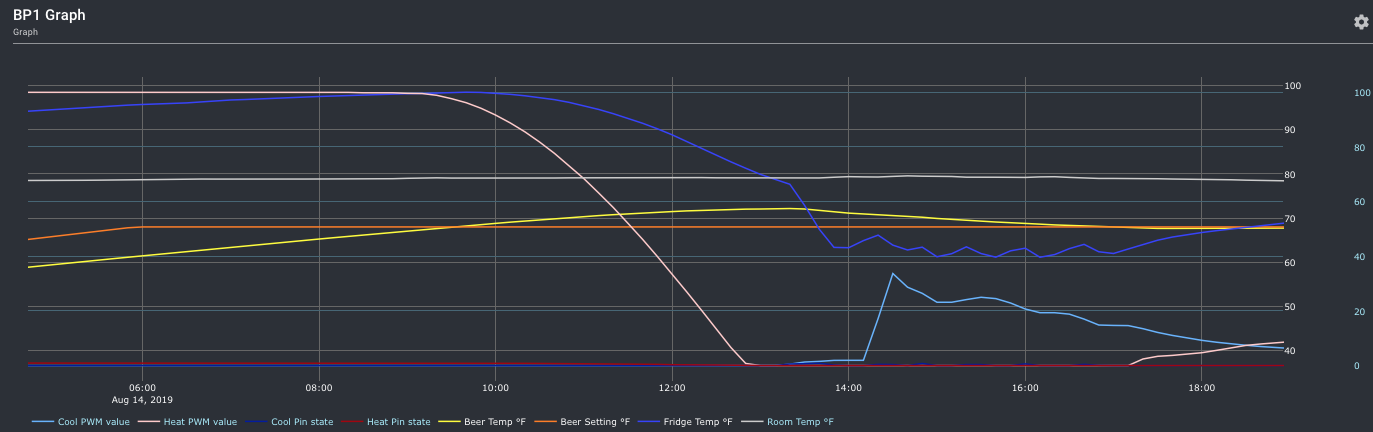
Seeing some overshoot and what appears to be a somewhat delayed response as beer temp passes the set temp. All in all, pretty good, yes? Seems to stay within a degree or so except during the period after extended heating on Aug 14th.
Since we’re being rather data-driven with all this, is there anything you’d recommend in terms of tuning to reduce the overshoot in either magnitude or duration in this case?
I see my temp ramp-up from 40-70 deg.F. is a bit shorter (by about 3 hrs) than my heater can provide. I’ll make note of that for future actual fermentations. (this is just starsan in a glass carboy for these tests).
Anything I can tweak to shorten/reduce what appears to be about 9-hours of overshoot up to about 4 deg above set temp? I’d rather have the heating gain slow down/stop before or just at temp rather than exceed the set temp like this and react more proactively rather than wait to reduce the Heater PWM value until after meeting the setpoint.
I think the profile is still fairly aggressive for heating and cooling 5 gallons of liquid plus a heavy metal keg. Especially the ramp up, as you noted yourself. Usually when there is delay and overshoot you want to increase the proportional component (and possibly decrease the integrator component if overshoot is still a problem). However, in your case, the proportional component doesn’t seem to be the issue, as the PID output is already hitting the setpoint max at 100 degrees F (and I’m not sure you even really want your chamber that hot in the first place).
That said, a few other options:
Create a profile with “S curves” rather than sharp angles.
Figure out a way to increase convection (at least in the fridge, ideally in the keg as well).
Your best option in my opinion is still less aggressive profiles. I usually would do a 30 degree F ramp up over 2-3 days. Yeast don’t really like rapid temperature changes and shocking them can produce off-flavors in the beer. Rapid Increases in temperature are probably less of an issue than rapid decreases but I still don’t see much reason to risk it.
Good luck.
Edit: realized the new wizard has the PID act directly on the beer rather than through a fridge setpoint and I was looking at the heat PWM. That sad, my point still stands that if you need a heater to very quickly bring the fridge from 40 degrees F up to 90-100 degrees to follow your profile, the profile may be a tad aggressive.
I appreciate your analysis and instruction. Much appreciated.
Much to consider and I’ll read this through a few more times before tweaking anything - starting with an actual realistic fermentation profile. The profile is just an ad-hoc random test, not something I’d brew with. Wanted to see how the system responded.
FWIW, I’m using just a 5-gal glass carboy, perhaps that’s worse than a metal keg from a heat conduction perspective… Thermal mass of the water/liquid is a lot higher than the glass or metal anyway from what I understand. Putting a fan in the chamber is on my to-do list.
How does one create an “s-curve” profile in BrewBlox?
honestly, it would be alot nicer to have a profile editor with a temp target, a step duration (not a total time offset), and a functional declaration such as “hold” or “step” or “curve” to define how the new temp is applied over that step’s interval. Awkward as it stands today. Happy to separate this out into an enhancement request with a few better-developed ideas at a later date.
Yeah I’d love it if the profile editor could automate S-curves. I just do it manually and eyeball it. If you wanted to be super precise you could model a logistic function in excel or some other software to get the exact values needed for various points in time.
Shouldn’t be too hard to calculate the S and then spit out a handful of points along its path.
Biggest issue would be UI design. We’ll likely soon’ish refactor the profile settings UI, and then incorporate shapes. No idea on timeline though, just that it’s on the list of clunky UI elements.
I don’t think S curves in the profile should be needed. Tuning the PID properly should suffice to get the desired aggressiveness and prevent overshoot.
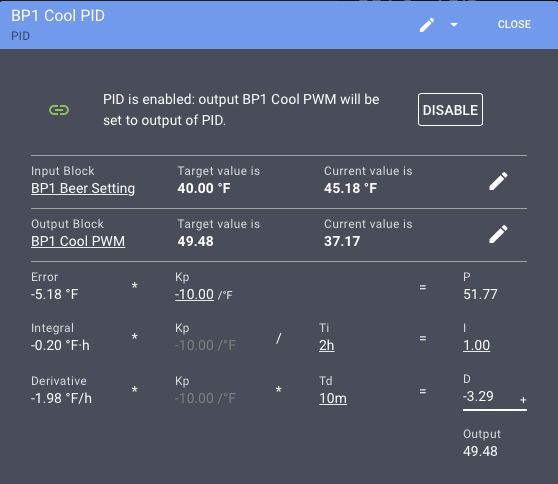
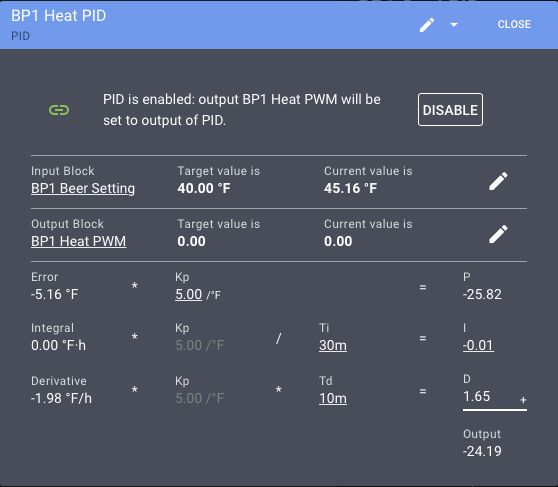
Looking at the graph of the PID should give you a better understanding of why the actuator is driven like this, because it will show you how the actuator setting is formed as the sum of P + I + D.
That will tell us whether we should adjust Kp, Ti, Td or a combination of them.
 Wanted to see how the system responded.