All–
Sorry to start another separate topic on the forum as a new user, but I do not feel like there are many people out there with the newest version of the BrewPi. Most topics I have founds, including the installation guides are referring to the Arduino, but for those of us who just ordered one, this is useless information.
So I will try to reserve all my questions to this thread. More to follow.
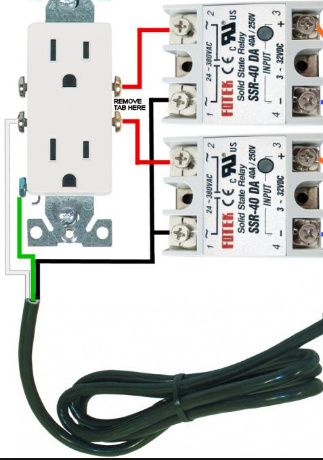
Question #1: How to Wire the BrewPi Spark to the Cooling/Heating Elements using SSRs.
The only thing that I could find to help with this was in the fridge hacking guide, but again it was slightly confusing and I believe missing some info. Can someone walk me through this process?
Question 1a: What kind of wire do I use from the BrewPi to the SSR?
Question 1b: How does the wire feed into the small green receptors on the BrewPi?
Question 1c: How to I wire the output (AC side) of the SSR to an outlet?
Question 1d: On the Fridge Hacking Guide, the SSR shows a “2-core wire as a strain relief.” What does this mean and do I need it if I’m rigging an outlet to the other end?
For Question1: The wire connections on SSRs is as follows. Post 1 and 2 are the load side and only controls the HOT wire. if you are going to control 110v+ AC then of the 3 wires, the black wire is the HOT. Simply cut it and attach to post 1 and 2, leaving the white wire (Neutral) and the green wire (Ground) whole. Post 3 and 4 are the control side, these connect to the BrewPi. Be sure to connect post 3 and 4 in the correct polarity. 1a: Since we are using only 5v of power from the BrewPi the gauge wire can be small. I used 18g doorbell wire. 1b: The pug received, the wires do not need to be stripped, but inserted in the orange area and then push in the orange tab to lock in the wires. I had to look this up myself when I got them. 1c: 1d: When running wire to/from another box, its best to always use strain reliefs so you don’t pull your wire connections loose or free. The strain reliefes clamp on to the cable itself so any tugs would be on that area and not the wire connections.
For Question2: For now the BrewPi connects to your RaspberryPi via a USB cable.
Thanks! Got everything wired and it seems to be working just fine with the test firmware. I’m getting the rest of my raspberry pi stuff tomorrow and will begin working through the rest of the set up.
Question 3: Okay so now that I have all the components, I am stuck again. I cannot even make it past the first step on the “Software install Guide” because I’m having an issue installing Raspbian on the Pi. What do I do if I can’t make it past the first step?
Here’s what I’ve done…I purchased an SD card and installed NOOBS from their site. Then I followed the instructions in the “software install guide.” After initial boot, I got a screen with only one option to install Raspbian, without all the other OS options. SO I figured it must have been something with the way I had NOOBS installed.
So then I ordered another SD card with NOOBS pre-installed. SAME THING HAPPENED and I even tried it in a SECOND Raspberry Pi.
***Here’s what I think is the problem: According to the NOOBS website, the NOOBS files must all be saved at the ROOT of the SD card and NOT in a folder. Well both of my SD cards have folders in the main area. I don’t know how to open all the subfolders into the root. The OS folder has thousands of subfiles.
Someone help me out here I am hours into this project and hundreds of dollars with nothing to show for it.
This page lists i detail how to install raspbian on the SD card:
My guess is that what you see is because the raspberry pi isn’t connected to the internet. The SD card only contains raspbian (which is a linux variant) and not all possible linux distributions. To get this working you should install raspbian so this shouldn’t be an issue for you.
I would skip NOOBS and download raspbian jessie lite directly (without pixel).
On the bottom of the page linked by Espen you can find instructions to write the image to your SD card.
Alright, I was able to get Raspbian installed on my SD card and everything is good there. I was able to change all my settings in the configuration menu.
So now I’m at the SSH login step, and getting stuck. Here’s what I’ve done:
I installed Zeroconf/bounjour using your command prompt, no issues.
I tried the local IP address, but the instructions were quite confusing and you said it was optional.
I have my Pi plugged into an ethernet cable and I am able to ping Google.com with no problem.
So, I proceeded to the SSH step. I installed Putty, entered my IP address, and received the response “Network Error: connection refused.”
Then I tried typing raspberrypi.local in Putty and received the response “No Host Exists”
Ok. I assume you are using putty on another computer. You need to determine the ip adresss if your pi. You can either:
Connect your pi to a keyboard, mouse and TV using hdmi and USB. Log on, start a terminal and enter “route print”. If you post your output it is quite easy to determine the ip adress.
Log on to your router and find the ip in some listing there. There you can probably set the router to give your pi the same address every time as well.
For zeroconf to work, you need to have it installed on both the raspberry pi (by installing avahi-daemon) and on the computer that is running putty.
If you have iTunes installed, you already have bonjour (which implements zeroconf).
As an alternative to zeroconf, you can also do this:
Leave the raspberry pi settings at automatically getting an IP address via DHCP
Find out the mac address of your raspberry pi
On your router, add a static DHCP lease to bind an IP address in your DHCP range to the mac address of the pi. This will be a reserved address in the router. The Pi does not now this, but each time it requests an IP address from the router, it will get the same address.
If none of that is a problem, where do I go from here?
I’ve got the Pi plugged into an ethernet cable with its own monitor and keyboard. I’ve got the BrewPi with temp sensors wired. I’ve got access to putty on a separate computer.
Q1: How does it all connect? Do I leave the Pi connected to ethernet? Do I plug the BrewPi to the Pi with a USB?
Q2: How do I access the Web Interface? Can I access the UI from a phone that is not connected to my home internet connection?
Did you run our installer?
It should have created the directory /home/brewpi
Unless you told it to install somewhere else, which it is asking about here.
Q1: yes, that is correct.
Q2: to do that, you will need to setup port forwarding on your router, so that an external port (anything you choose, for example 34842) is forwarded to your brewpi at port 80.
Thanks, I’ll give it a try this afternoon and let you know how it goes.
Just for clarity on Q2: I’m not sure if your response was in reference to part 1 or 2. Before I mess with an external device (phone) I am completely clueless as to how to access the BrewPi Web Interface where I can see the temps/setup/controls on my home computer.
Really appreciate the time you guys are giving me to help me get this figured out.
Your easiest way to approach this is to start setting this up in your local network. To do this you need:
A. A way to connect your PI to your local network and
B. A way to reach your PI from your computer / phone / whatever.
To make A happen, the easiest way is to connect your PI to your home wifi router using a cable. It is also possible to use wifi if it is a newer PI with integrated wifi or adding a widi dongle. Setting up wifi on the pi is easy if you know how. This forum is however not the best place for info. Try googling “setting up wifi raspberry pi” and you should get som idea. If this still seems to complicated I would suggest using a TP cable or search for You can set up most routers to assign the same address each time. Either play around with your routers admin-console, try google or find a friend.
Once you have your pi set ut with an address you can access the pi using http://192.168.0.74 or something similair. The number is given by your router but it usually is a number quite like this one. The same number-string is also the address tou use in putty.
I’m getting closer. I can see the UI on my external computer and it seems to be reading the temp sensors and running the scripts. I’m sure I’ll have more questions as I keep going with setup but I have a quick one for now:
My RPi keeps rebooting randomly (about every 3 minutes) and then the scripts stop running. The scripts won’t start running again until I go to my Pi and Login with my password (or do so on PuTTY). I suspect it’s my power supply that I’m using for the RPi. It’s just plugged into a standard phone charger. Not a USB one, but a regular plug-in version. Do you guys think I need to find another charger? If so, what exactly do I need? I really need to know this thing’s not going to shut off randomly during a fermentation.