Cabinet unit with 2 fermentation chambers built in

Hello all!

I’m finally reaching the end of work on a plan I’ve wanted to realize for a long time–fermentation chambers that are integrated into a cabinet unit that looks nice enough it’s not restricted to the garage.

I’ve probably spent enough money on it that I could have bought a conical with glycol cooling, but doing it this way keeps my spouse happy and the owners association of the condominium I live in would probably frown upon me keeping industrial-looking equipment in the apartment. Building the cabinet unit itself was also a nice summer project with my father who is a woodworker.

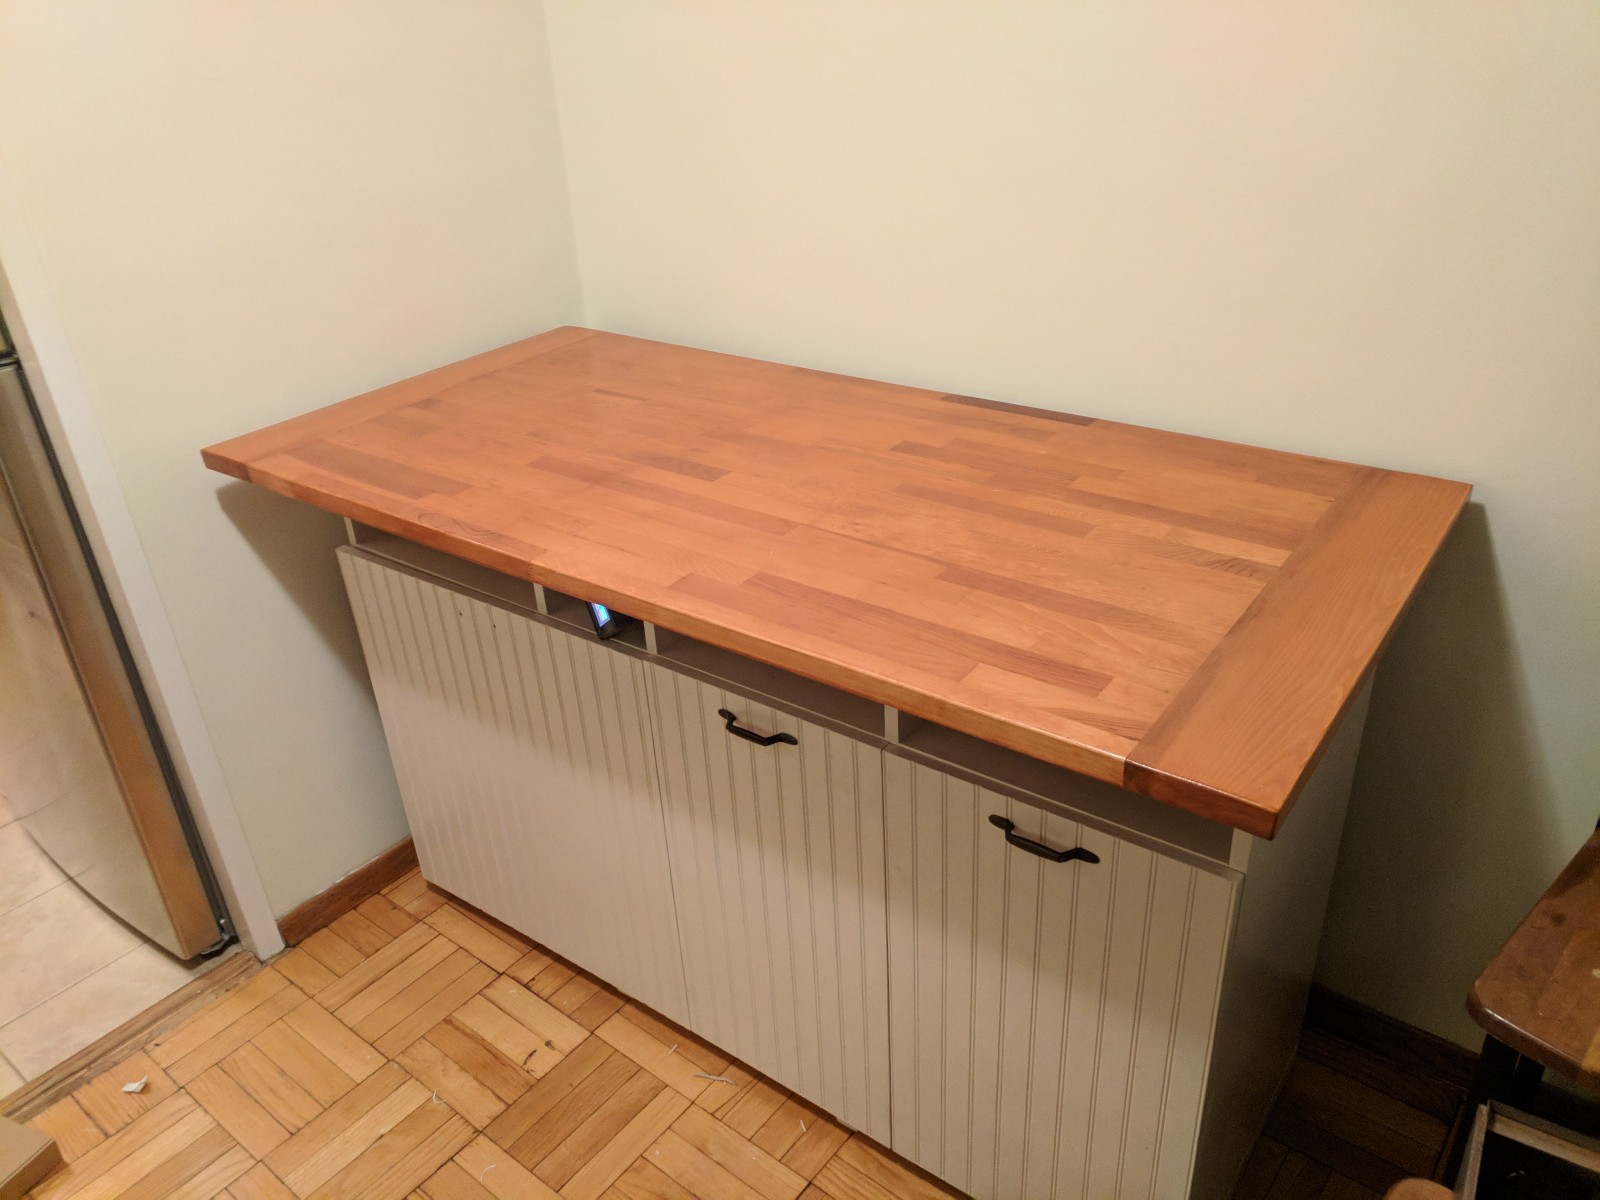
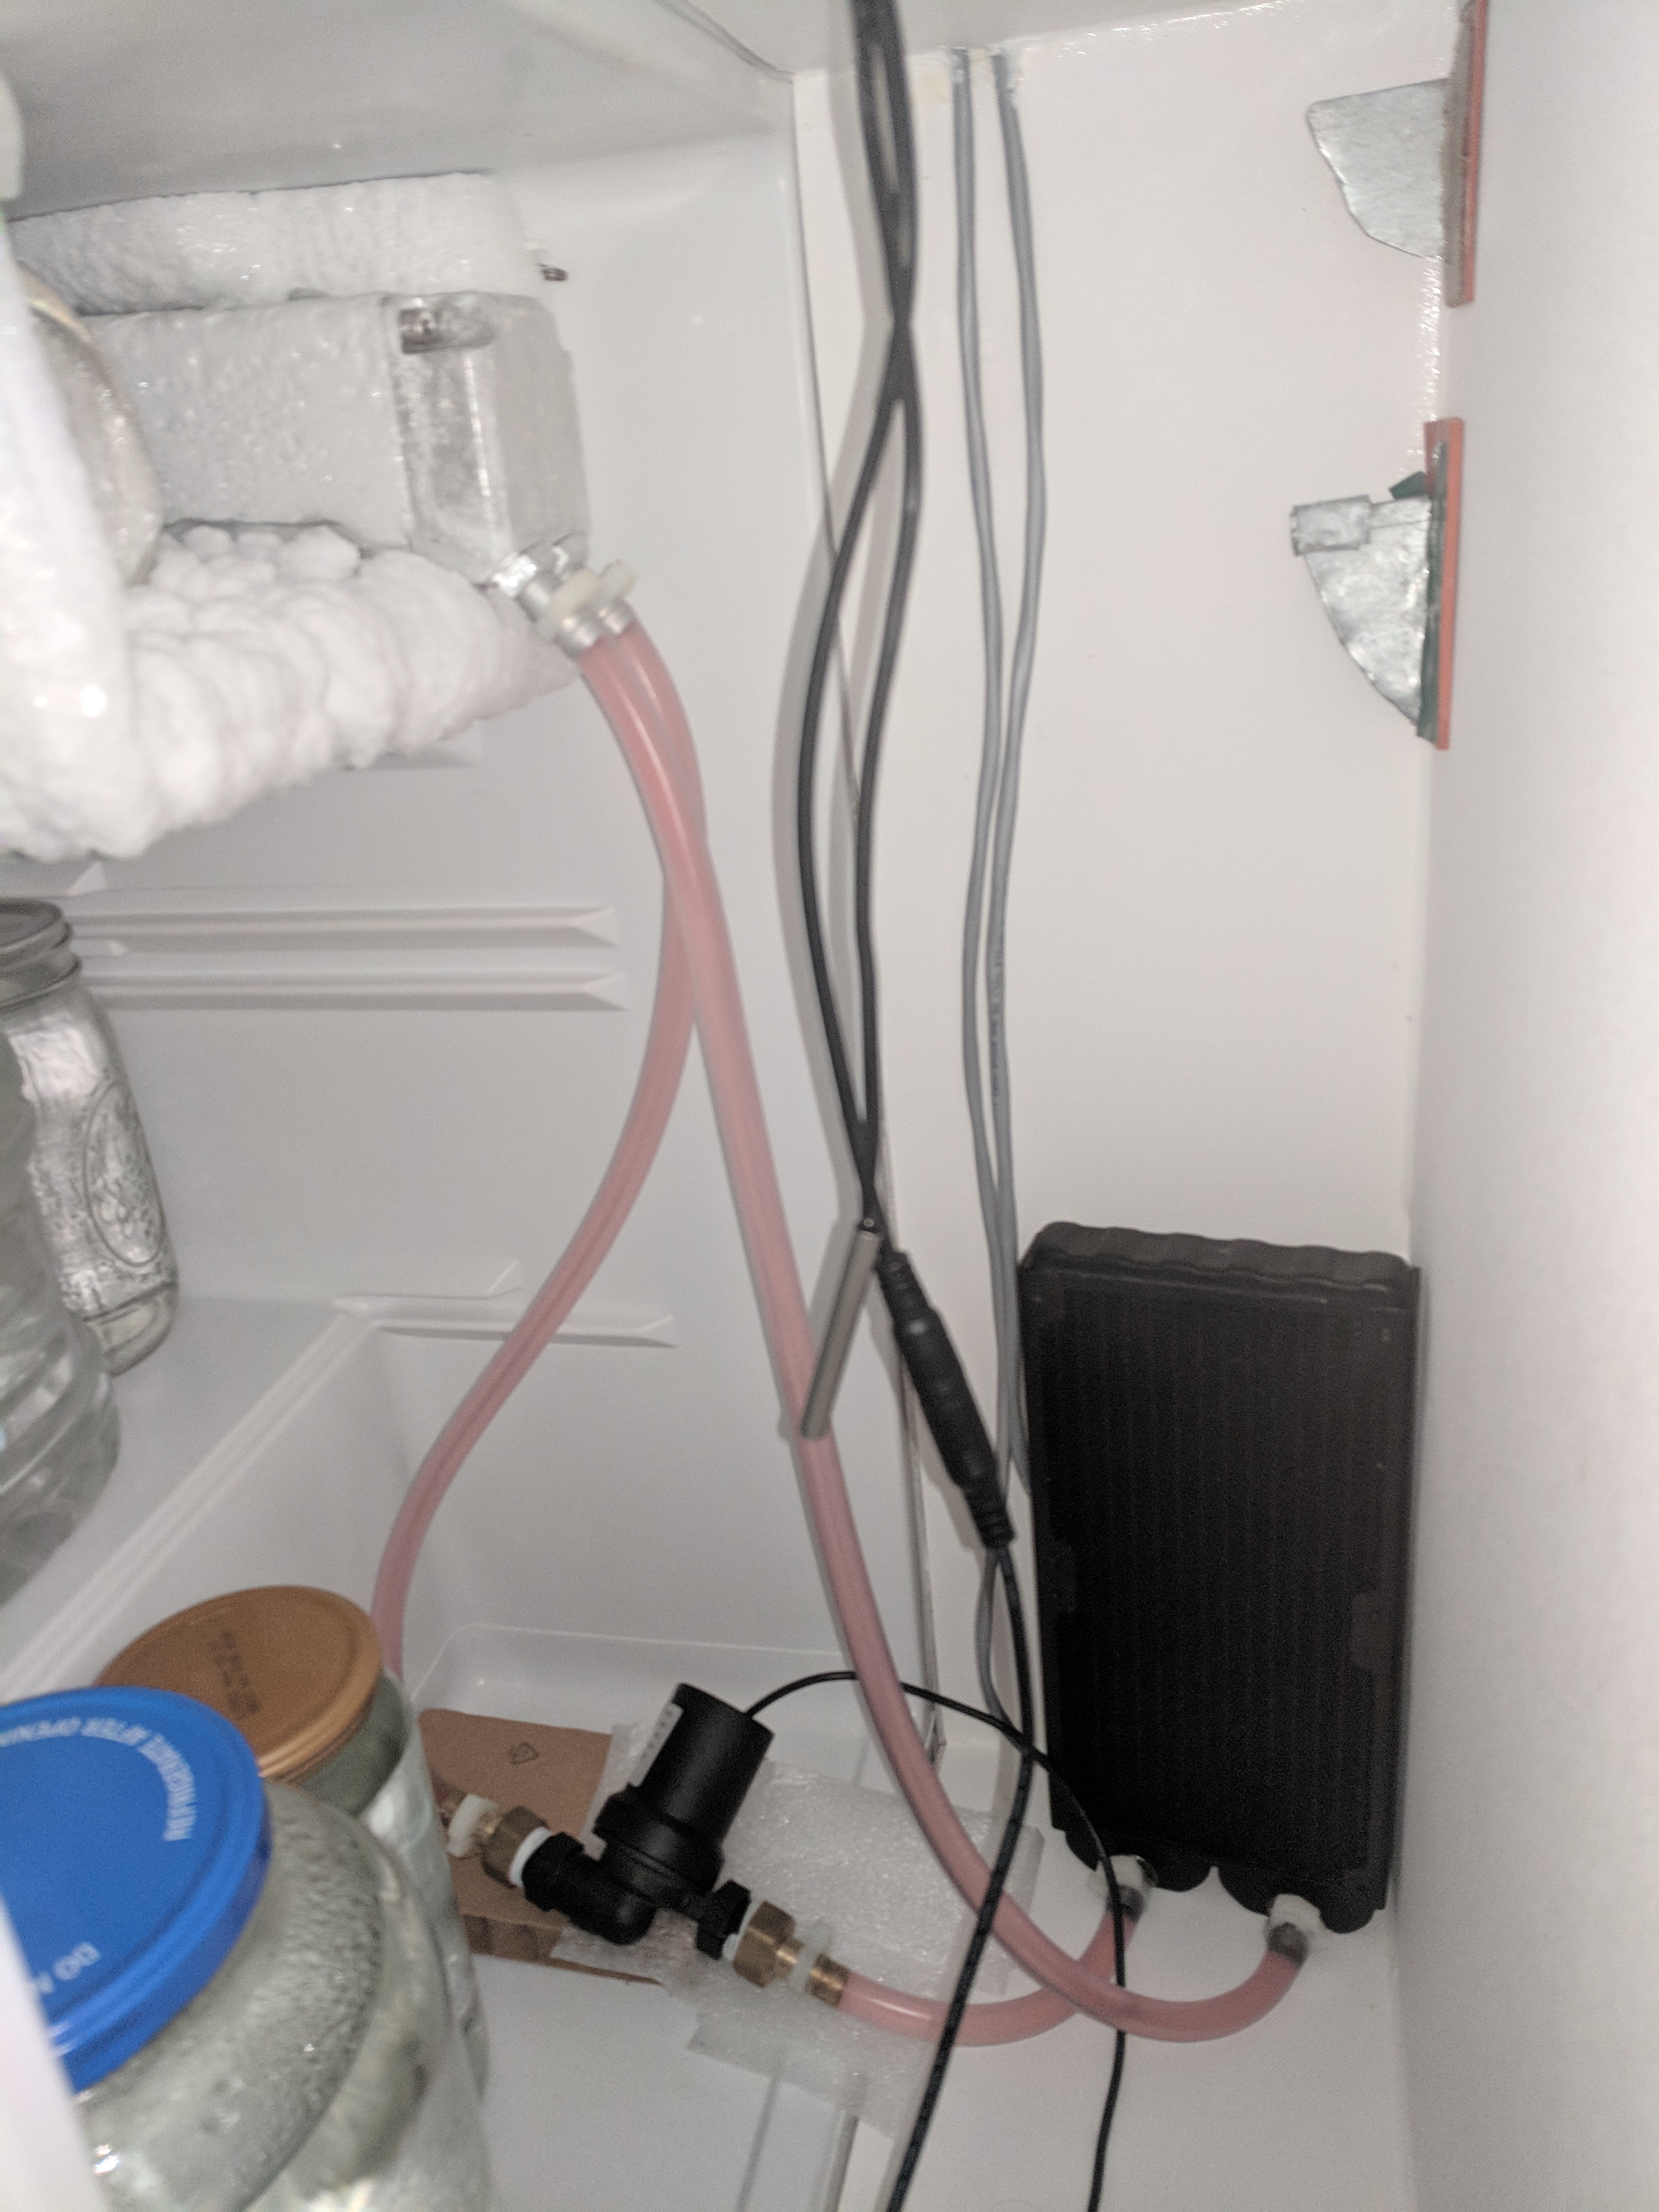
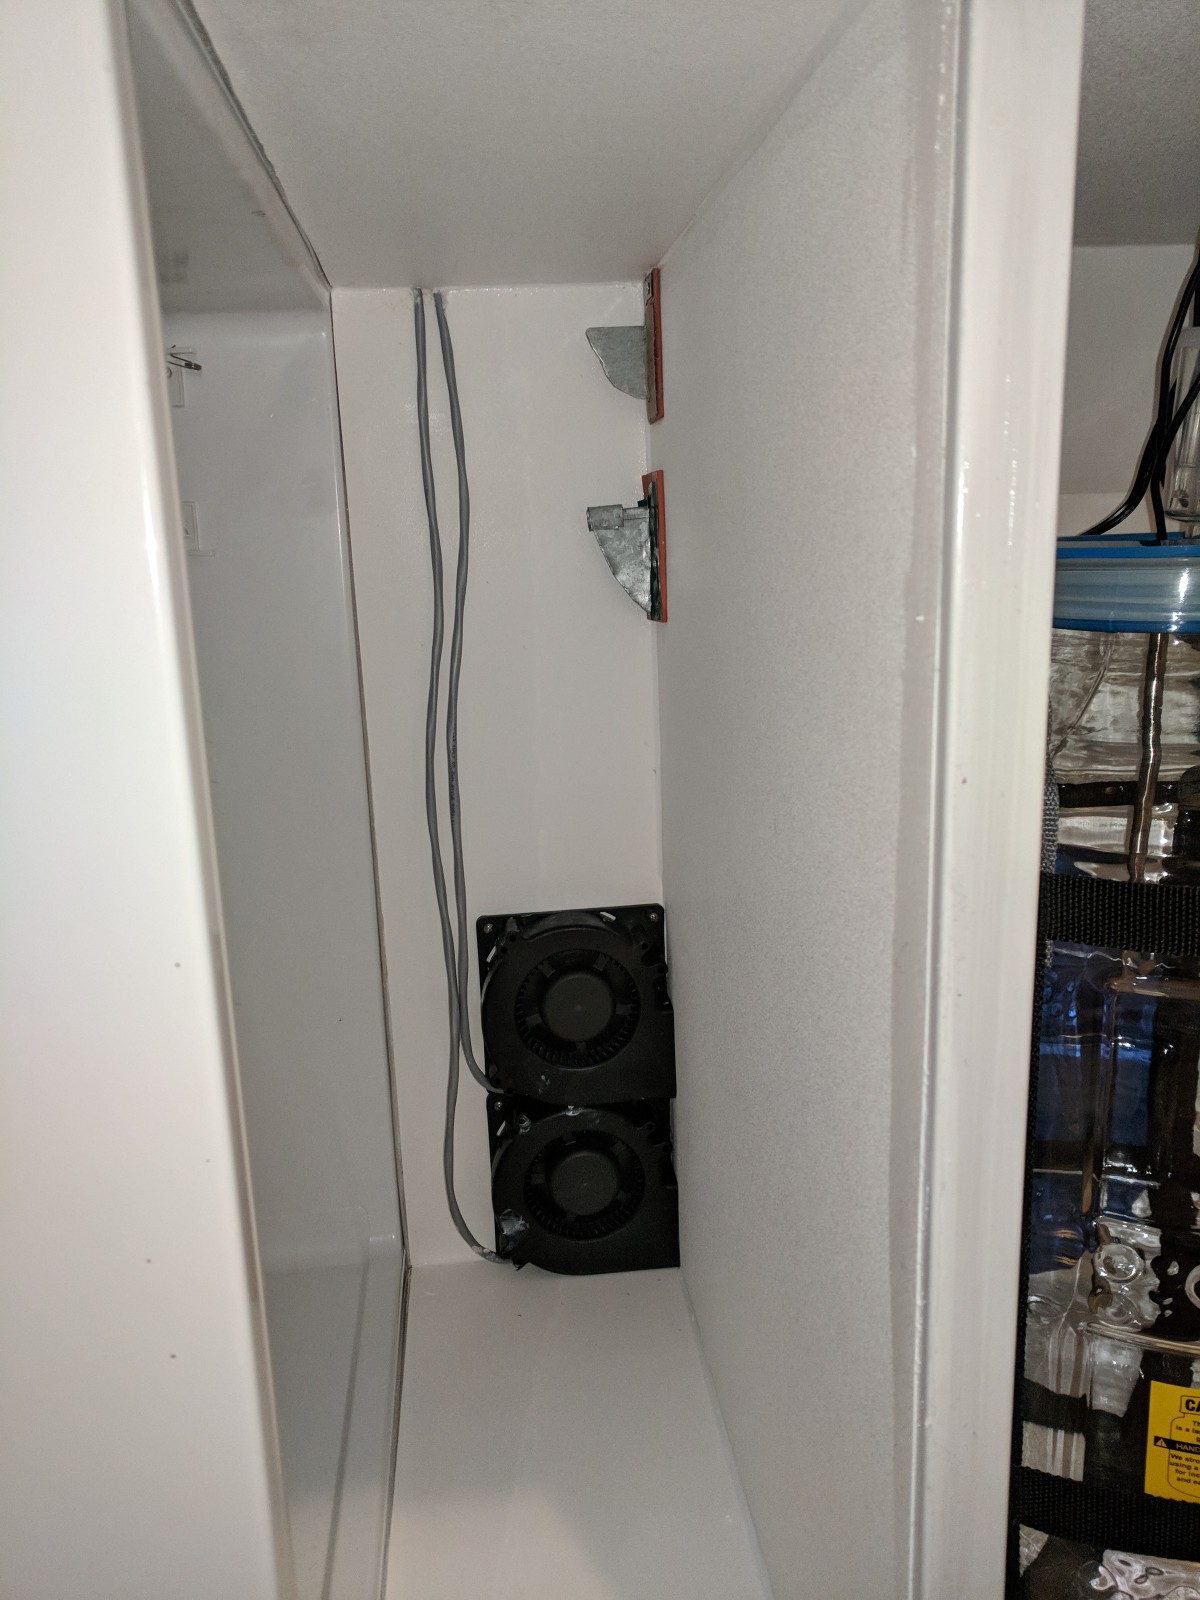
The counter is a reclaimed table that had been sitting in my fathers basement. The cabinet is just plywood and beadboard with 1.5" foamboard insulating the interior and dividing it into three chambers–one of which is abutted by a repurposed mini-fridge. The chambers are lined with vinyl and caulked for easy cleanup. The front edge is sheet metal which magnets embedded in the doors stick to. There is a 1" hole drilled in the top of each chamber for wires and potentially a blow-off tube.

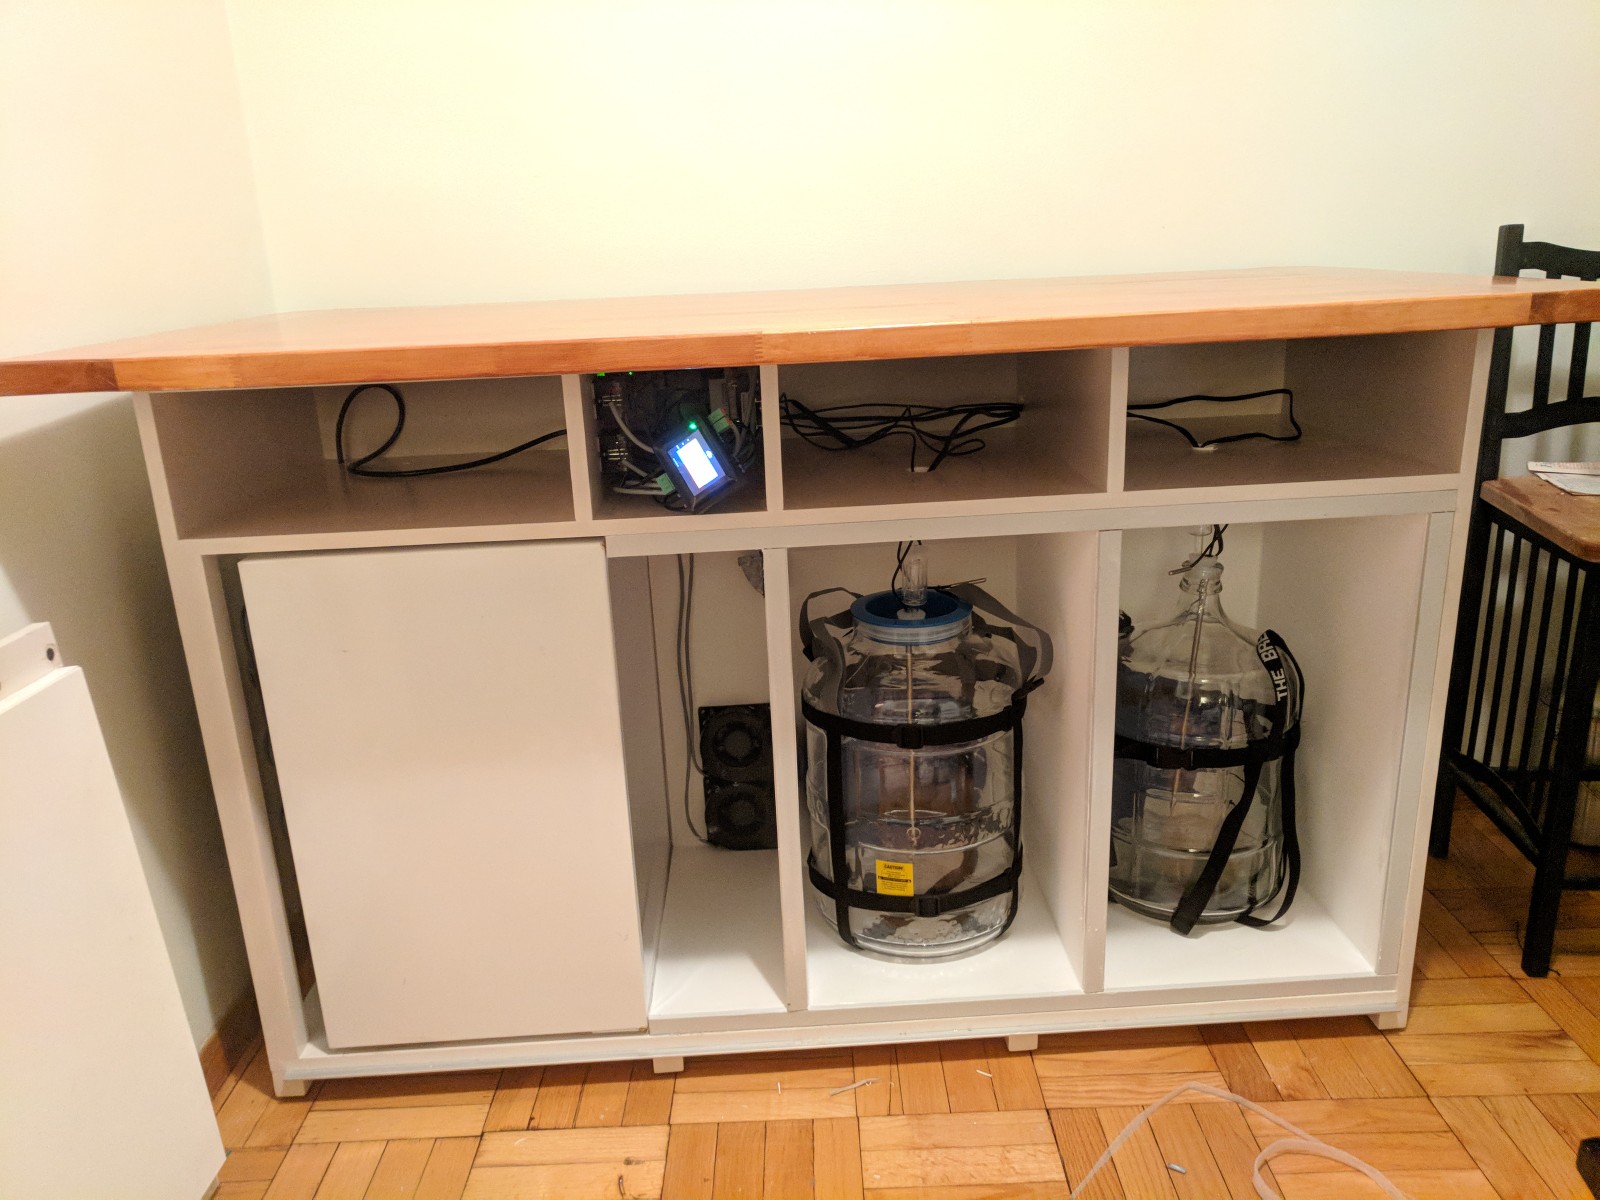
Cooling is done using 2 blower fans that blow cold air from the fridge compartment through ducts into the fermentation chambers. The ducts have cantilevered flaps on the ends so they are sealed when the fans aren’t blowing. There are return ducts (picture below) as well.

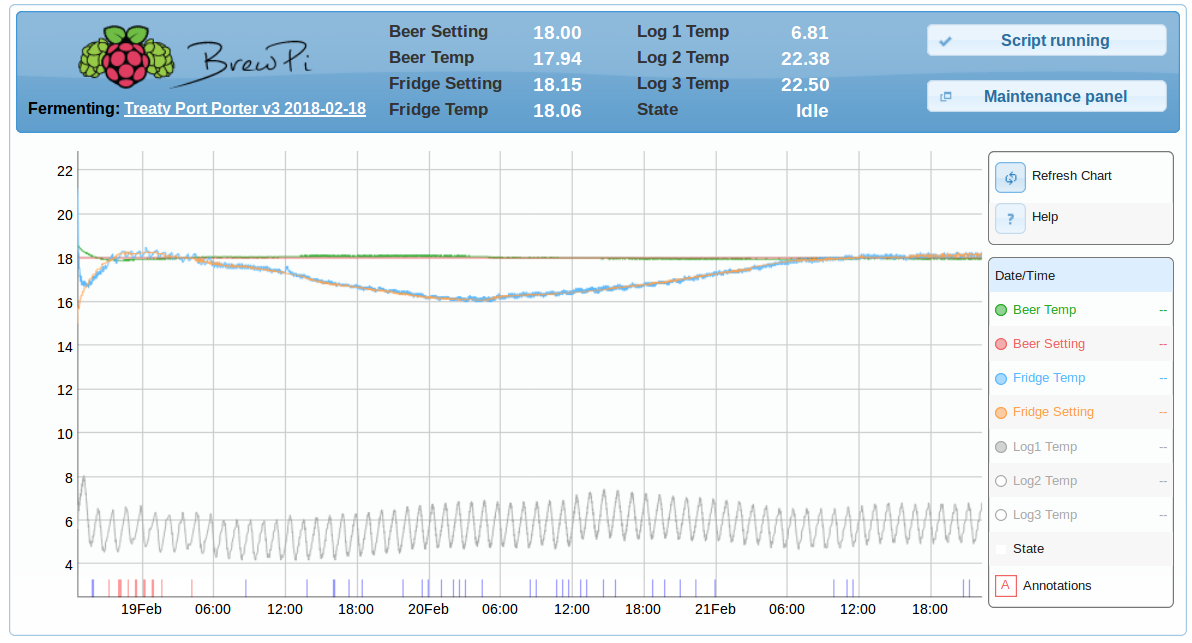
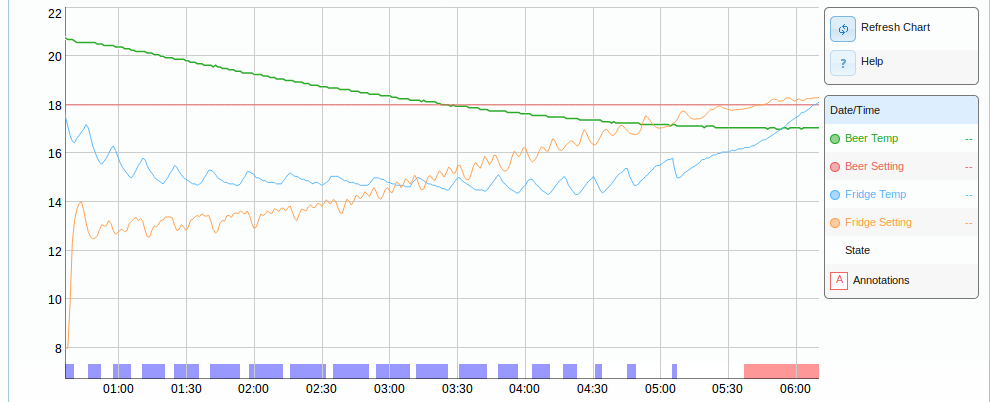
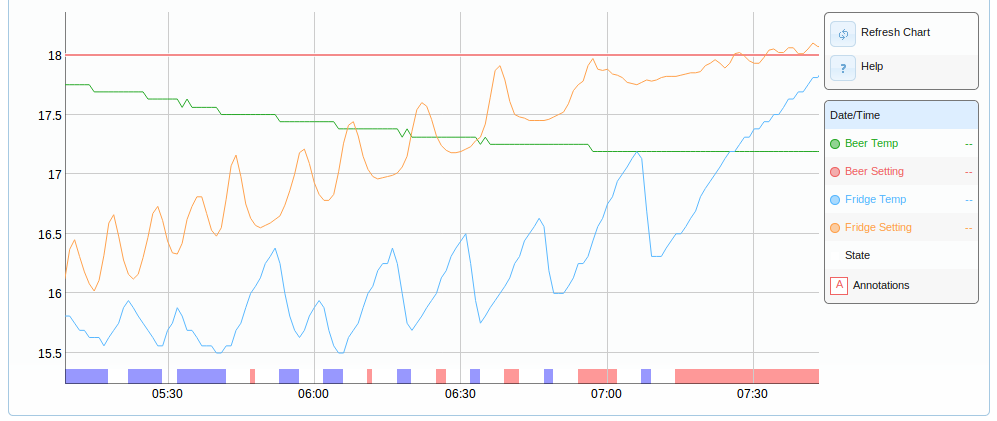
I’ve left the fridge alone with its original temperature control for now, although I probably will drop a temperature probe into that compartment for logging purposes. The cooling setup is a little spotty at the moment but it should become fairly efficient once the fridge-chamber is full of cold beer.

Heating is done via heating pads in each chamber. They seem to work fairly well. For now I have no circulation fans in the chambers.

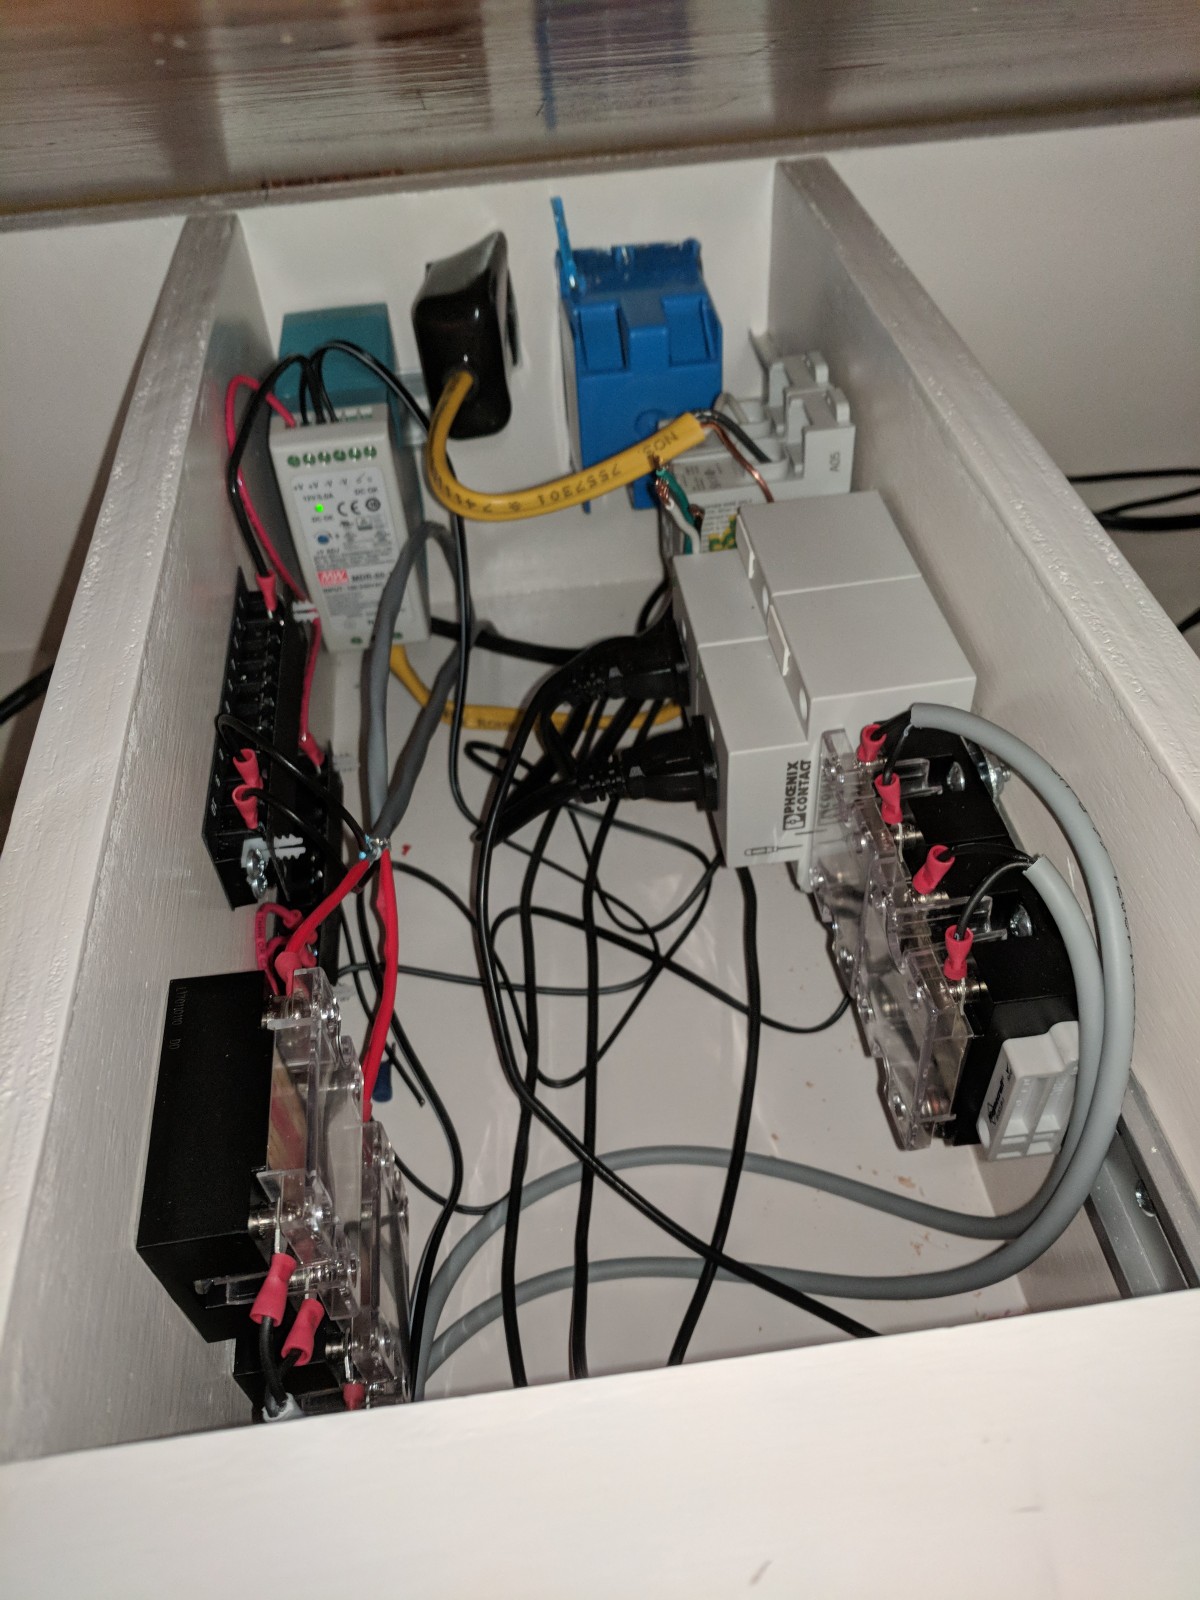
The unit has 120V AC and 12V DC circuits, with the a 5A DC power supply powering the blower fans, the Brewpi Spark, and potentially a stirplate as well. The heating pads and fridge run on the 120V AC mains power, and there is an outlet built into the back of the unit for easier access from the countertop.

Even though I’ve finally got this project close to operational, I’m sure it will take some time to fine tune the PIDs and I would welcome any comments/suggestions from other brewers who’ve used brewpi with similar setups (fan forced cold air for cooling).

I’d also be happy to provide more pictures, details, parts lists, etc. if people are interested in the long journey behind the finished product.

Cheers!
Austin

2 Likes

I’ve just finished a ~23 hour water trial and can start thinking about tuning. The spark lost wifi connectivity and had to be reset twice during the trial, once from ~9:00am - ~10:30am and once a little after 10pm (caught the second one right away). The resets are almost useful in a way as they show the extent to which the integrator had accumulated too much error.

Beer-Fridge PID:

Kp: 2 ; Ti: 7200 ; Td: 1200 ; Max diff: 10 ; Input filter delyay: 18s ; Derivative filter delay: 159s

Cooling performance seems to be more or less in line with other examples I’ve seen on the forum (1 degree celsius per hour) despite the cooling PID struggling to match the fridge set temp. There is a little overshoot which appears to come from the integrator. I’m guessing fixing this requires either increasing Ti (so it adds the integral less frequently) or increasing Kp (so the integrater is less significant relative to the proportional part). Given that I’m relatively happy with the cooling rate, perhaps this means I increase Ti without touching Kp?

Heating performance is very slow despite the heating PID working nearly perfectly. I’m guessing more aggressive heating would require raising Kp (in the beer-fridge PID). Any suggestions for how much I should be raising Kp by?

I can’t imagine that the derivative component is doing much if anything in this trial, but I can imagine it might do a good job of predicting how yeast heat output might ramp up during active fermentation.

Cooling PID:

Kp: 2; Ti: 1800; Td: 200; PWM: 1200; Min off: 180; Min on: 120; input filter delay: 18s; Derivative filter delay: 159s

Seem to be some problems here, although it’s an imperfect trial as the fridge chamber (where the forced cold air comes from) had just turned on–jumpstarted with containers of ice and cold water–and the structural elements of that chamber hadn’t gotten down to temperature yet. I’d be interested to see if this PID works any better now that the fridge is more consistently holding ~4.5 degrees Celsius.

That said, there seem to be two problems:

  1. The cooling PID is slow in bringing down fridge temperature.
  2. Once the fridge setting goes up the cooling PID keeps cooling for awhile which results in a substantial overshoot for this PID and the beer-fridge PID.

Regarding the first problem, I can’t help but wonder to what extent there are simply limits to how far below the beer temp I can keep the chamber with only forced cold air (as opposed to fermentation chambers where the fridge’s evaporation coils are in the chamber walls and that thermal mass can counter-balance the thermal mass of the beer). If this is the case, perhaps I just need to lower the output of the beer-fridge PID from 10 to something more realistic (maybe 4 or 5?).

Regarding the second problem, it could be that Kp or Ti are too low, or it could be the aforementioned problem that unrealistic expectations for the cooling PID are creating errors that accumulate in the integrator–leading to overshooting.

I’m guessing I need to run another water trial now that the fridge is down to temperature to sort out exactly how much of the problem was from a relatively warm fridge chamber.

Heating PID

Kp: 10; Ti: 600; Td: 60; PWM: 4; input filter delay: 18s; Derivative filter delay: 159s

This one seems to be working really well. Although it may appear that the heating is always on, the PWM is only powering the heater a very small percentage of the time when the error term is small (or slightly negative). Interestingly, as far as I can tell (please correct me if I’m wrong) the brewpi seems to handle PWM differently for how it logs cooling and heating states. For heating it logs the heating as on constantly rather then only when the heating actuator is powered. For cooling on the other hand, it seems to actually log the PWM cycles (ie. only when the cooling actuator is on).

Actuator switching:

With my setup (a heating pad and fan forced cold air) I don’t really see a need for a 30 minute gap between heating and cooling. Does anyone see a reason to not switch this to 5 minutes?

Next steps
While I have some hypotheses about what needs to be done, I’d certainly appreciate some input from more knowledgeable persons. I think I’m going to setup another trial after 1) reducing the actuator switching delay, 2) increasing the beer-fridge PID Ti, 3) decreasing the max gap between beer and fridge setpoints and 4) increasing cooling PID Kp and Ti. That said, exactly how much to adjust these values (especially the Kp and Ti values is difficult to judge without experience so your input is very welcome!

Thanks in advance for any suggestions!

Best,
Austin

Okay, I made the adjustments from the last post and ran another trial. The wifi cut out three times (interestingly, the first time it came back on by itself after 2 hours) but I didn’t lose that much information.

Beer-fridge PID:
inputError: -0.0039,
Kp: 2,
Ti: 10800,
Td: 1200,

Heating PID:
“inputError”: 0.0078,
“Kp”: 10,
“Ti”: 600,
“Td”: 60,

Cooling PID
“inputError”: 0.0078,
“Kp”: 20,
“Ti”: 5400,
“Td”: 200,

Switching dead time: 300s

Basically, the changes didn’t help much. The cooling side continues to be underpowered and I didn’t reduce the max fridge-beer setpoints difference enough. I reduced it to 6 but I probably need to reduce it to 4 or even 3 to keep the integrator under control.

In the current state, the system can deal perfectly fine with keeping an ale at steady state, but I doubt it will work well for cold crashing or lager temperatures. I think the main is that the evaporator coils in the mini fridge are simply too far away from the blower fans and the air is not a very good conductor. Adding more thermal mass will likely help to some degree. Placing ice in front of the blower fans also helps a little (I did this to some extent in the first water trial and as you can see the system was able to get 1 degree colder. Ultimately though, I think I need a better way to get the cold from the mini-fridge evaporator coils to the blower fan. As such, I just ordered a cheap copper CPU cooling style radiator, a small 12V coolant pump and an aluminum oil catch can that I am going to stick in the mini fridges “freezer compartment” (ie. evaporator coils) and use as a coolant reservoir. I’ll wire it with rectifier diodes so the coolant pump switches on if either fan switches on and I should be able to consistently blow very cold air into the fermentation chamber.

Until I get this setup, I’ll reduce the setpoint gap to 3. I also think I probably need to increase Kp for both the beer/fridge PID and cooling PID. I don’t really want to increase the output PWM % of the cooling PID though (as it already cools really fast until it reaches the lower limit) so I’m thinking maybe I increase Kp and the PWM period by the same proportion? As per my understanding, this would increase the weight of the proportional component but without making the already agressive (up to limits) cooling system even more aggressive.

I’m also on the fence regarding whether reducing the actuator switching delay from 30 to 5 minutes was a good idea or a bad idea. There was some funny behavior in this trial, but I can tell to what extent the problem was the actuators switching relatively fast and to what extent the problem was that the output of the cooling PID was higher than the output of the heating PID when it shouldn’t have been (because of the integrator on the cooling PID).

I’m about to start a 3rd water trial where I increase the Kp on the beer-fridge and cooling PIDs and reduce the setpoint difference limit from 6 degrees to 3 degrees.

I brewed this past weekend and am very happy with the results. The system kept the beer within about 0.2 degrees celsius of the setpoint throughout active fermentation. The fridge chamber (log1) got a little warm during the height of active fermentation, but a bit more thermal mass and/or a fan should change that. The wifi also dropped out twice but I didn’t want to lose the integrator so I just left it and both times it reconnected eventually. An imminent firmware release should fix the wifi bug so I didn’t want to bother reconfiguring it to USB. I did a bit of real-time tuning of the cooling PID, (Kp, minimum on time and pwm cycle length) and you can see the results in the graph. I’m pretty happy with the final settings–although I’ll have to re-tune the cooling PID when I upgrade the fridge chamber with a liquid cooling circuit.

Hi Adempewolff, beautiful cabinet and setup! It’s a shame you can’t also use the fridge to store beverages. Perhaps if you cooled using glycol lines rather than forced air. :slight_smile:. regardless, nice job!

Thanks! I’m actually planning on lagering in the fridge compartment eventually. It will require special containers I can fit through the door and some upgrades to the cooling side of things that are currently in the works. I’m installing a mini glycol loop from a reservoir in the mini-fridge’s freezer compartment to a radiator in front of the fans. Once this is installed, the fans should only need to turn on for less than 15 seconds to get down to whatever temp the other chambers need and they won’t be pulling as much air out of the fridge. Combined with much more thermal mass in the fridge compartment, I think that even during active fermentation in another chamber the temperatures in the fridge compartment will be steady enough to store beverages or even lager. As to why I’m spending so much time and money making a forced air system work instead of just running glycol lines everywhere… no good answer there :stuck_out_tongue: (although it does give me flexibility to keep things that don’t fit in a glycol belt temp controlled, like bottle conditioning beers)

So I recently got around to installing the cooling system in the fridge compartment that I was talking about and after a few weeks of trying to get a coolant that had the right freeze-point I finally have it fully operational.

As I was hoping, this makes the cooling side much more powerful and the fridge temperature rises less than a degree even during active fermentation on a hot day. In fact, the fridge is actually a bit colder than it was before (it was around 6 degrees before)–probably because the radiator stays pretty cold even when the cooling PID is only powering the pump and fan infrequently. The fridge is also currently only at its “4” setting on the scale of 1-7, so I theoretically can get everything even colder.