I just rebuild my HERMS setup after a long time and thus it is also my first time using brewblox. The setup of brewblox all went good and it looks all ok and ready to configure stuff.
But I am having some troubles configuring the HERMS temperature control in brewblox. A lot of blocks and I cannot see the forrest because of the trees (dutch saying )
I am also curious about the status of the valve control. I can now manually control my valves but I am really interested in automating the valves in each step of brewing in my HERMS.
A good start may be to first build simple control chains for all three kettles. If you can control the individual temperature for each kettle you’re more than half way there.
The Step View widget allows you to create macros that change multiple blocks (valves) at the same time.
We’re still working on full and integrated automation, but this allows you to apply all your changes for each brew step with a single button.
If you have any additional questions, feel free to ask. I’ll be able to provide some more real-time answers tomorrow.
Adding a HERMS configuration to the documentation or, even better, creating a wizard in the UI for it is on my todo list, but other high priority issues got in between.
The step view widget will work just fine for controlling the valves!
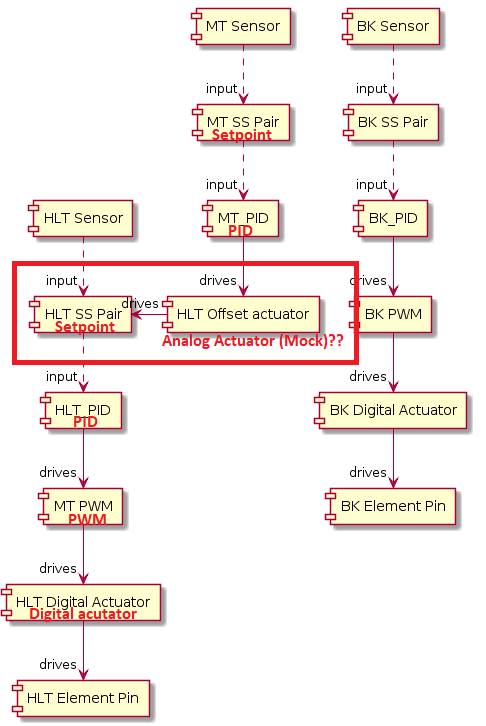
Building the control chain for the BK is not a problem but the control chain for the HLT/MT is where I dont get it. In the added image I put a red square around the part where my problem is. I cannot get a second input for the HLT SS Pair…
Oké that was the problem indeed. Configuration looks OK now.
I noticed one other thing about the step view widget for controlling motor valves.
I created a step where all valves should close. When I run this step not all valves close… The valves that do not close looks random. I can control all the valves manually from the valve widget. Any idea what this might cause?
Attatched all the files you requested. The .har file was rejected by the forum so I changed the file extention to .txt, change it back to .har if you have downloaded it.
In this try all valves were opened before I applied the close all valves step. Valves 1,2,3,4,9 & 10 did close.
Valves 5,6,7,8,11,12,13 & 14 did not close. The state in the valve widgets is still ‘closing’ but there is nothing happening at with the valves in question.
I just now did the update and I can see that all the DS2408 boards are connected.
If I toggle the valves manually they all work fine, also the status LEDs on the DS2408 boards
After a step view widget control the valves that did not respond keep the state they were in on the LEDs on the DS2408 board.
I just now tried to reduce the number of valves that are oprerated at the same time to half, 7 valves. Even now some valves do not respond. What I did notice is that the status LEDs are flickering during operating the valves. I made a video of this but I cannot upload this to the forum. I’ll sent it to you via whatsapp, ok?
Can it be that the current is to high and the voltage drops if several valves operate simultaneously.
I use the 12V 2A DIN rail power supply from the brewpi store.
That could be the case.
But perhaps more likely is that the GND current through the RJ12 a bit much if the valves are all on the same cable.
This high GND level perhaps causes an issue with the 5V voltage being lower at the valve.
Did you buy your cables from us? I had issues with my motor valves in the past when I used RJ12 cable made for phone lines. The wires are pretty thin. It seems impossible to buy RJ12 (6-wire) cable at the same quality as network cables.
That’s why the cables that we have in the store are made from CAT5e cable, which is much thicker. They just use 6 of the 8 strands.
It works ok now. I put 12V, 5V and GND directly on the DS2408 boards with a thicker cable. That did the trick.
No I noticed none of my valves go to the state opened or closed. It is always a combination of the leds closed/closing or open/opening.
This worked before…
What state does the software report? Do the valves physically open/close?
The old software mostly ignored the feedback pin on the valve. The new software uses it to report closing vs closed. It may be a wiring issue there that previously went unnoticed.
All valves physically open and close. The software reports the correct state, in the situation now all closed. But all the valve boards report closing and closed.
There is not much wiring that can go wrong. The opening and closing led is set from the software I guess because the valve only reports open and closed.
No @Bob_Steers, he just noticed that we changed how the software handles the status pins.
We stopped driving the motors when a status pin went high. Because the valves also have an internal end stop disabling the motor, it is not necessary.
We did see a few cases were the feedback pins didn’t work well or were not connected in the right way. Keeping the motor drive on opening or closing instead of going to idle is less likely to cause trouble if the feedback pins cannot be trusted. So this is changed behavior.
It is a deliberate change for better reliability under error conditions.
The middle leds now mean: I should be opening or closing and the outer leds mean fully open or closed.
I thought the valves worked ok now but just now a valve did not respond… The valve was closed, as soon as I give the open command the status goes to opening. Nothing happens though. If I give the command to close the status goes back to closed (is already in closed position so no closing status)
I disconnected the valve boards and after power up the valve worked again after a new command.
I was not using the step view but just manually one valve.
 )
)