Done - I’ve put those in and I’ll leave things be for a while. I’ve seen the PWM period is 10s, but I’ll leave that alone for the moment.
I’ll be back …
Done - I’ve put those in and I’ll leave things be for a while. I’ve seen the PWM period is 10s, but I’ll leave that alone for the moment.
I’ll be back …
That didn’t seem to make any real difference Bob, so to give me a solid base line, I’ve created a new brew kettle with a fresh start as that is closer to what I’m trying to do than massaging previous rigs. I just set this off and I’ll leave it for an hour or so and report back on the results…
That would be a good start to setting up a config. Do keep in mind you’ll want to drastically reduce Kp, as the heat capacity of your column is a fraction of the ~60L water expected by the brew kettle settings.
Edit: I’ve actually no idea how much liquid you’re heating when distilling, so take Kp comment with a grain of salt.
Setting Ti to 10s is bad advice actually.
The integrator is for correcting steady-state errors. 10 seconds is not steady-state. Steady-state happens over a much slower time frame so it needs a much longer time constant.
Setting Ti to 10s means that every 10s, the output will increase with the proportional part!
What are your PID settings?
Without knowing anything about your current settings, my guess would be to configure it like this:
Use the herms wizard to set up a cascaded setup. You want to control the temperature at the top of the still, but you are doing this by controlling the temperature at the bottom. You can measure both.
First tune regulating the temperature at the bottom. This is similar to a HLT temp in a HERMS setup: the HLT temp indirectly influences the mash temp. You’ll want to first tune getting the target HLT temp.
Tune the PID so the heating element maintains a constant temperature for a sensor in the liquid a the bottom. My guess would be a Kp around 20 (20% power for 1 degree too low), an integral time constant of 5 min and a Td of zero (we don’t expect much overshoot here).
Once the bottom PID is tuned well, it’s time to tune the relation between top temperature and bottom temperature. The top PID (like the mash PID in the HERMS setup) has a setpoint driver as output. This setpoint driver offsets the HLT setpoint from the mash setpoint to move the mash temp in the right direction. This is similar to the distilling setup: you want to achieve the bottom temp that gives you the ideal top temp.
Again, I would start with Td at zero and just tune P and I.
If the bottom temp would suddenly jump 10 degrees, how long it would it take for the top to react to that and reach a steady temperature? Multiply that by 2 to get your Ti for the PID that drives your setpoint driver that manipulates the bottom setpoint.
For Kp for this PID: if the top is 1 degree too low, how much should the bottom temperature be above the target temp for the top? I think a very low Kp might actually be suitable here. 1 or 2 perhaps?
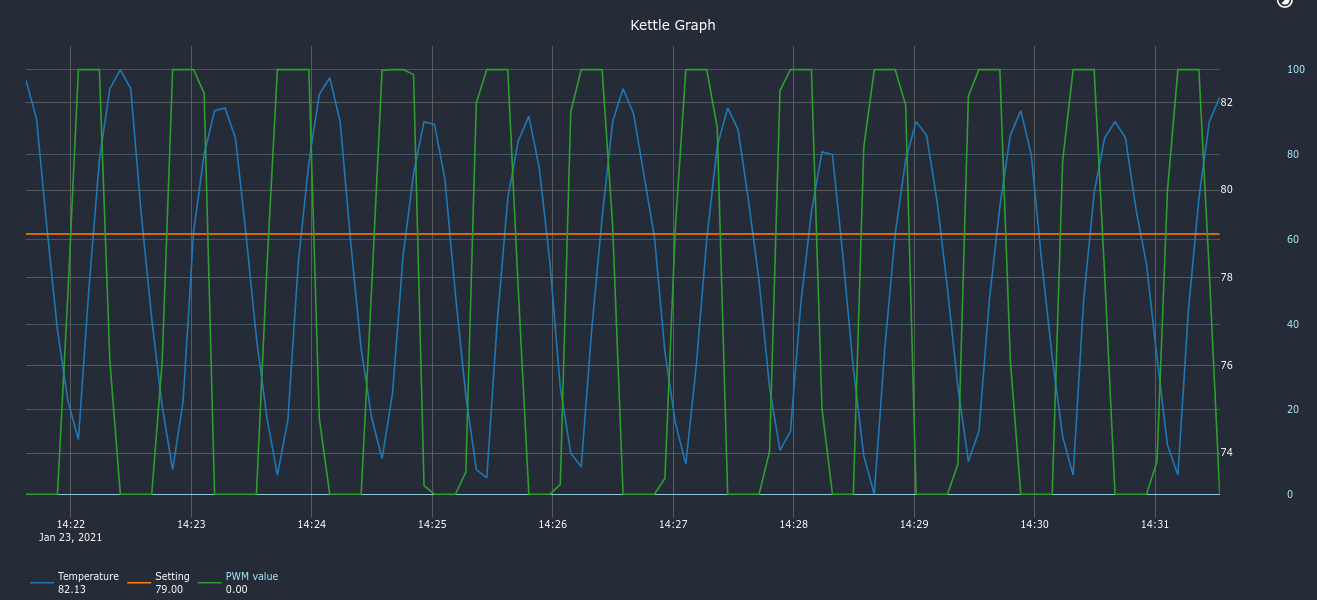
Thanks Bob in my case it is a test run so I have 20L of fluid in the still. A pot still has no column as such, well a very, very short one. The cycles of heating are now quite a bit shorter, more product is being delivered, but the temperature is varying between 73 and 82. Better than it was and the short time between cycles certainly helps.
I guess I’ve been spoiled when fermenting as typically I only saw a variance from lowest to highest of about 1 degree 
I’ll try reduce the current value of Kp from 50.00/C to 1/3rd of that as I have 1/3rd the amount of fluid and come back. In the meantime, here are the graphs after having used the kettle wizard:
Before going all in with a cascaded setup, you can get this much more stable by disabling the derivative part (set Td to zero) and reducing Kp.
Set Ti long enough to not interfere with step responses, 5m looks reasonable.
Hi Elco - this still (my other one) is a pot still, so no column and only 1 place to measure the temperature which is just before the condenser. I’ve just used the kettle wizard as indicated as that seems to be pretty close to what I’m trying to do, but I’m happy to try out the HERMS setup. I did briefly look at it and there seem to be a bunch of things its wants that I simply don’t have.
My pot still has a heater, a thermometer and a flow of water which I can vary by hand, but is really only to condense any product that comes out.
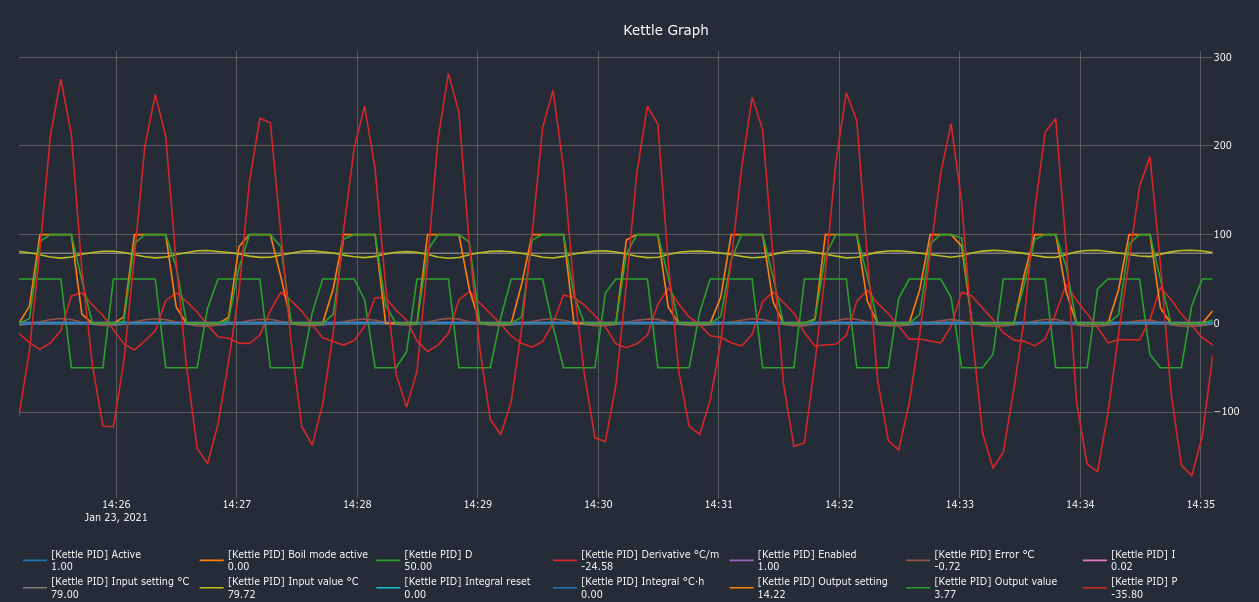
The PID settings I think you are after are:
You can see here that the temperature is very jumpy, changing 12 degrees per minute.
So the system responds very quickly and will probably not overshoot much. You’ll want to start with Td at zero. Start with a low Kp, let’s say 10. Increase it until it starts getting unstable.
Overlap in my response on this one Elco. Just to recap I’ve used the Kettle Wizard and changed Td to 0, Kp to 30 and Ti to 5m
Really appreciate the advice by the way from you and Bob.
I’ll leave it to run …
Also, you have manually created a graph with all of the PID values.
You can just go to the PID block/widget, click the 3 dots and choose the graph menu item.
Thanks Elco. Is there a way for me to simply set a percentage of power (say 85%) and have brewpi deliver that to the kettle heater? I ask because I used to have a very simple manual power regulator which did the job but that has recently broken. I know brewpi is way more capable than my old physical dial, but it’s all I really need and calibrating my still appears to be a fair amount of work.
Disable the PID and just set a value manually in the PWM block.
Another option is to use the PID to heat up, but use the boil mode limit to maintain a minimal pwm value above a certain temperature.
Perfect - thanks Elco. Also once I dug through the docs I found a very useful example too:
At the moment it’s all working fairly well, better than before, with me manually setting the level to (in my case) 38% of full power.
At some point I would like to revisit using brewblox for controlling my sample pot still more in line with the way brewblox is intended to work, so if you have any thoughts on the best place for me to start, I’d be more than happy to follow along.
If I manually control things I can get some product coming out, but as expected I need to keep a very careful eye out and twiddle. If I use a brew kettle wizard and set Ts to 0 and manually change Kp from 5 up to 40 in increments, the best I get automatically is a spread of about 3 degrees plus/minus the set point. I realise the wikipedia article explains in detail how these algorithms work, but the maths used is way beyond me.
If I started out with:
A boiler that has 20 litres of fluid
A heating element of 1Kw
A single sensor which sits a little above the boiling fluid, so not a tall reflex with the sensor at the top
A desired set point of 78 degrees
Is there a recommended starting point for creating a brewery to give me a chance of letting brewblox do it’s job properly?
Or a way of starting with an A, measuring, adjusting and looping round measuring? I’m happy if the answer is no or is in the too hard basket The typical hardwired controllers that control the power such as an Inkbird ITC 308 seem to use the same type of algorithm as brewblox, but I’d rather use brewblox if possible to replace my old unit.
If I understand correctly, the desired setpoint for the vapor (not the liquid) is 78*C?
The Brew Kettle wizard will yield the required blocks for a single-sensor config. The PID settings must be figured out manually.
Automated tuning is in the “when we have time” basket. It’s really useful, but I can’t implement it (don’t have the math for it either), and Elco is working on the new board.
For manual tuning I’d set boil point adjustment to -25*C, Kp =10, and Ti/Td both 0. Increase Kp by 10 until you have a smooth sinus wave around setpoint.
Then check “normal” output value, and set boil mode output to that - ~5%.
Once you have that steady sinus wave, we’ll look at Ti/Td to flatten it.
Thanks very much for those hints Bob. I’m starting off the first parts of this later on today. Would you mind expand on the bit that says:
Then check “normal” output value, and set boil mode output to that - ~5%.
I’m not quite sure where to look for this normal output value
What I mean by “normal” is the constant output required to keep a steady temperature (input heat equals heat lost to environment). You can determine this value by checking your graph and estimating the average output of your PID.
Normally this is handled by the Ti, but we can cheat a bit by using the boil mode. We’ll set the Ti after we have a rough value for Kp.
I’ve got a Kp value of 20 which achieves the setpoint with a stable curve on the temperature which varies by about 4 degrees above and below the set point. I can get less variation with a Kp of 10 or 15, but with those values the setpoint is rarely reached.
As suggested Bob I have estimated from the graph which shows the PID output that a good working average value would be 50%
So for “set boil mode output to be that - ~5%”, (47.25%) should I be setting the parameter
“Minimum output when boiling” to be 47.25 (default looks to be 25). I’m only checking as I cannot see anything called “Boil Mode Output”, but then my eyes are very old
Edit: well I can see one called"Boil mode" on the PID, but I cannot edit it.
You can set a minimal actuator value on the PID when the setpoint is above a threshold. That’s boil mode. It is not really needed in your case, because you don’t have the energy loss from the phase change. But you can still try it.
It sounds to me that 10 or 15 is the correct value for Kp actually. The integrator should correct for the steady state error.
Did you try with Kp at 10, Ti at 5 minutes and TD at zero?
Thanks Elco. For the time being I’ll park trying to set “Boil Mode Output”
I’m happy to try Kp 10 Ti 5 and TD 0 and I’ll start that off later on this morning. I usually wait until I get a decent amount of sunshine on my solar PV rig before distilling as it use a fair mount of electricity. More from me later on…