Distilling with the brew pi spark

OK todays numbers are in: These are all with Ti5 and TD 0

Kp 10, doesn’t reach the set point, spread of roughly 70-72 degrees
Kp 15, reaches set point, spread of roughly 73 to 83
Kp 20, reaches set point, spread of roughly 73 to 82

in case it helps, when I did the first run with Ti0 from Bob, I got the following:

Kp 10, doesn’t reach the set point, spread of roughly 70-74 degrees
Kp 15, reaches set point, just, spread of roughly 74-78.5
Kp 20, reaches set point, spread of roughly 73 to 82, so same as with Ti5

Could you please take a picture of the PID graph for Kp 15 and 20?

Screenshots work, but there’s also a little camera icon in the toolbar if you hover over the graph.

Here you go. I changed from Kp 15 to Kp 20 at 14:05 Td and Ti both 0

It looks like you managed to enable boil mode after all, with a minimum output of 25%.
To simplify control, you can indeed try turning that off again while we tune Ti/Td.

What does the graph with Ti=5m look like? By the looks of it, Kp=15 seems like the right value when combined with some Ti.

I don’t recall enabling boil mode Bob. The brew kettle wizard leaves the Control Mode set to be Kettle, so if that is what needs to be changed, I’ve changed it to be Manual and the Minimum Output when Boiling to be 0, which I think you also would prefer.

The Boil Temperature Setting is 100-25 as it has been fo some time.

Kp=15 and Ti=5 are now both set and I’ll fire up the still shortly…

and I’ve enclosed two graphs. One for the still temperatures and the other fr the PID. It appears as though it has settled on an average of 75 degrees rather than the 78 setpoint.

1 Like

Whoops I should have left it for longer - we now get to the set point, but the variation around the rough average is larger than it was earlier. Here they are:

Ti is set? It looks like the I portion is not contributing anything.

Yes to 5m. Here is a screen shot of that general area of settings

You could reduce Kp a bit to 10 or 12. The temp is still very much driven by the P. You want the initial P step to take it to about setpoint, and then have the I take over.

OK I’ll change Kp to 10 initially and leave it for a while, then to 12 and leave that for about the same length of time…

Here we have Kp10:


and here we have Kp15

1 Like

What is your pwm period? I think 2 seconds would be good here.

You can also try increasing the filtering in the setpoint. Perhaps it just fluctuates too quickly for the PID.

Are you sure you want to measure the air? Why not measure the liquid? It seems to me that measuring the vapor is very difficult. It just evaporated, so it should be 100 degrees, but it will cool down as soon as it escapes the liquid. Maybe you are measuring the amount of vapor instead of temperature.
The place where it evaporated close to the element might also be hotter than the rest of the liquid. Recirculation will help with that.

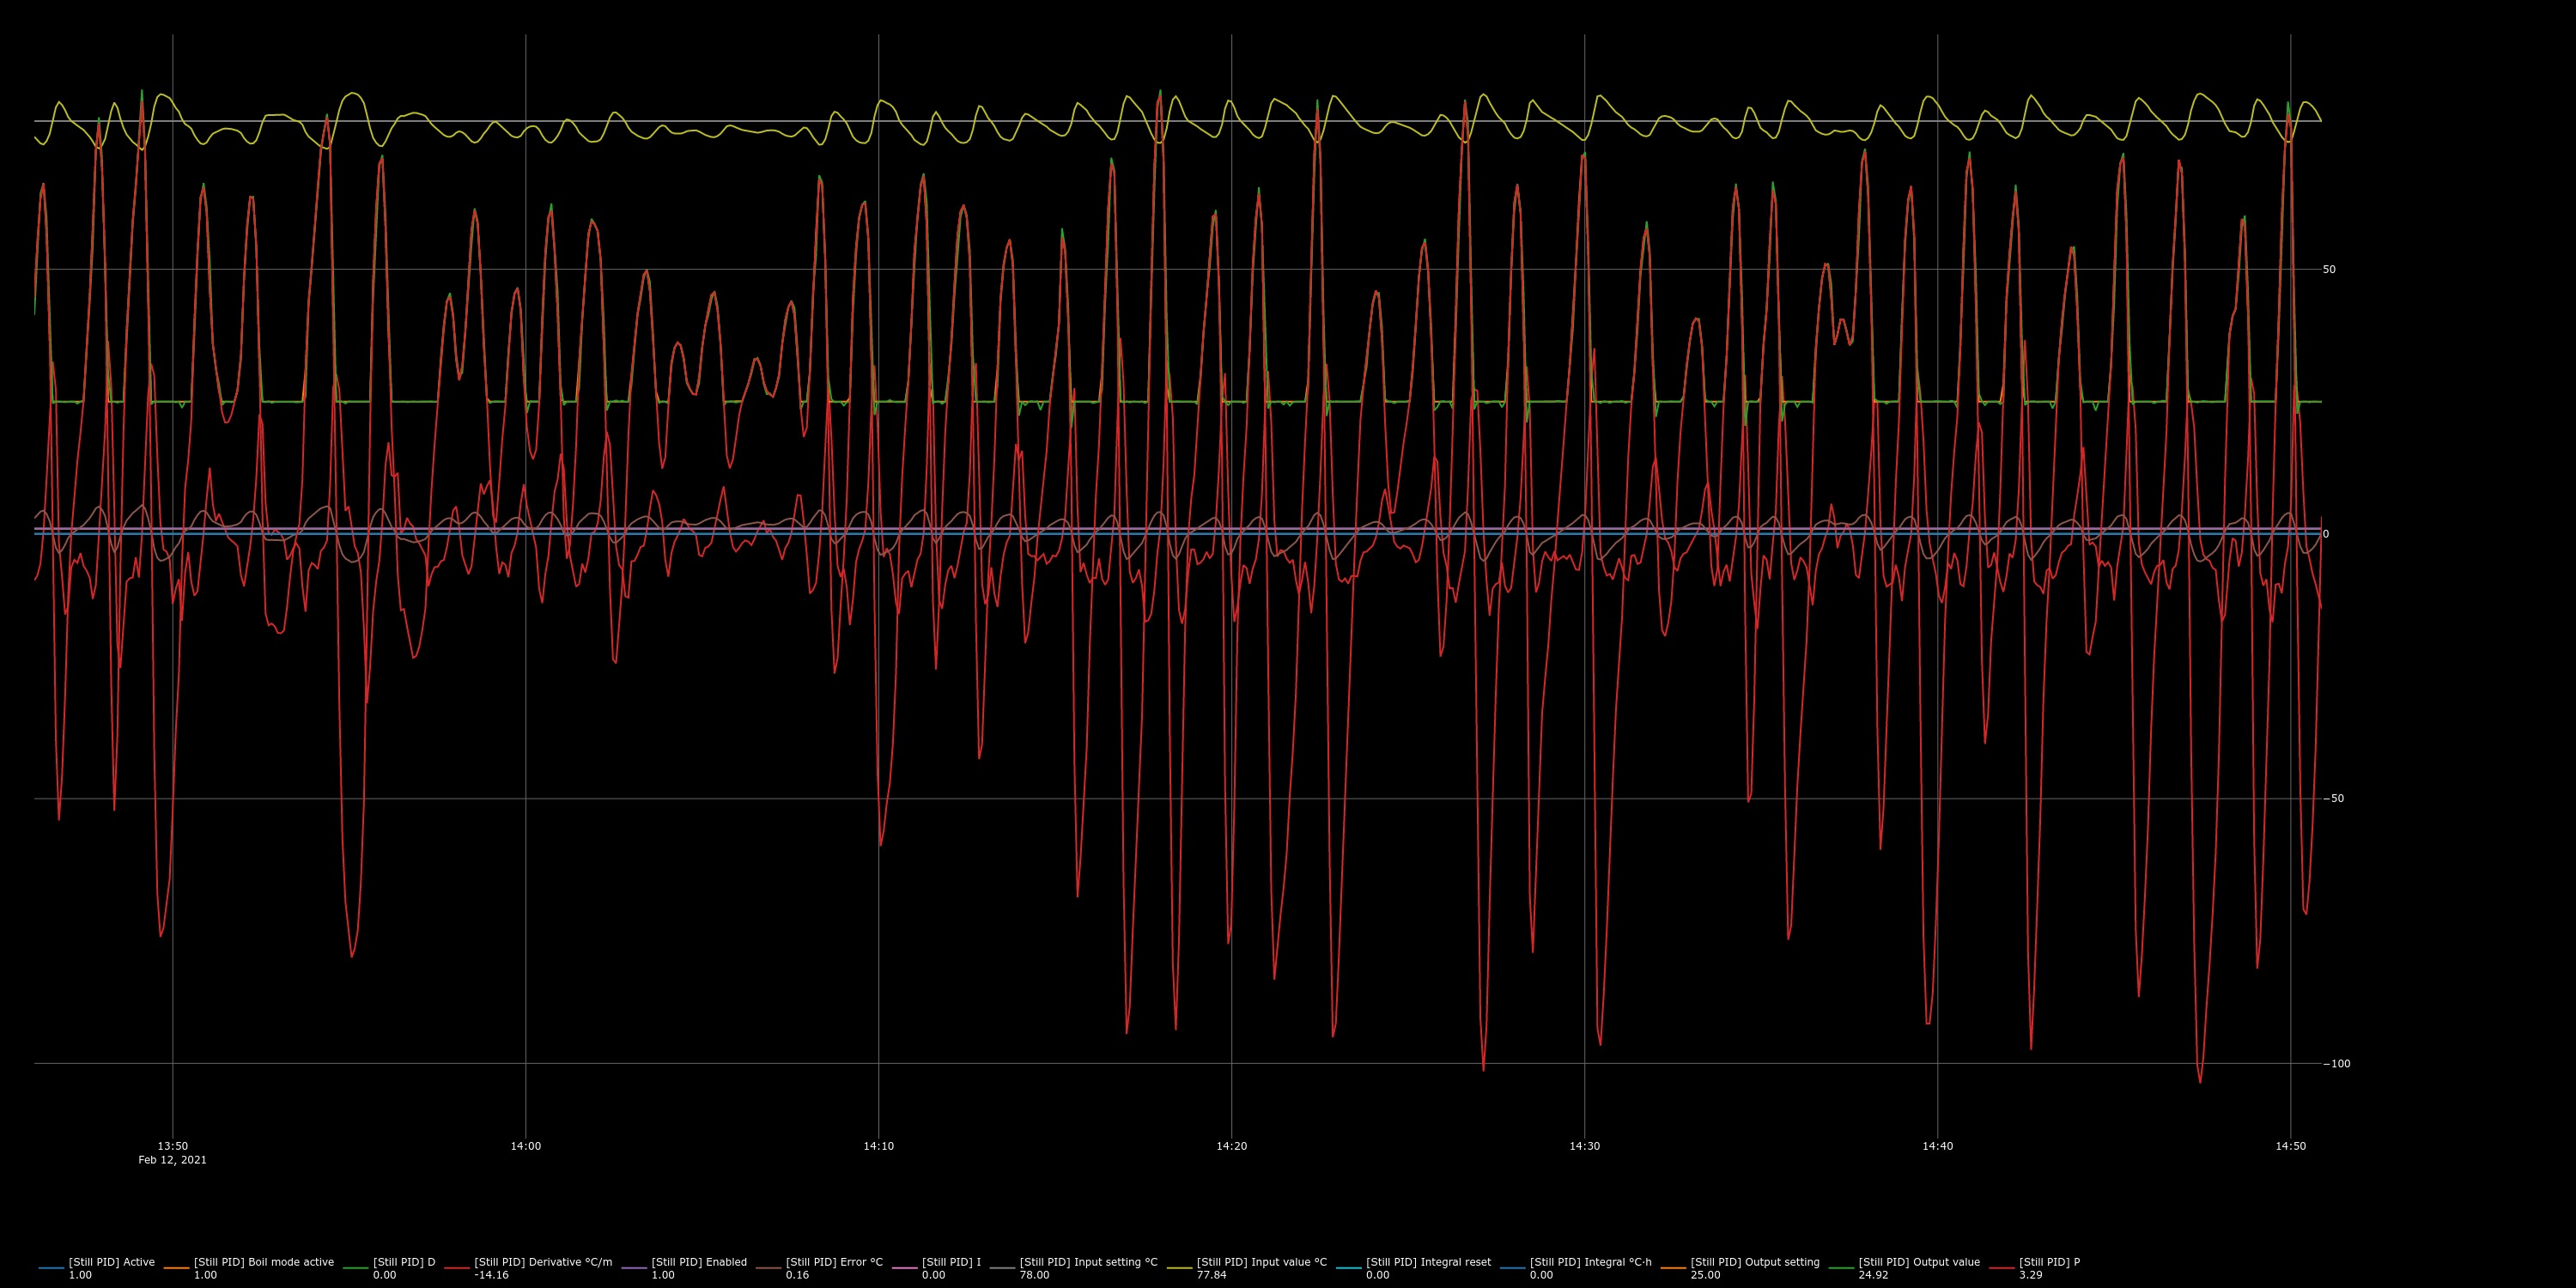
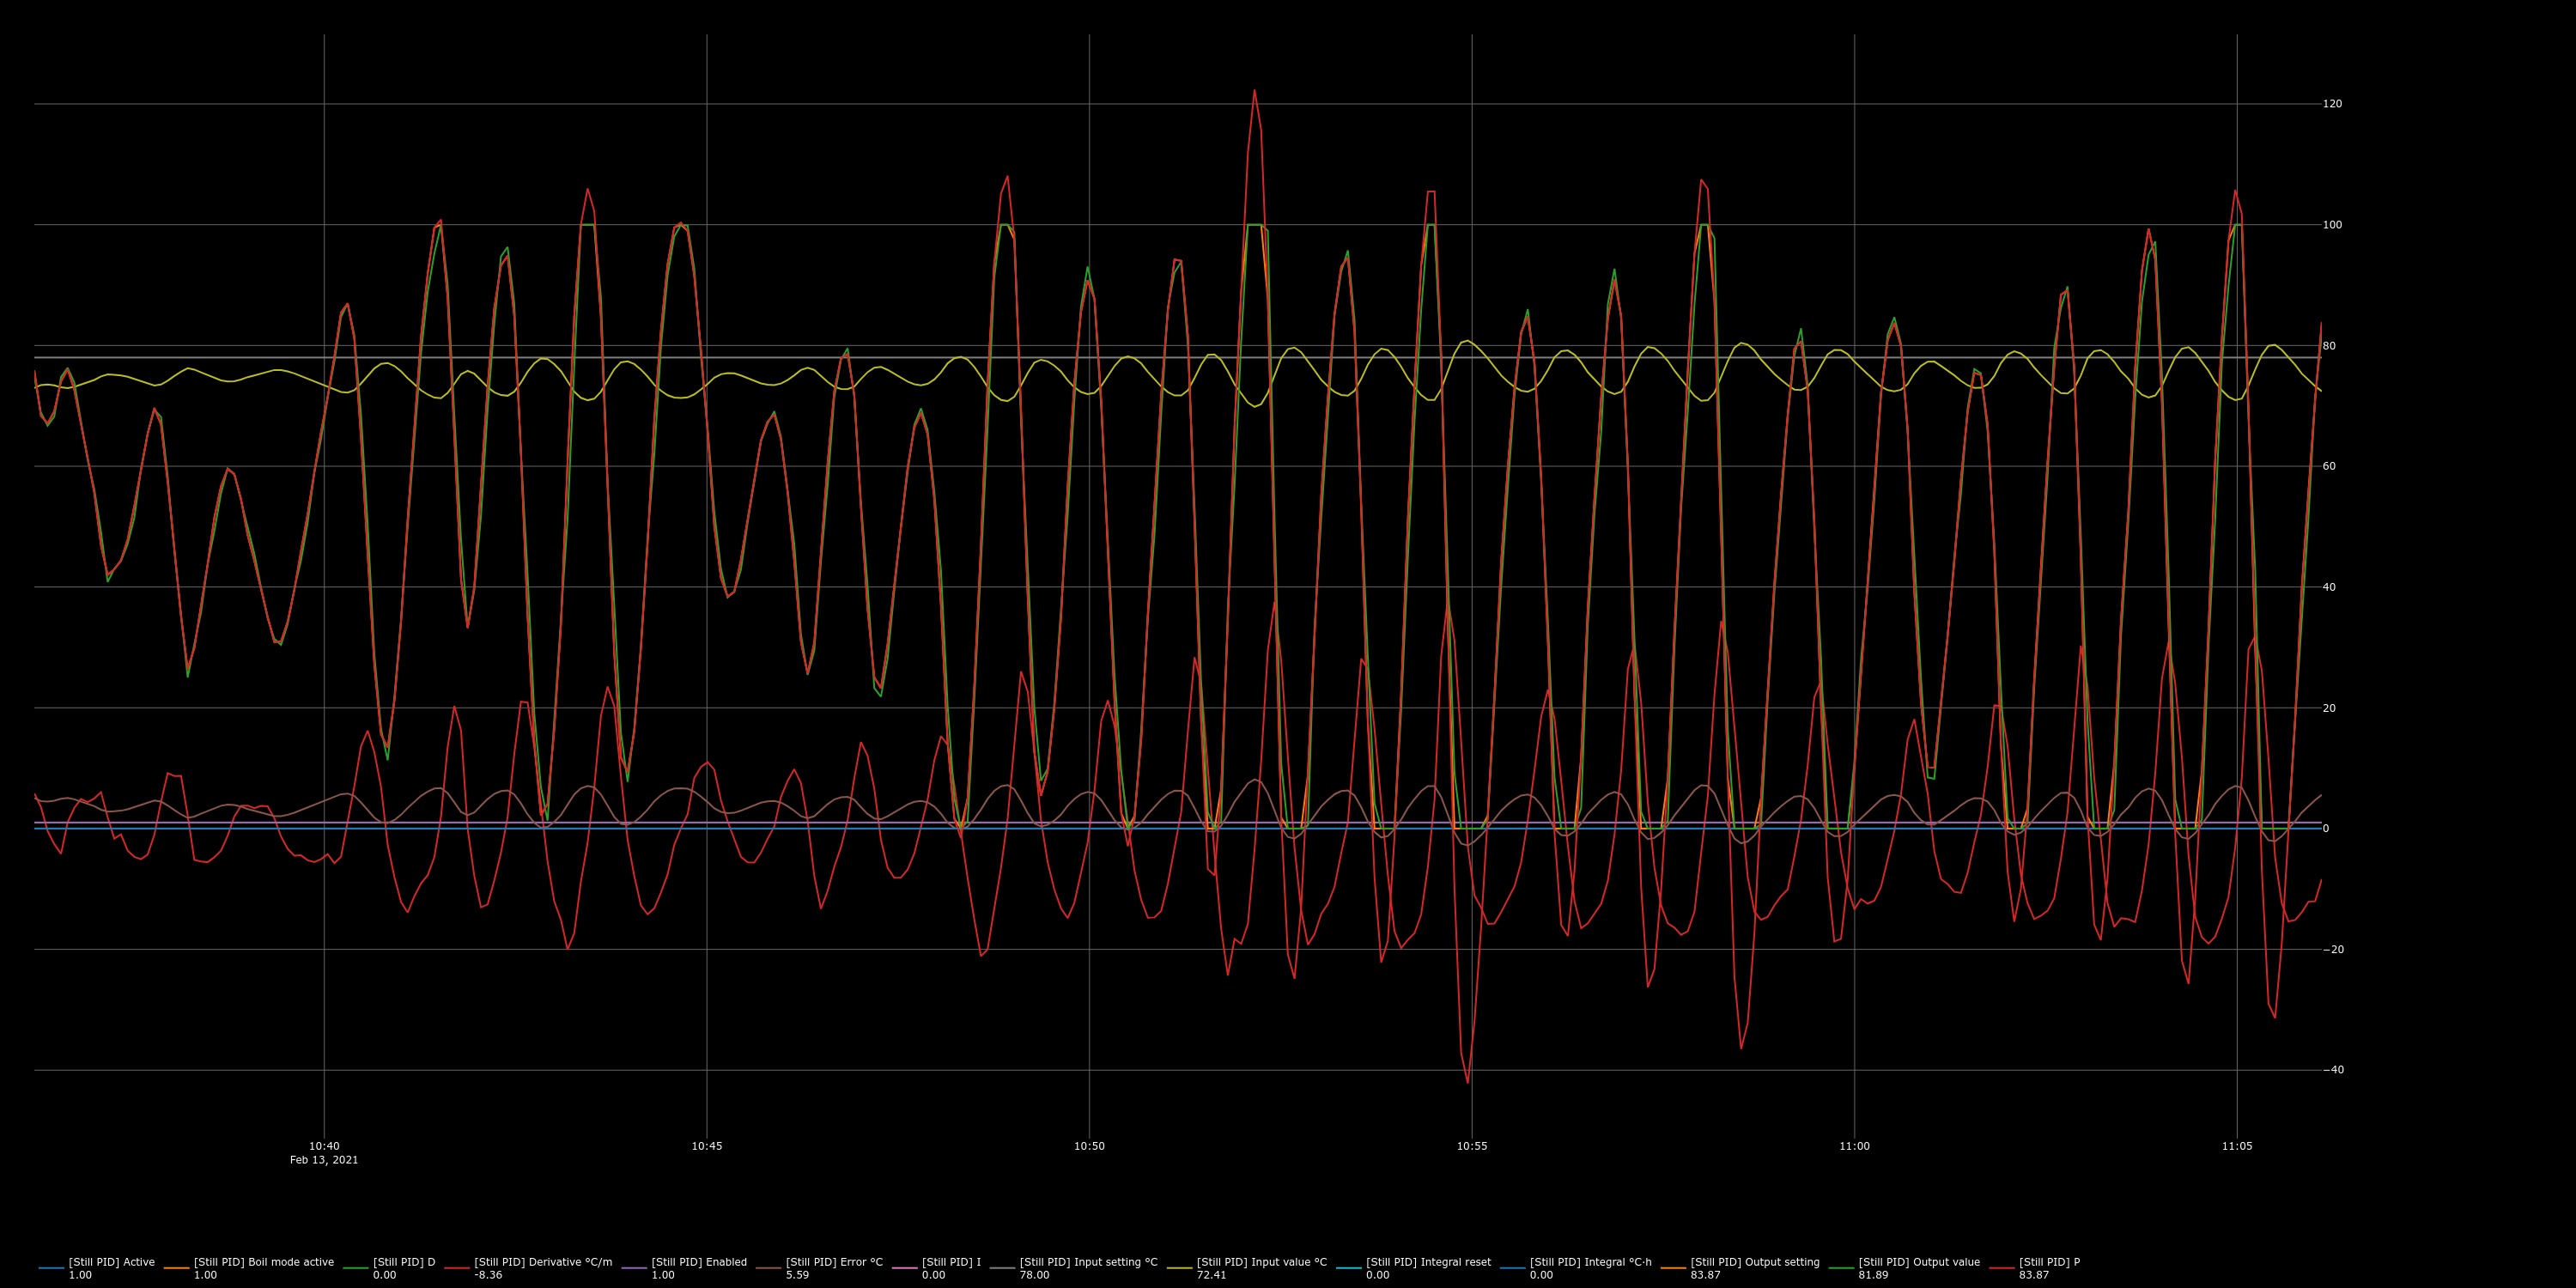
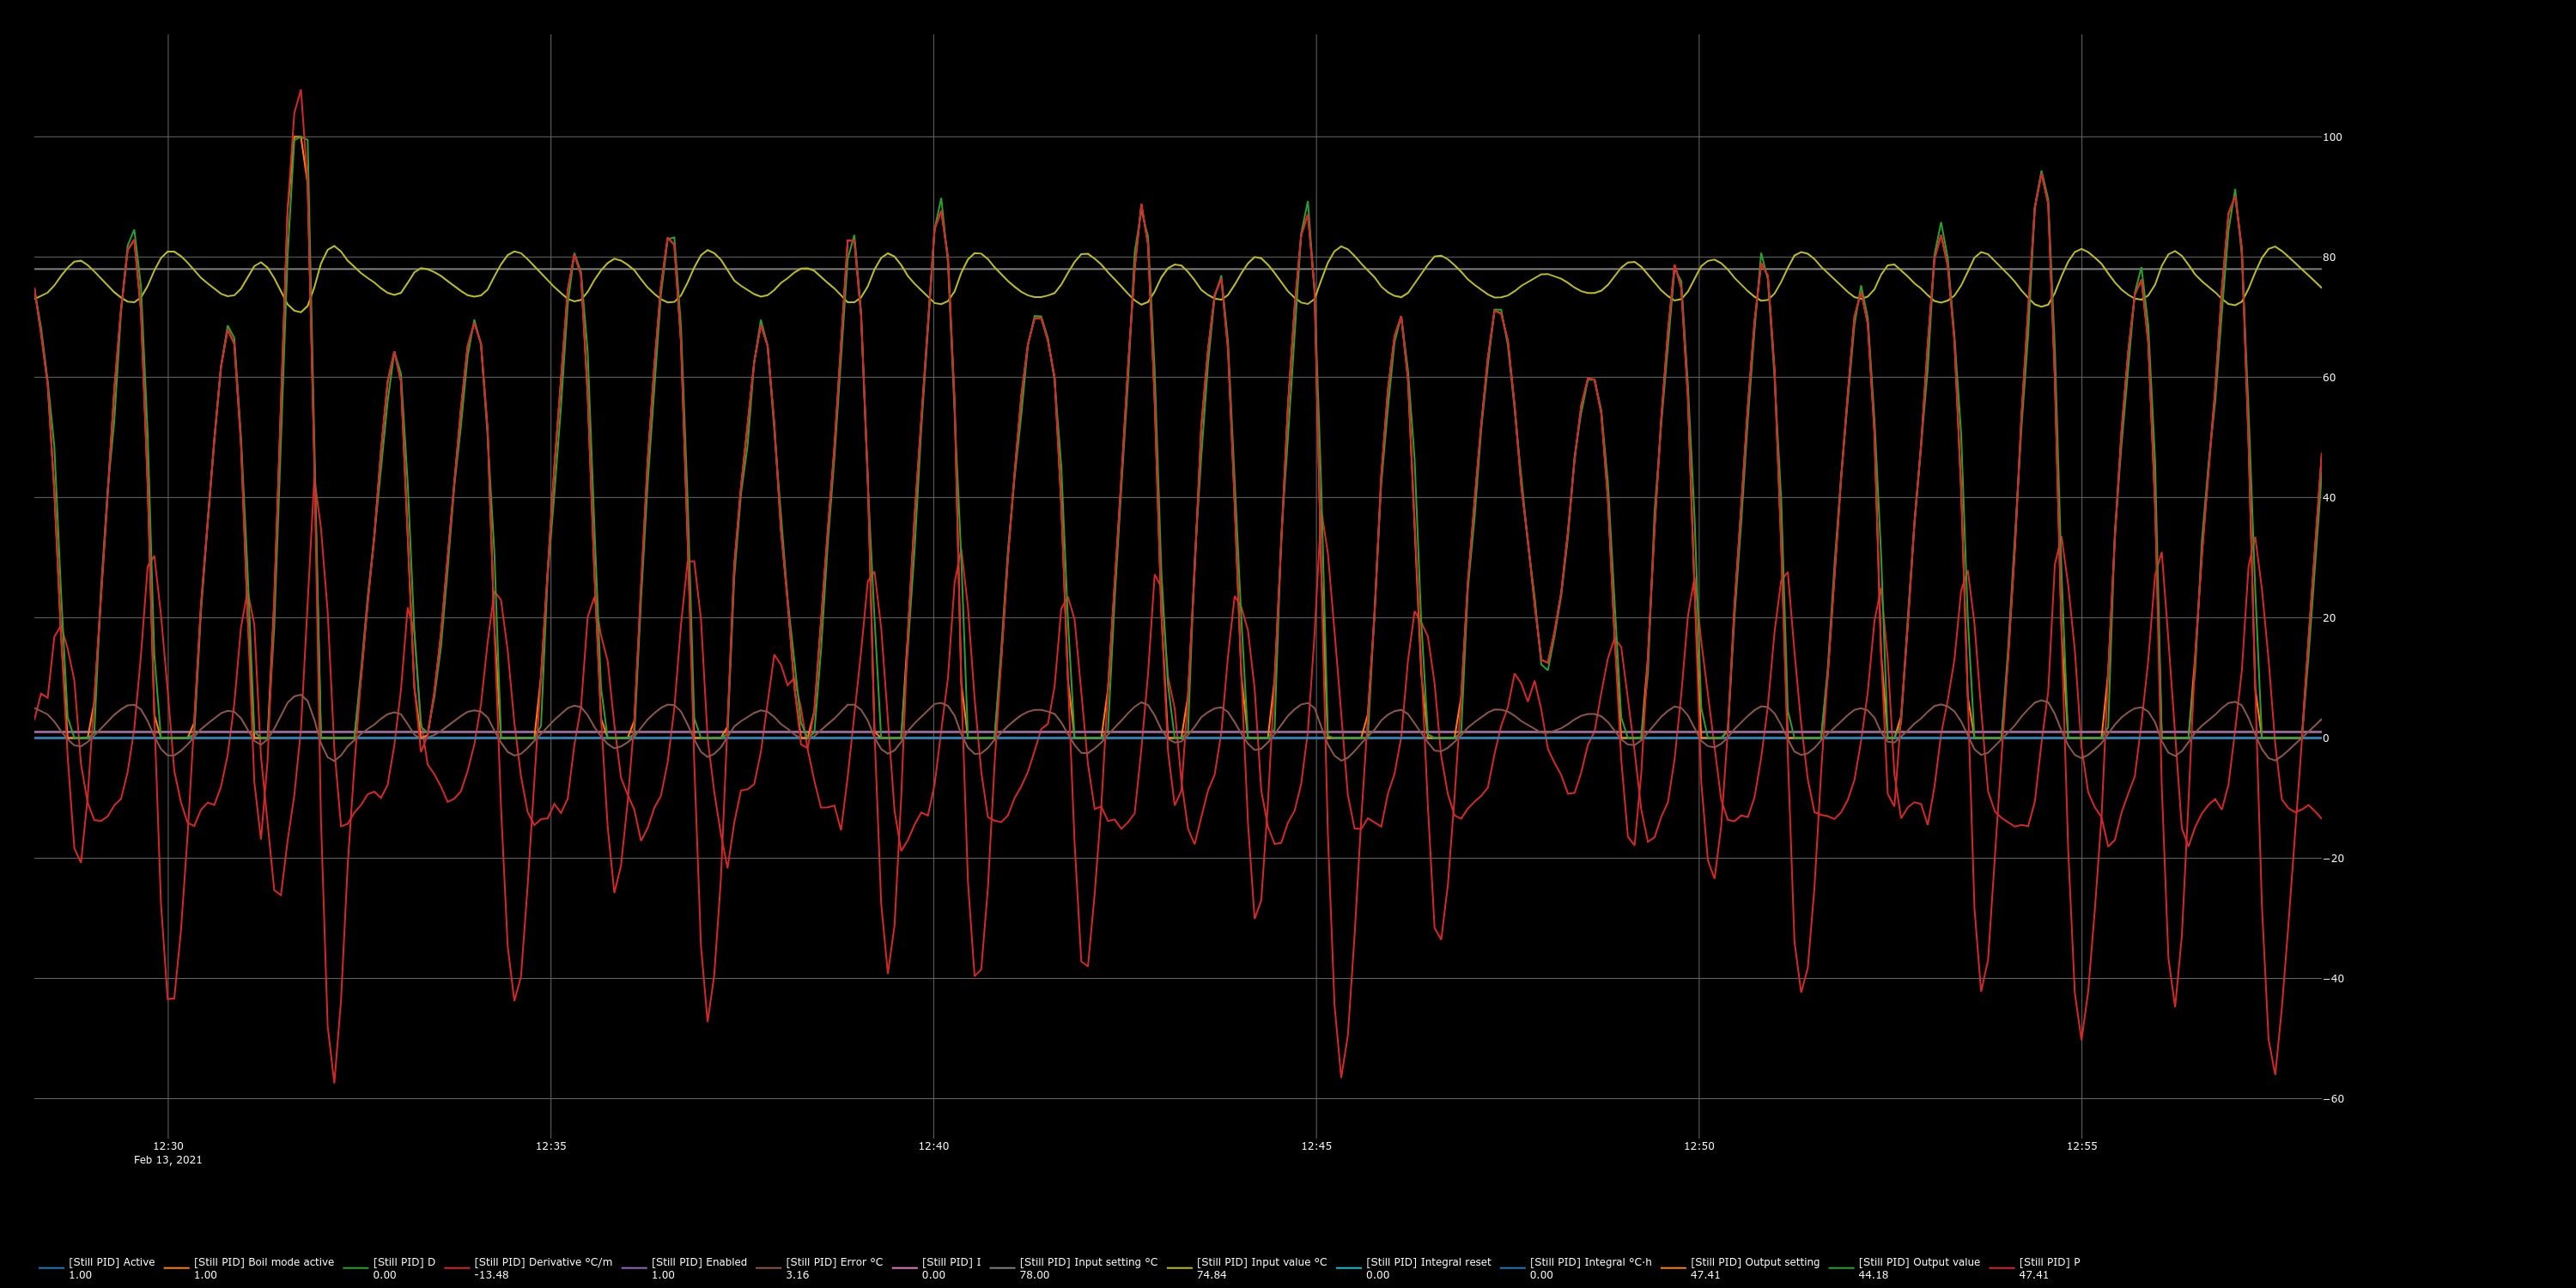
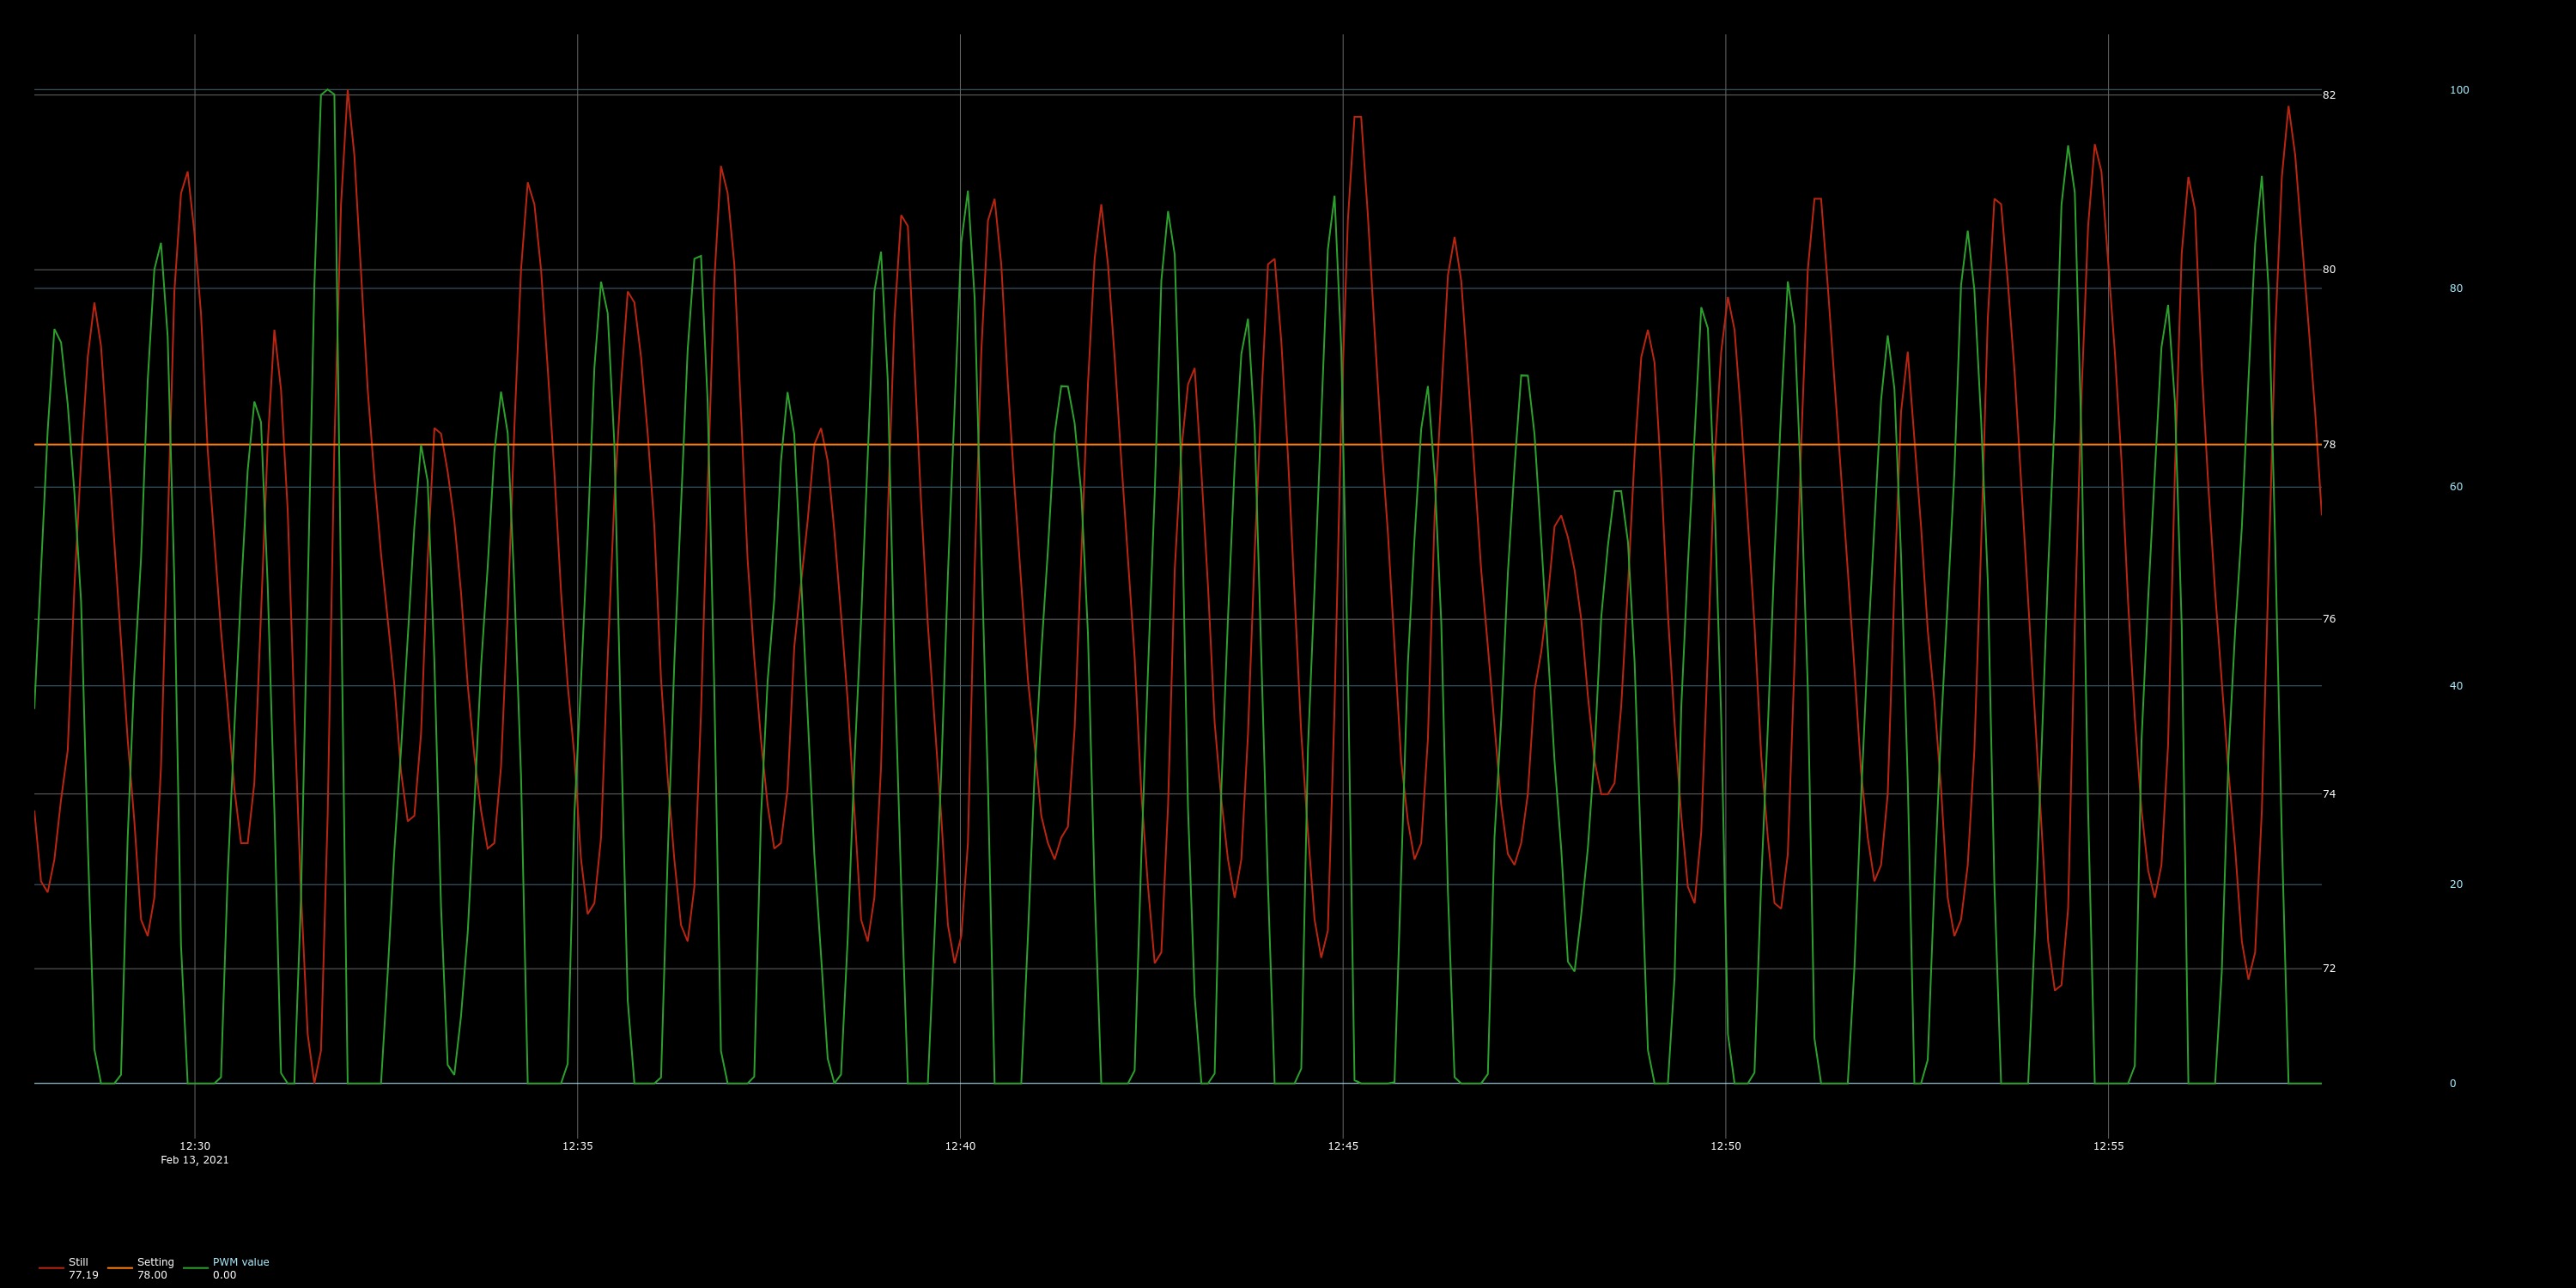
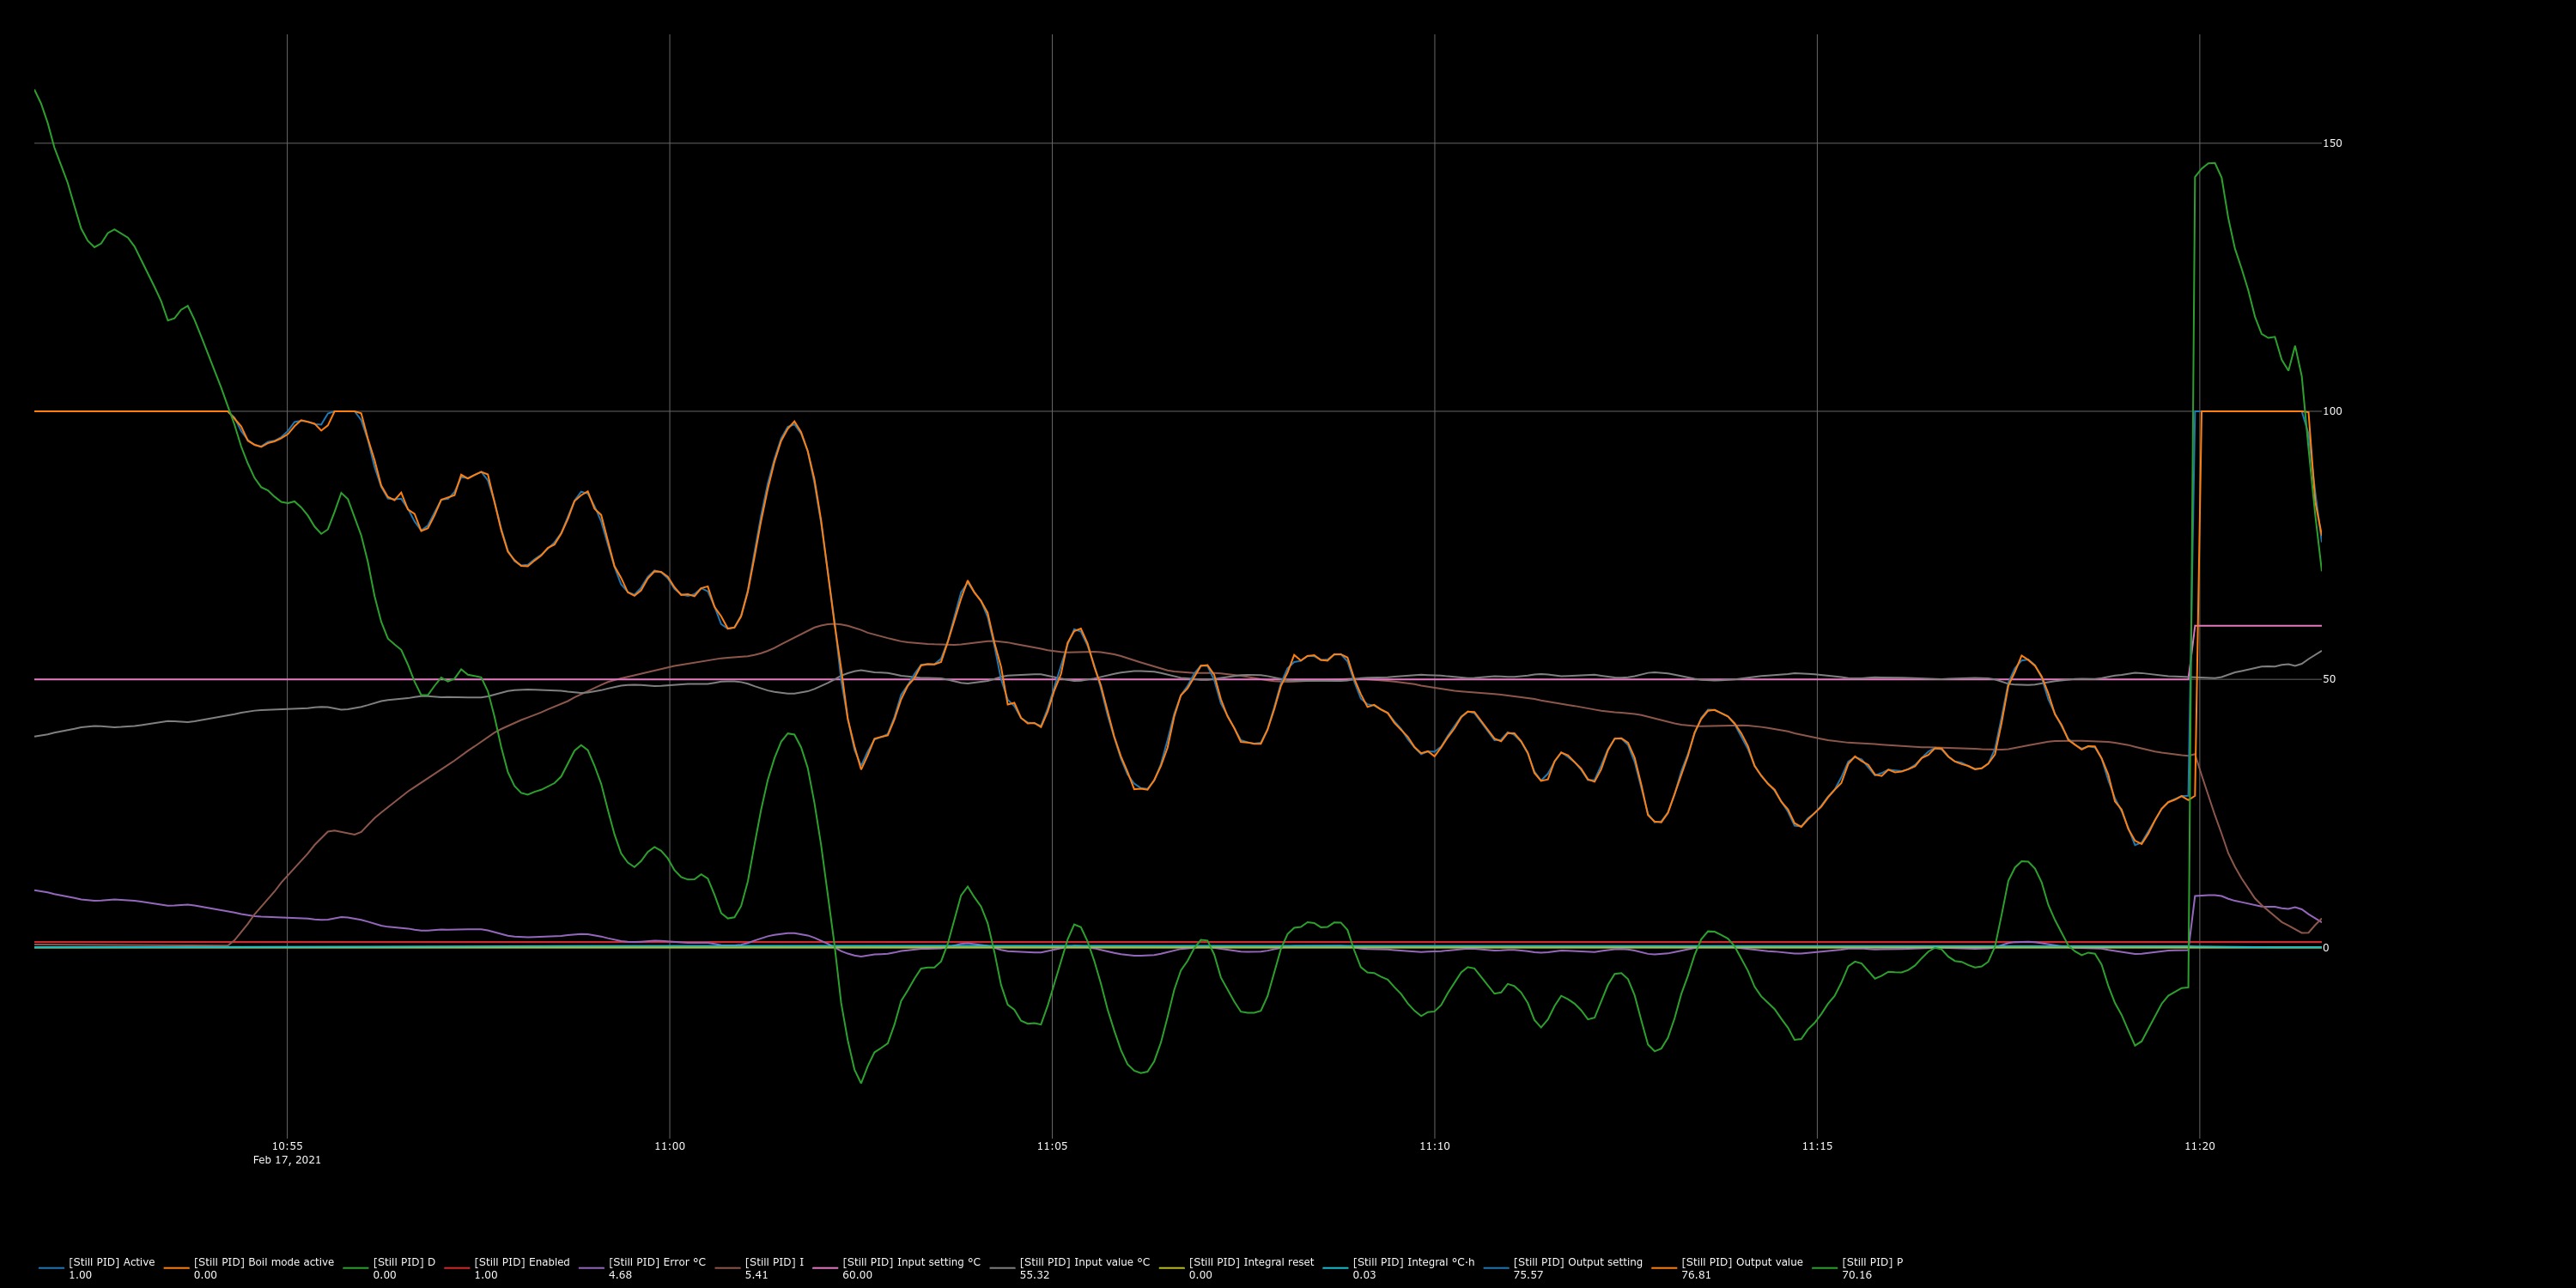
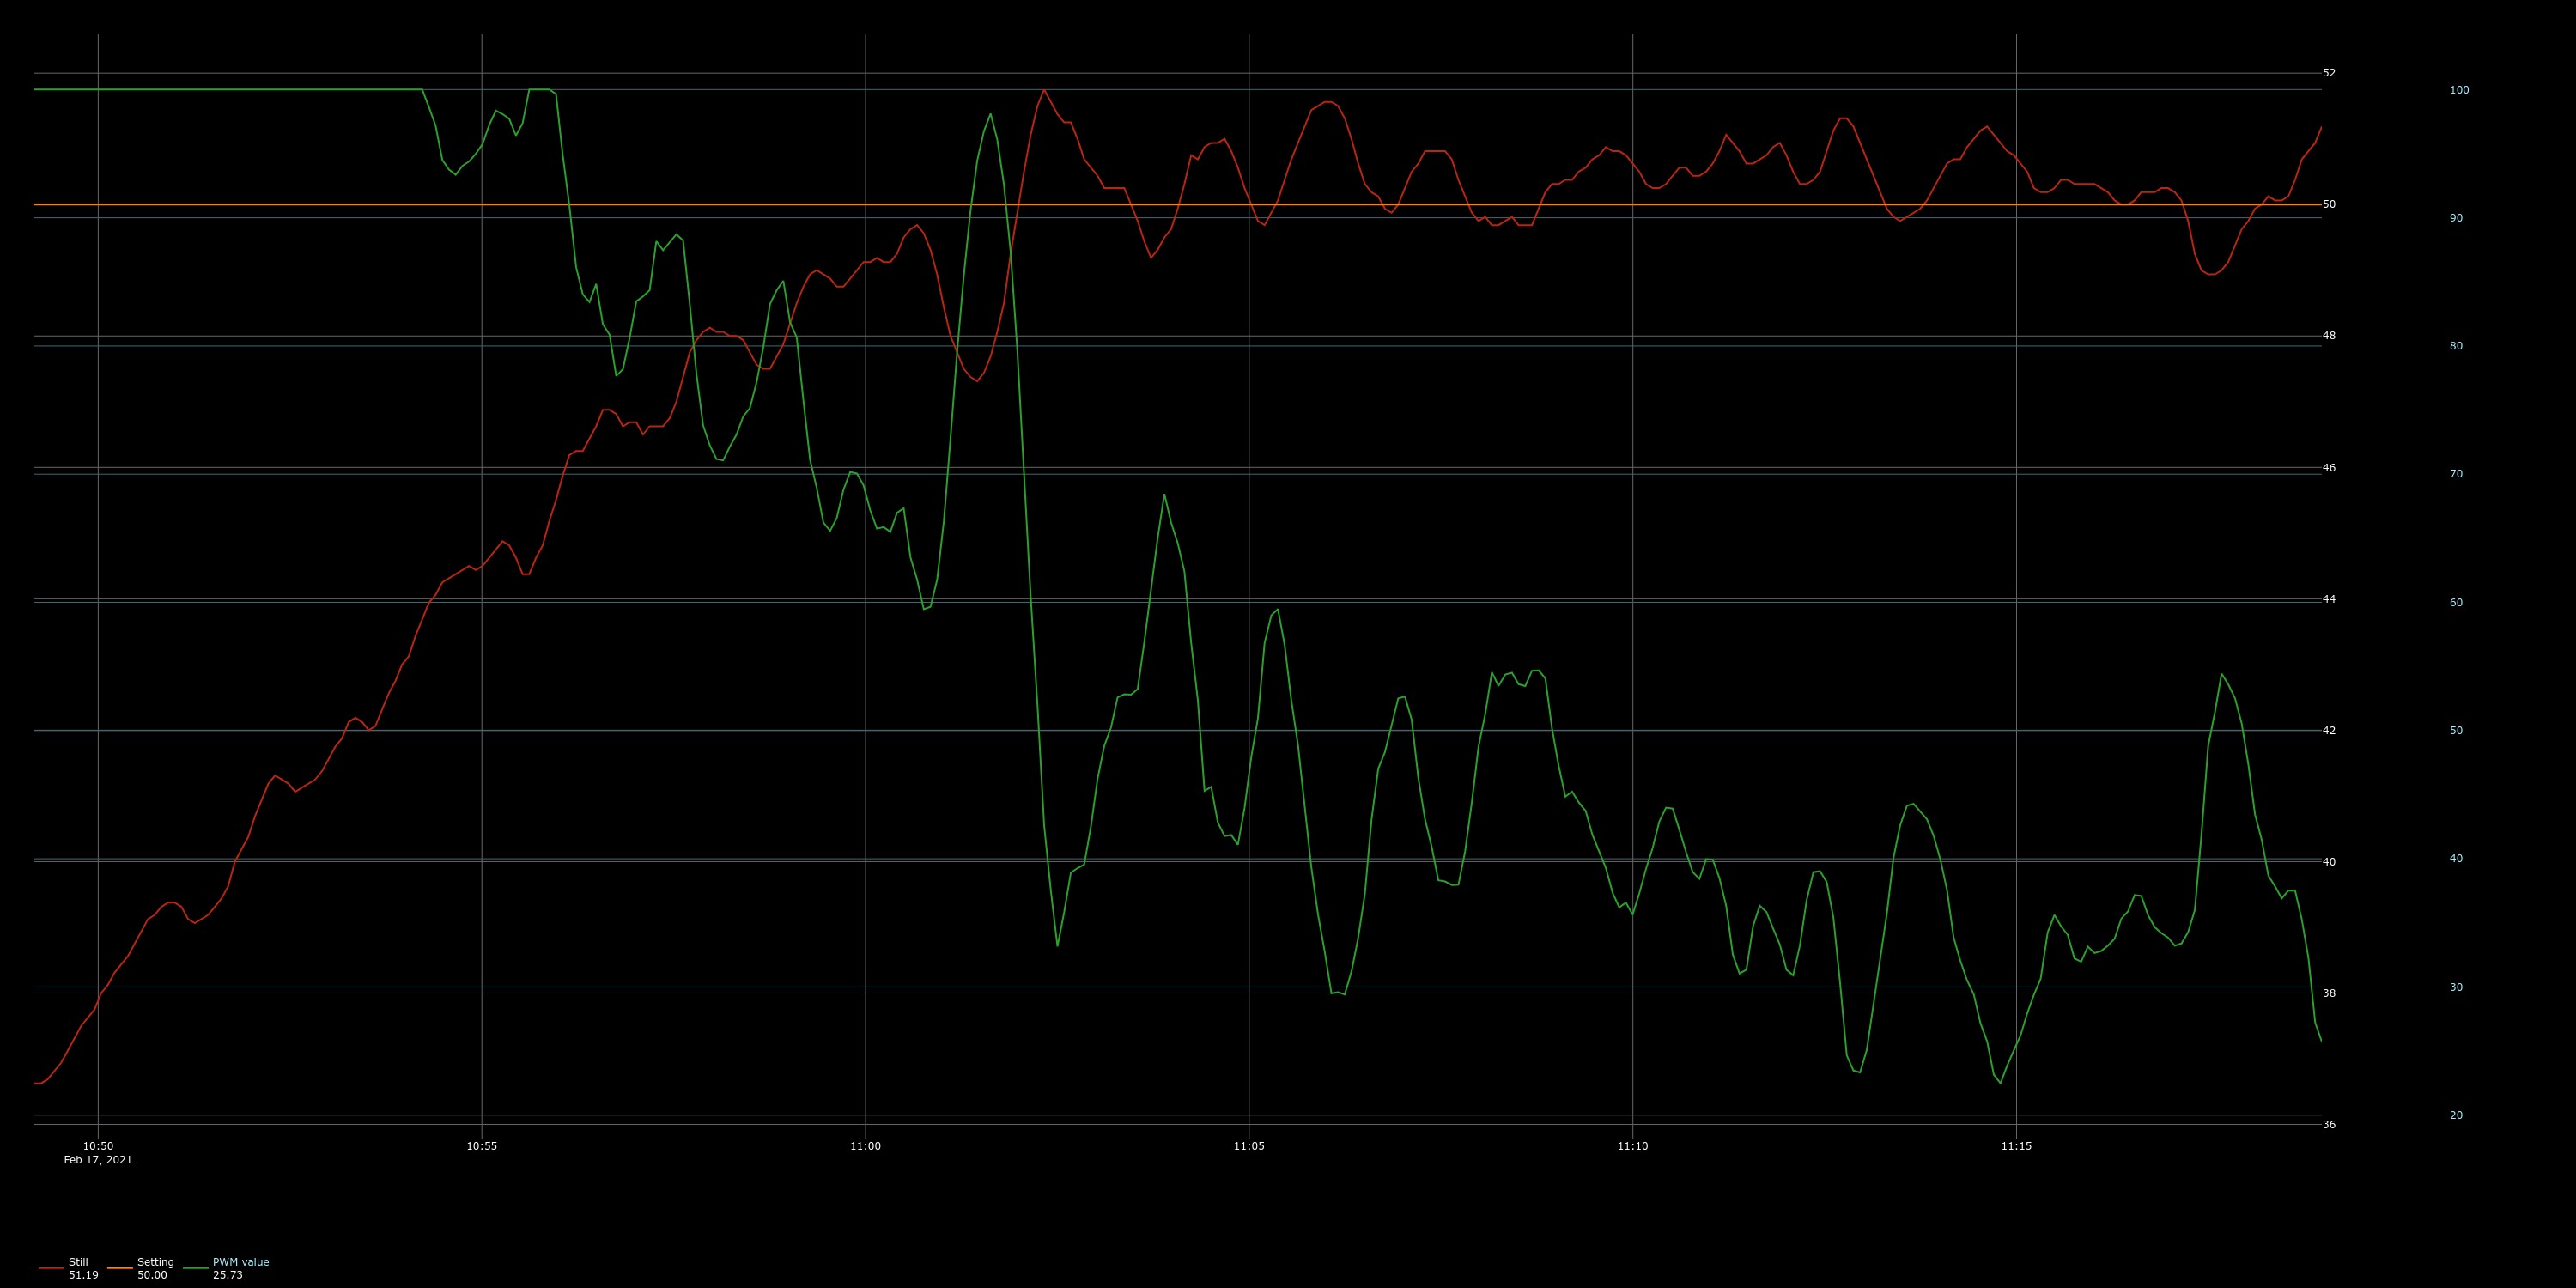
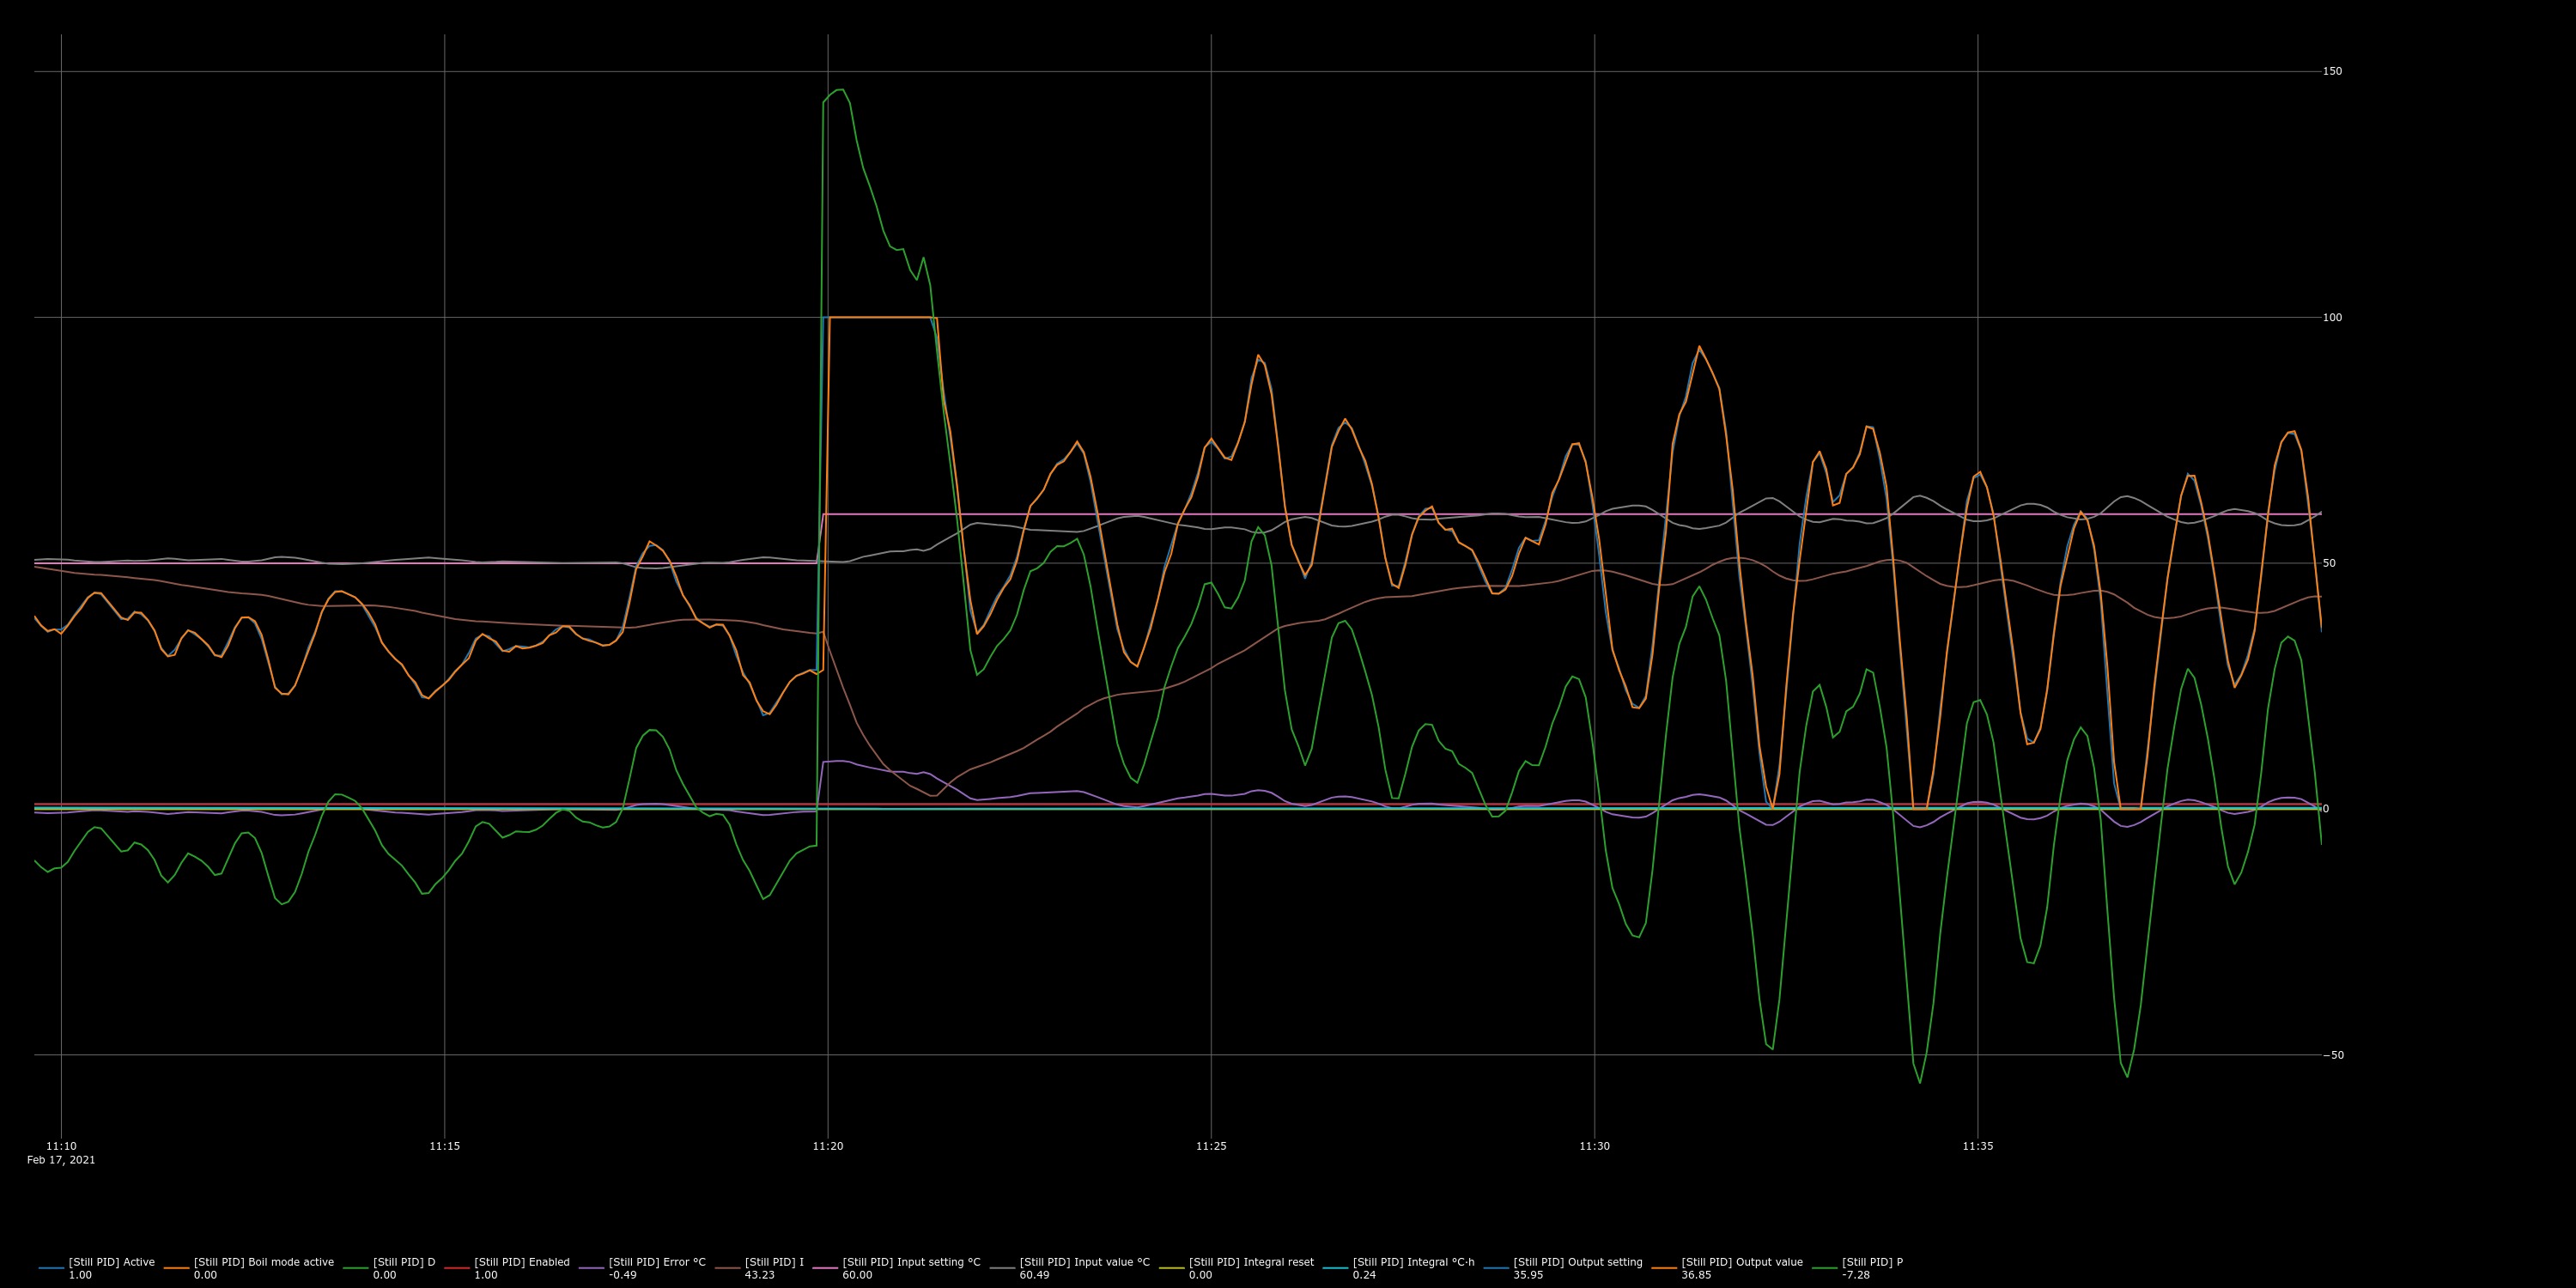
Hi Elco - the PWM period is indeed 2 secs set by the wizard.

If you could expand on what you mean by “increasing the filtering”, I’m happy to try that out and report back.

My comments on where to measure are from a distilling perspective, not brewing. With distilling it’s vital to measure the temperature of the vapor. Other measurements are handy and fancy stills have these too, but the key one is the vapor temperature. If you have a mixture of alcohol and water, the boiling point of the liquid is less than 100. As the alcohol boils off first, the vapor that comes off and hits the thermometer before the condenser cools it back to a liquid at around 77-79 degrees for a decent quality of alcohol. At that temperature the condenser turns the vapor into liquid.

Now as the alcohol boils off, the liquid boil temperature rises and this process repeats until there is pretty much no alcohol worth extracting and the boiling point of the liquid is well up into the 90s.

So for distilling with a pot still, you get the good stuff coming out first with the vapor at around 76 (say), that then stops coming out as its all boiled off, the temperature goes up and you get more, but slightly different quality or type of alcohol out at this higher temperature. This process repeats until no more alcohol of any decent quality is being produced - often in the high 80s.

Now I’ve described this as a step process, but its very analogue and part of the skill in distilling is spotting when the next stage or cut can and should be taken in a fresh jar. This is often done by smell and taste. A lot of skilled distillers agree that you shouldn’t try and engineer this process too much but focus on taste/smell.

For me when using a pot still, I used to find it very helpful to set the power up to maximum until the vapor was approaching my magical 78, then lower the power so I could grab that cut of alcohol from the condenser. Then when that was gone, raise the power and take the next cut and so on. Again I’ve simplified this process as (for example ) you tend to throw away the initial product from the condenser as it will likely have some traces of methanol.

When my old power controller broke, I was tempted to just get another one, but I felt that there was a lot of merit in trying brewblox as it is in doing in software what many of the brewing power controllers do. I have found brewblox brilliant at proving bread, fermenting wine/sugar wash and anything that needs a steady temperature from the box I use it in.

With the still, there is a lot more power going in and no box containing the still, but a steady temperature is still an important part of the process.

With a reflux still, the whole process is quite different, but let’s not go there yet :slight_smile:

I appreciate that I’ve probably gone on a bit too long with this one, but a man has got to have a hobby. For anyone reading this and thinking distilling isn’t legal, I live in NZ where it is for home use only.

Thanks for that elaborate write-up, that helps.

It seems that the process responds very quickly, while we don’t want to make quick adjustments. That’s why I think filtering the input to the PID might help.

You can find the filter in the settings of the setpoint. Try setting it to 3 minutes for example.

When you post a screenshot of the PID graph, please disable the line for the derivative. We are not using it and it makes the rest of the graph hard to read.

The best is a graph of a step response: raise the setting by 10 degrees and show how it responds. Just the step and a few oscillations afterwards if you have them. 20 cycles that are all the same are harder to judge than a zoomed in of only a few.

Sorry for the delay - I had some other things on. I’ve found the filter on the setpoint and I’ve changed it from 15s to 3m as requested.

No problem with adjusting the PID Graph. I’ve removed that setting from the graph - let me know if there any others which need removing.

As you have gathered by now, I’m not a brewblox expert, although getting better, so could you expand on ‘a graph of a step response: raise the setting by 10 degrees’ I’ve pecked around and I cannot see where step response is. Perhaps there should be a search function for all settings!

I think he just means step response as the response of the system to the proposed ten degree change in temp (step) setpoint.

Basically give it a command, so he can see the response. The cycles around this “step response” will help dial in the PID settings.

Yes and removing the line from the graph is just so you can show me a clearer graph. Just click it in the legend to temporarily disable it before you make a screenshot.

Perfect. I’ll start with a setpoint of 50, do the graphs with a few cycles round wherever it gets settles too and then increase in steps of 10 degrees. It might take me a bit of time to complete as I have a couple of other things on and I cannot leave the still unattended. But I’ll get this done as soon as I can.

1 Like

For PID tuning, the step is what gives most information. I don’t care about the cycles before the step, just the ringing after the step.

Here are the graphs for 50, 60 and 70. Pk is 15, Ti is 5m, Td is 0 and the filter on the setpoint is 5m. If you just want a minute or 2 before I changed the setpoint and a few minutes afterwards, I can do those too.


I think 5 minutes is a bit too much for the filtering because you will overheat it before the measurement arrives (5 minutes later).
But I don’t understand why your temperature measurement fluctuates so quickly. Can you share some photos of the hardware?
If the measurement is all over the place, it will be very hard for a controller to perform well. Garbage in, garbage out.