Got my new Spark today for fermentation control today. I followed the instructions and got my Pi running and connected to the web. SSH works, staticIP/port forwarding, the script is running. Spark appears to be in the default state.
Now what?? I could use some information regarding hooking up the two SSR (LSSR-DA purchased from the brewPI site).
Looking to control a fermentation chamber with a chamber temp and ferment temp thermowell probe.
Any info regarding wiring the SSR to a heater/cooler, followed by programming the web interface for this would be appreciated.
I will try and document this so that others may benefit.
I was there about 6months ago, and due to $reasons only just got mine properly up and running. I was lucky enough to have another guy locally who was able to help me out as he already had done it.
How to work the webui for brews I am still learning a little, like I create a new beer in temperature mode, click apply, but at the top the beer name is different and I have to apply it there as well…not sure what I am doing wrong there.
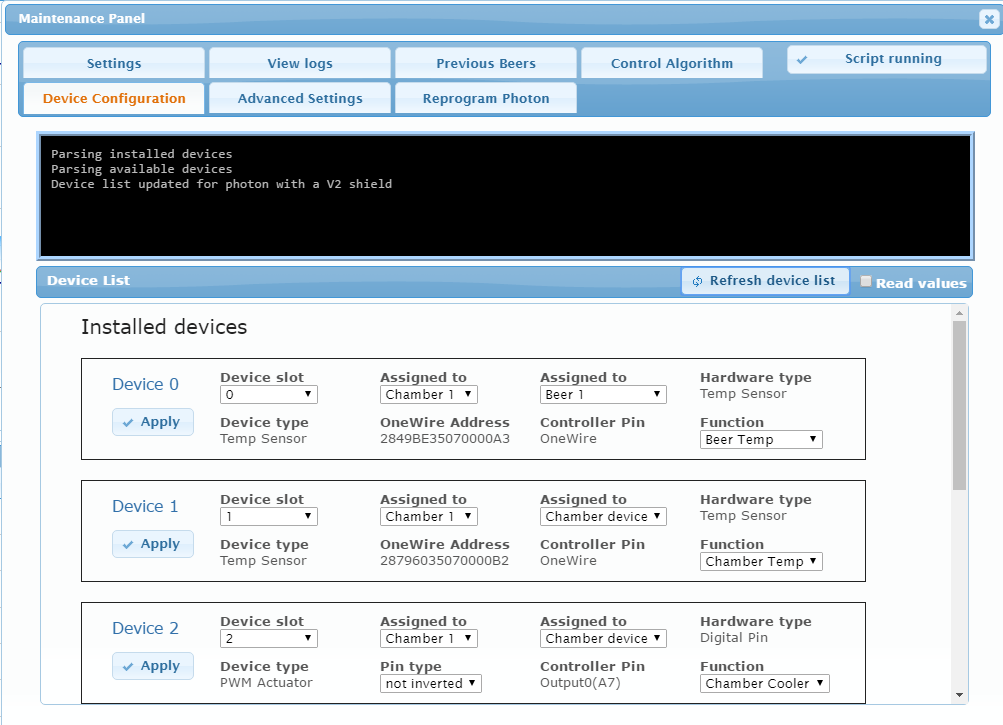
There are threads/topics in this forum, explaining connecting your electrical hardware. Nose around the forum and you will find interesting stuff. As far as “programming” the web interface goes, not much to it. Start the web interface by entering the static IP address in a browser on a computer on your network. If you have a screen attached to your RPi and the GUI is up you can use the browser there. You should see a screen appear that looks a little like the one I have attached below, but excuse some changes that you see in mine since I am using a Tilt wireless hydrometer. However, the main buttons and layout remain the same. First thing you should do is set up the Spark devices (temperature probes and the heat/cool SSRs). Click on the maintenance panel button. Then click on Device Configuration and Refresh Device List. There are instructions in the Install Guide or somewhere at BrewPi.com on how to connect your device. In the screen shot below you see two temp probes (like you will have)and one SSR (you would scroll down for the other SSR).
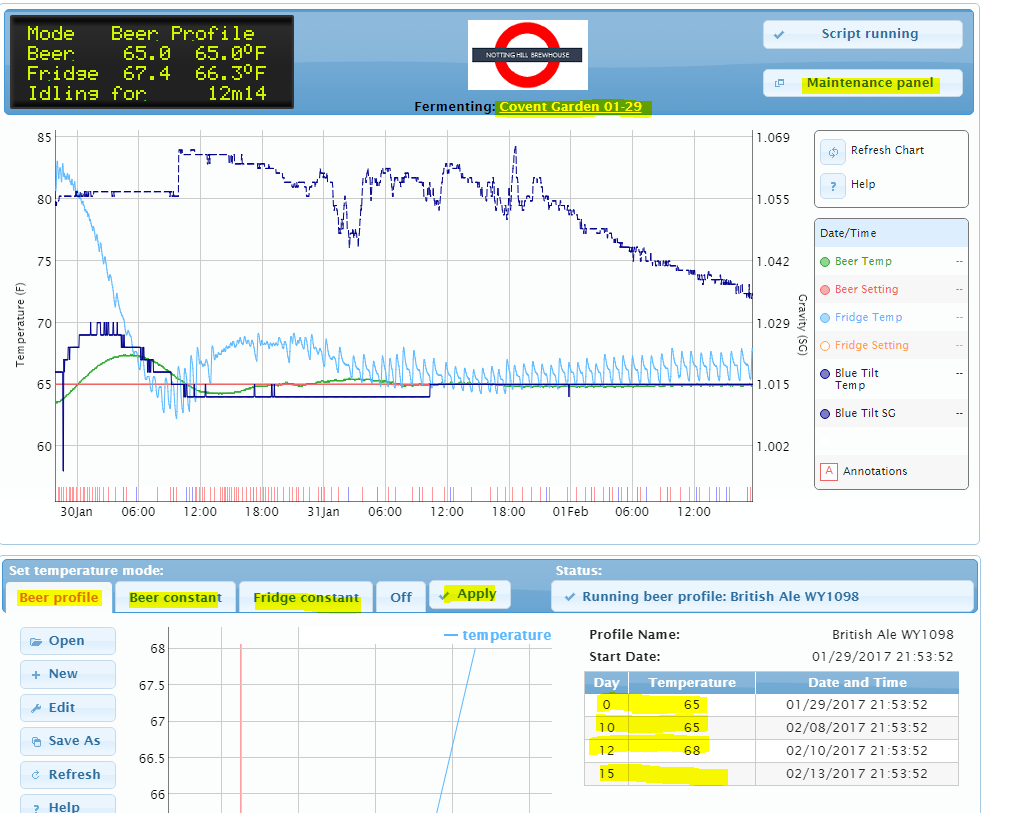
Then to control your fermentation chamber, once all your electrical hardware is connected, go to the bottom part of the BrewPi screen. Click on Beer Constant or Fridge Constant, enter a temperature and click Apply. This is to check that the Electrical side is working. If you set a temperature lower than your probes, the cooling SSR should come on. And for a higher ‘Set’ temperature, obviously the heating SSR should come on. If you do not hard wire you fridge/heater but use outlets (like I did), you can plug in lights to the outlet to see whether the expected switching occurs. Outlets also make it easier if you wanted, for example, to switch out for a different kind of heater. Once everything is working then set up your equipment, brew a beer and create a ‘Beer Profile’. Click on that tab, then on the ‘+ New’ to set up a profile. In the first line set the first day to ‘0’ and your required starting temp (e.g. 65). Say you want that temp for four days, the next line would say 4 & 65. After that you the temp to gradually rise to 68 over 3 days, the next line would say 7 & 68. In the final line you can leave the temp field open, BrewPi will take that last temp used (from the last but one line). BTW if you don’t put the second lone (4 & 65) to hold the temp at 65, the temp would slowly rise from 65 to 68 over 7 days. Of course, if that is what you want, you could do it that way too. Save the profile for future use and then click on ‘Apply’ (BTW, Elco calls it beer profile, but I usually name my profiles after the yeast being used).
Finally you will want to log you temperatures and get the pretty graph. Go the the top where is usually says ‘My First Beer’, click on it, you will get the option to create a new beer. Type in the name of your beer and save and the logging will start.
Sample below, remember, mine looks slightly different because of the Tilt hydrometer logging (a match made in heaven BTW)
Feel free to contact me if you have more questions, this forum is a great place, lots of friendly and knowledgeable people, many far more experienced that I am.
Stefan
You are not doing anything wrong, the way BrewPi works you have to set up a profile AND set up the logging. As mentioned in my other post, although Elco calls the temperature control a beer profile, I usually name it after the yeast. After all you can use the same yeast and profile for different beers.For the logging at the top I do use the beer name.
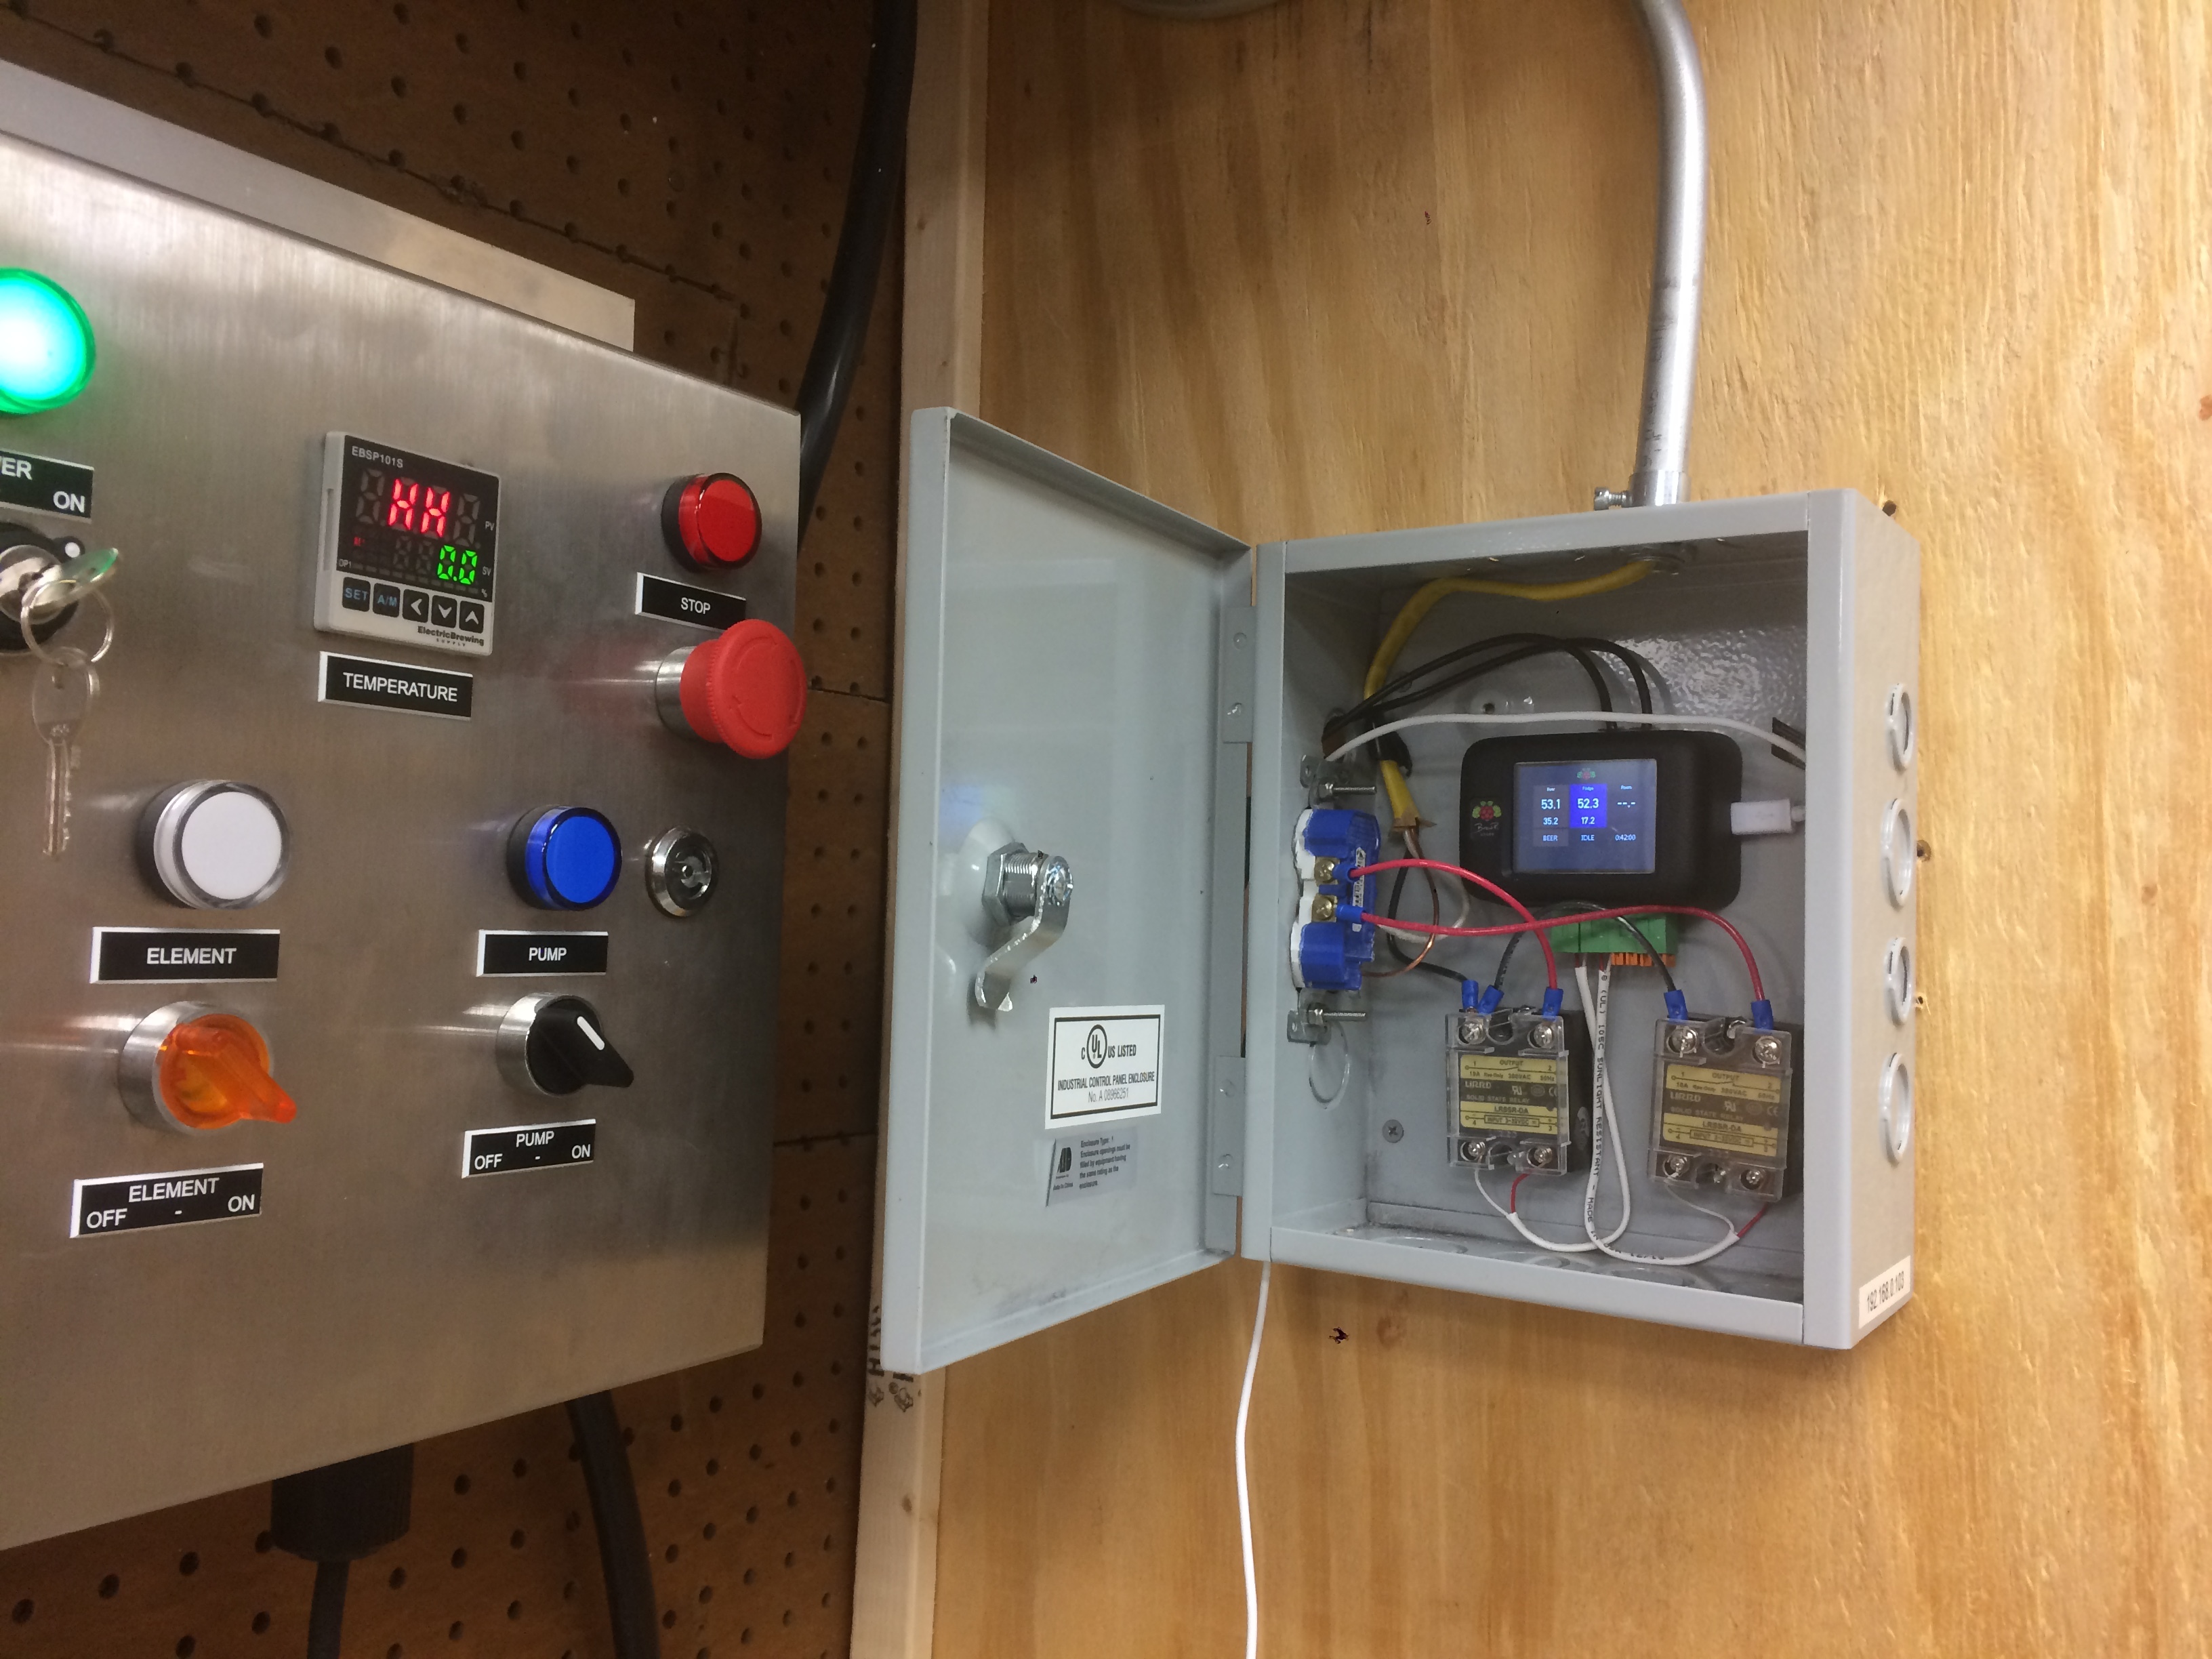
What I can’t figure out, is the wiring on the front of the Spark. There are four unmarked green and orange plugs. Does anyone have an explanation of this wiring to the relays?
You need 18 gauge wire for the spark to SSRs. If you look on the bottom of the spark, there is positive and negative marks for each plug location. Take the positive 18 g. wire from one SSR and push it into the round opening on the bottom of the orange plug. (No need to strip the wire) Take the negative and do the same. With a small screw driver push the orange part into the green part therefore securing the wires in place.
Then for the other SSR, just repeat the process but in a different plug location on the spark.
You’re welcome. I just built my setup the other day. It was pretty difficult to figure it all out at first, but I got it done. Just waiting for my heater to get here so I can get fermenting.
If you already have brewpi installed, you can simply clone the repo and skip to the very last instruction, “Tilt Hydrometer Setup”.
The code was only tested for a single tilt, but if you modify line 4 in the file tilt_install.sh to add the (space separated) list of tilt colors you own, it should create the appropriate TEMPERATURE and GRAVITY calibration files for each color tilt. You will have to add your calibration values manually to the calibration files.
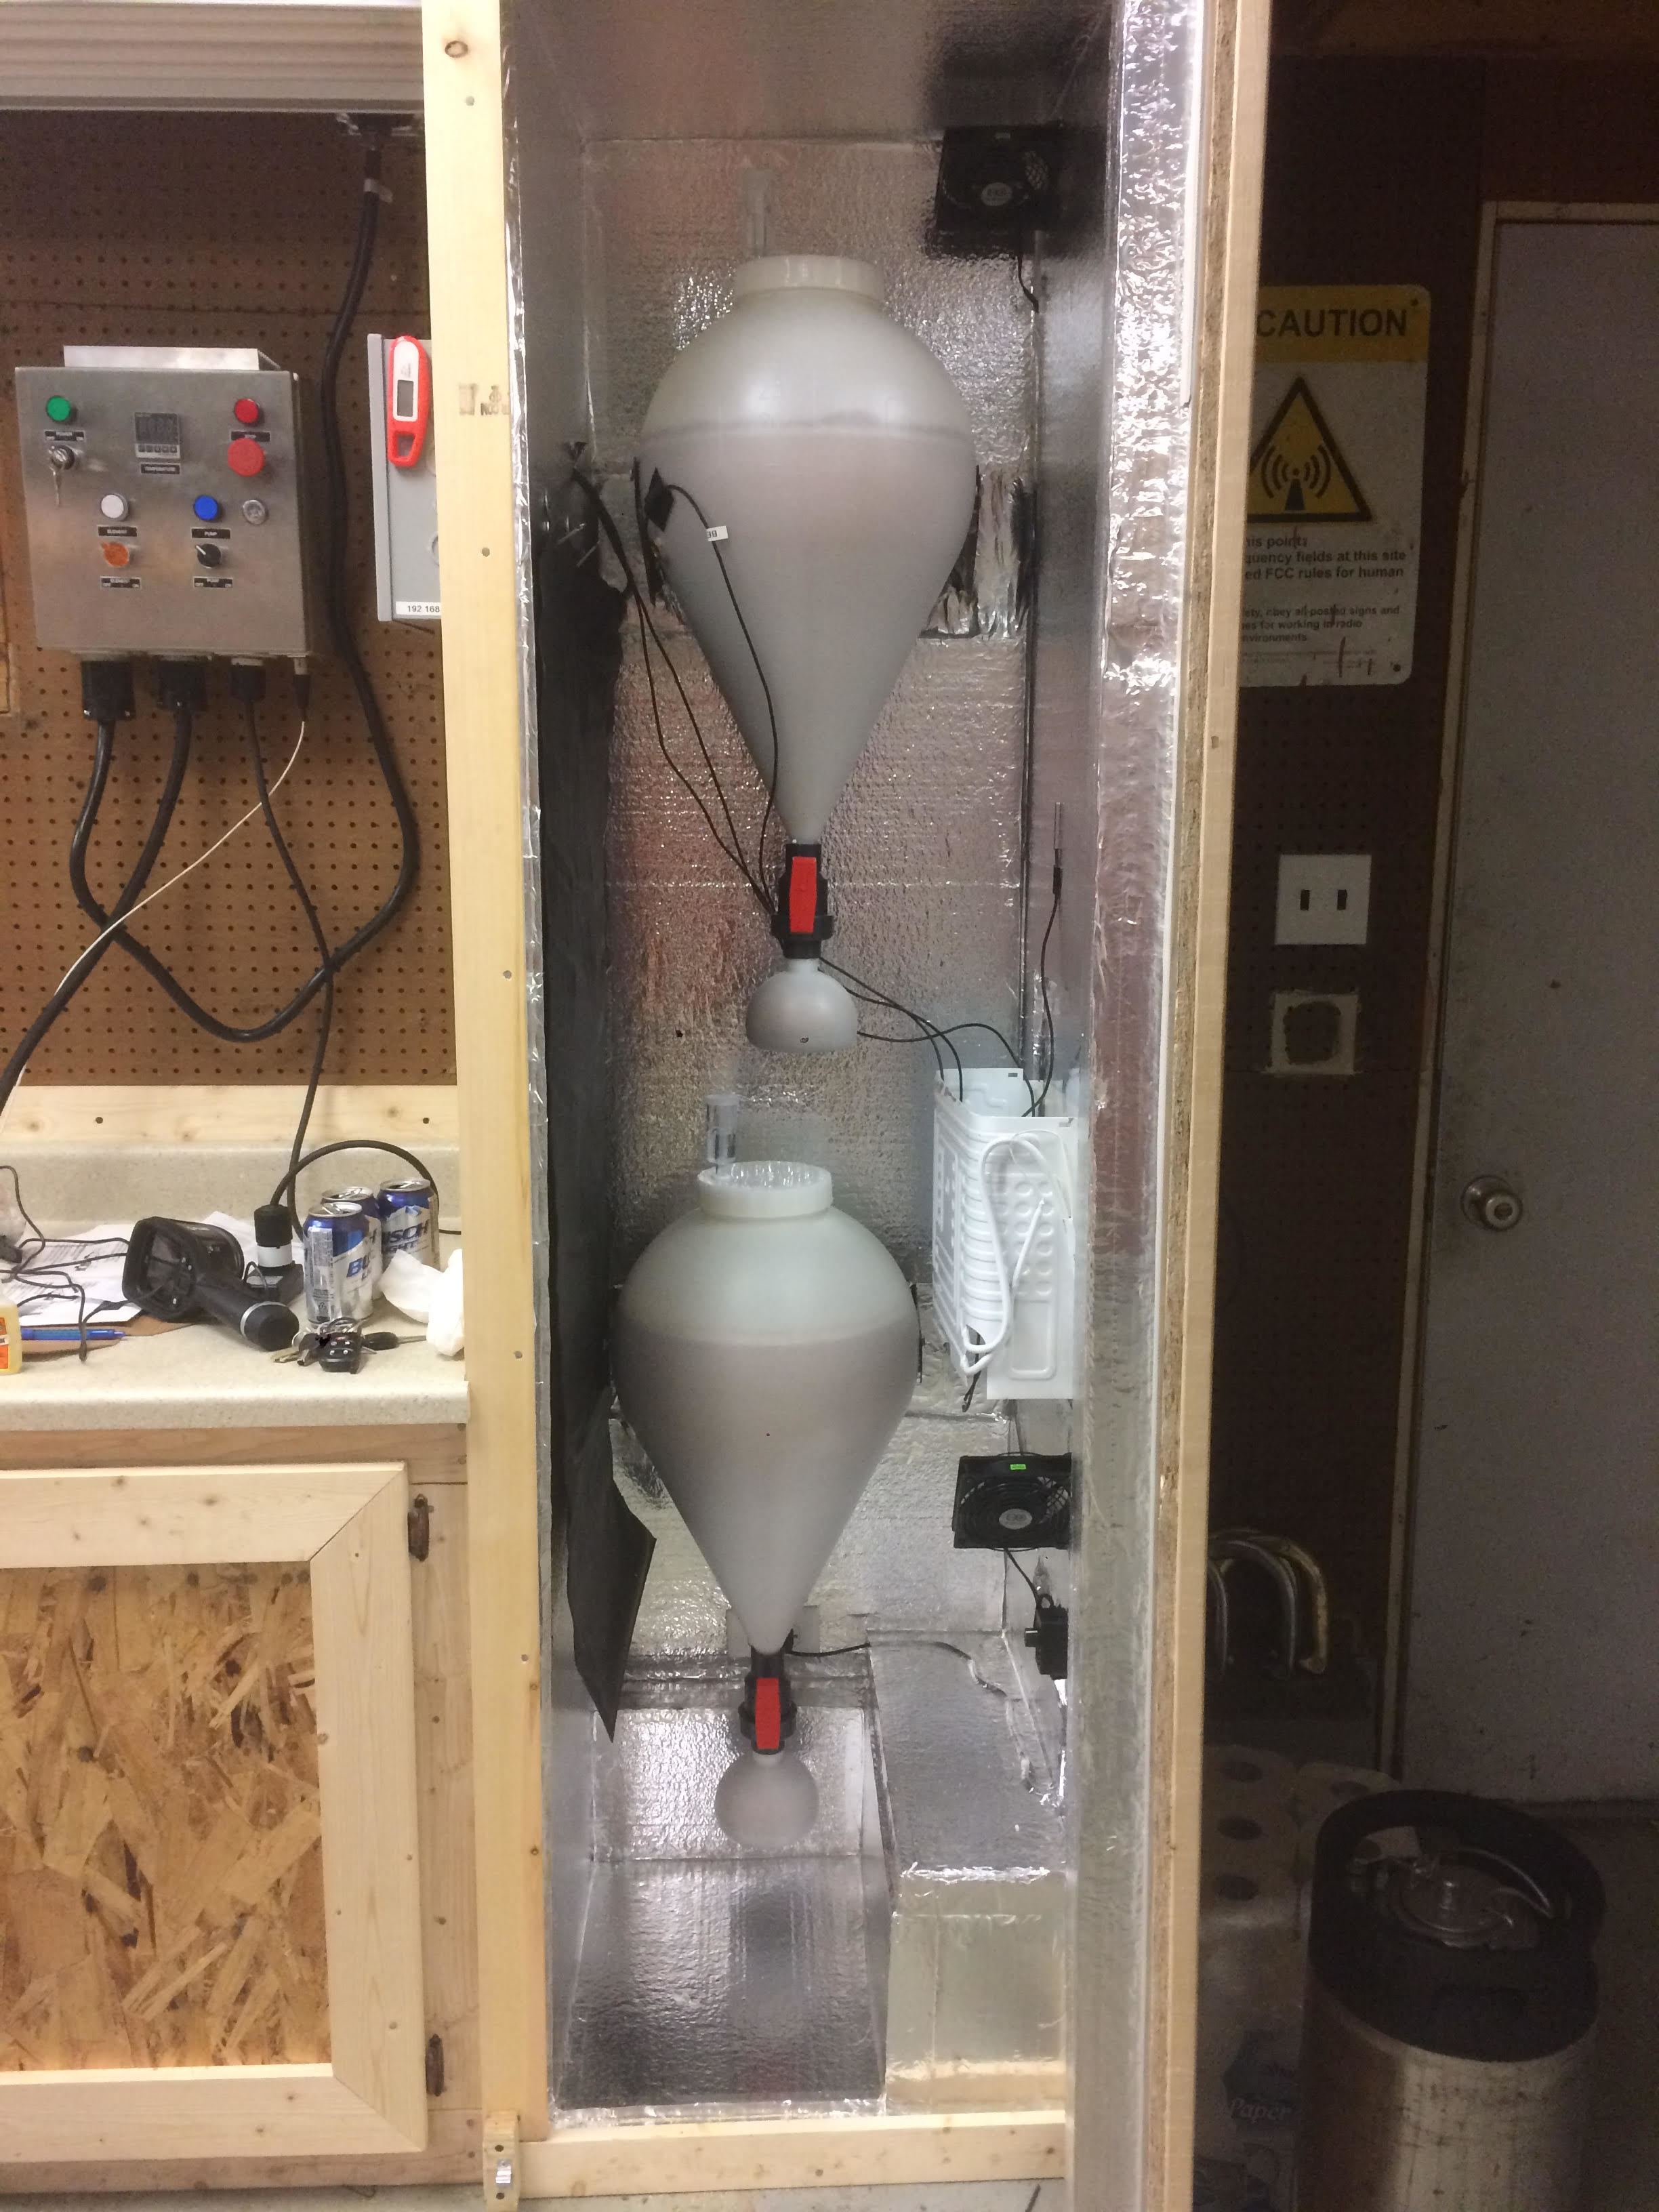
Awesome pictures by the way. Amazing setup. Thanks for posting!
I would like to add that the instructions above work great. BUT…
“Turns out that the new code doesn’t like to see the old data. You need to start a new brew making sure to name it something that you haven’t already brewed. Then everything should start showing up.”
Andylytical, thank you for your time setting up all that great code to do the legwork for us. Much appreciated. Maybe you could add one last instruction to start a new batch?
@RK9251 You’re welcome and thanks for the comments and feedback. It’s good to hear that the scripts were useful to someone else. I added the suggested changes to the README.
Cheers!