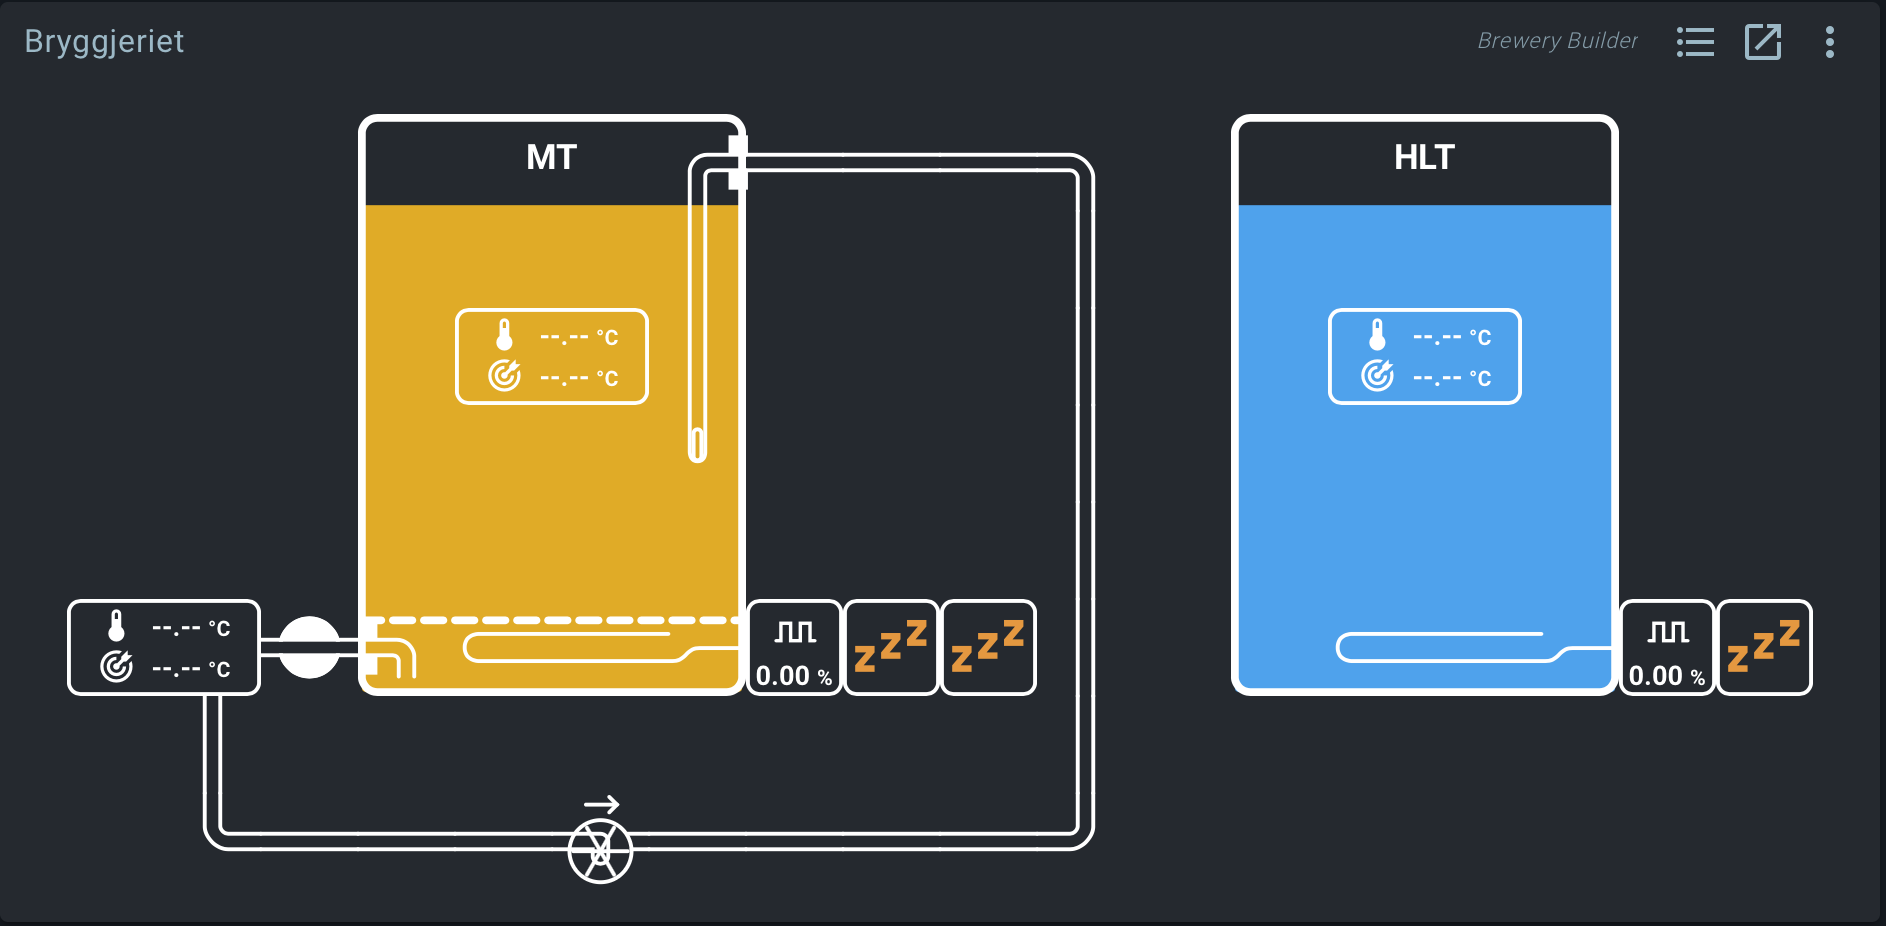
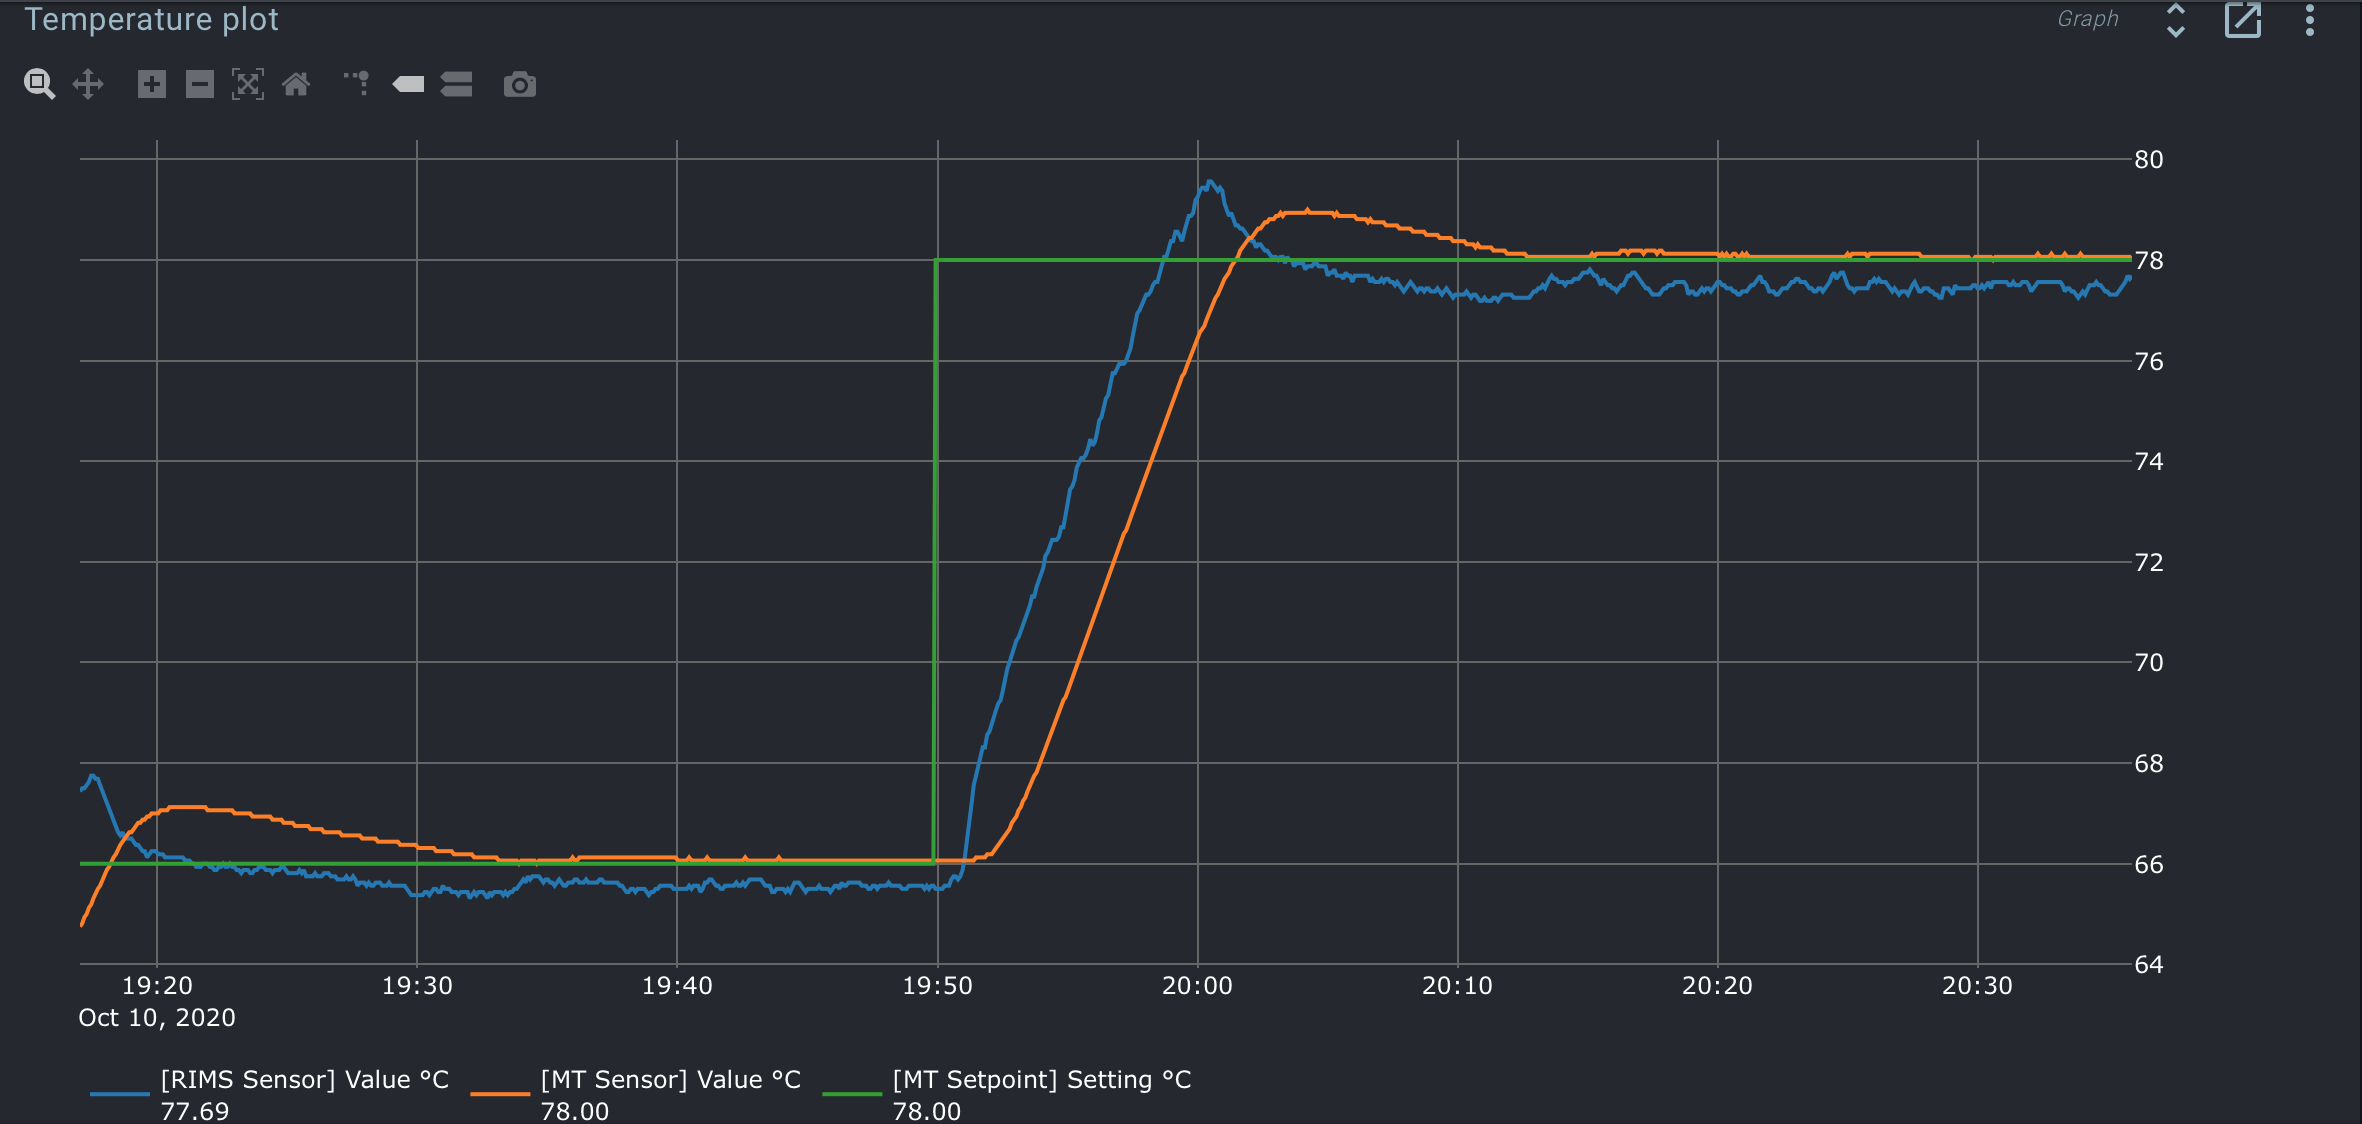
I’m very happy to finally have my mashing system operational and last night I did a test run with water and some towels covering the false bottom of my mash tun (simulating a grain bed).
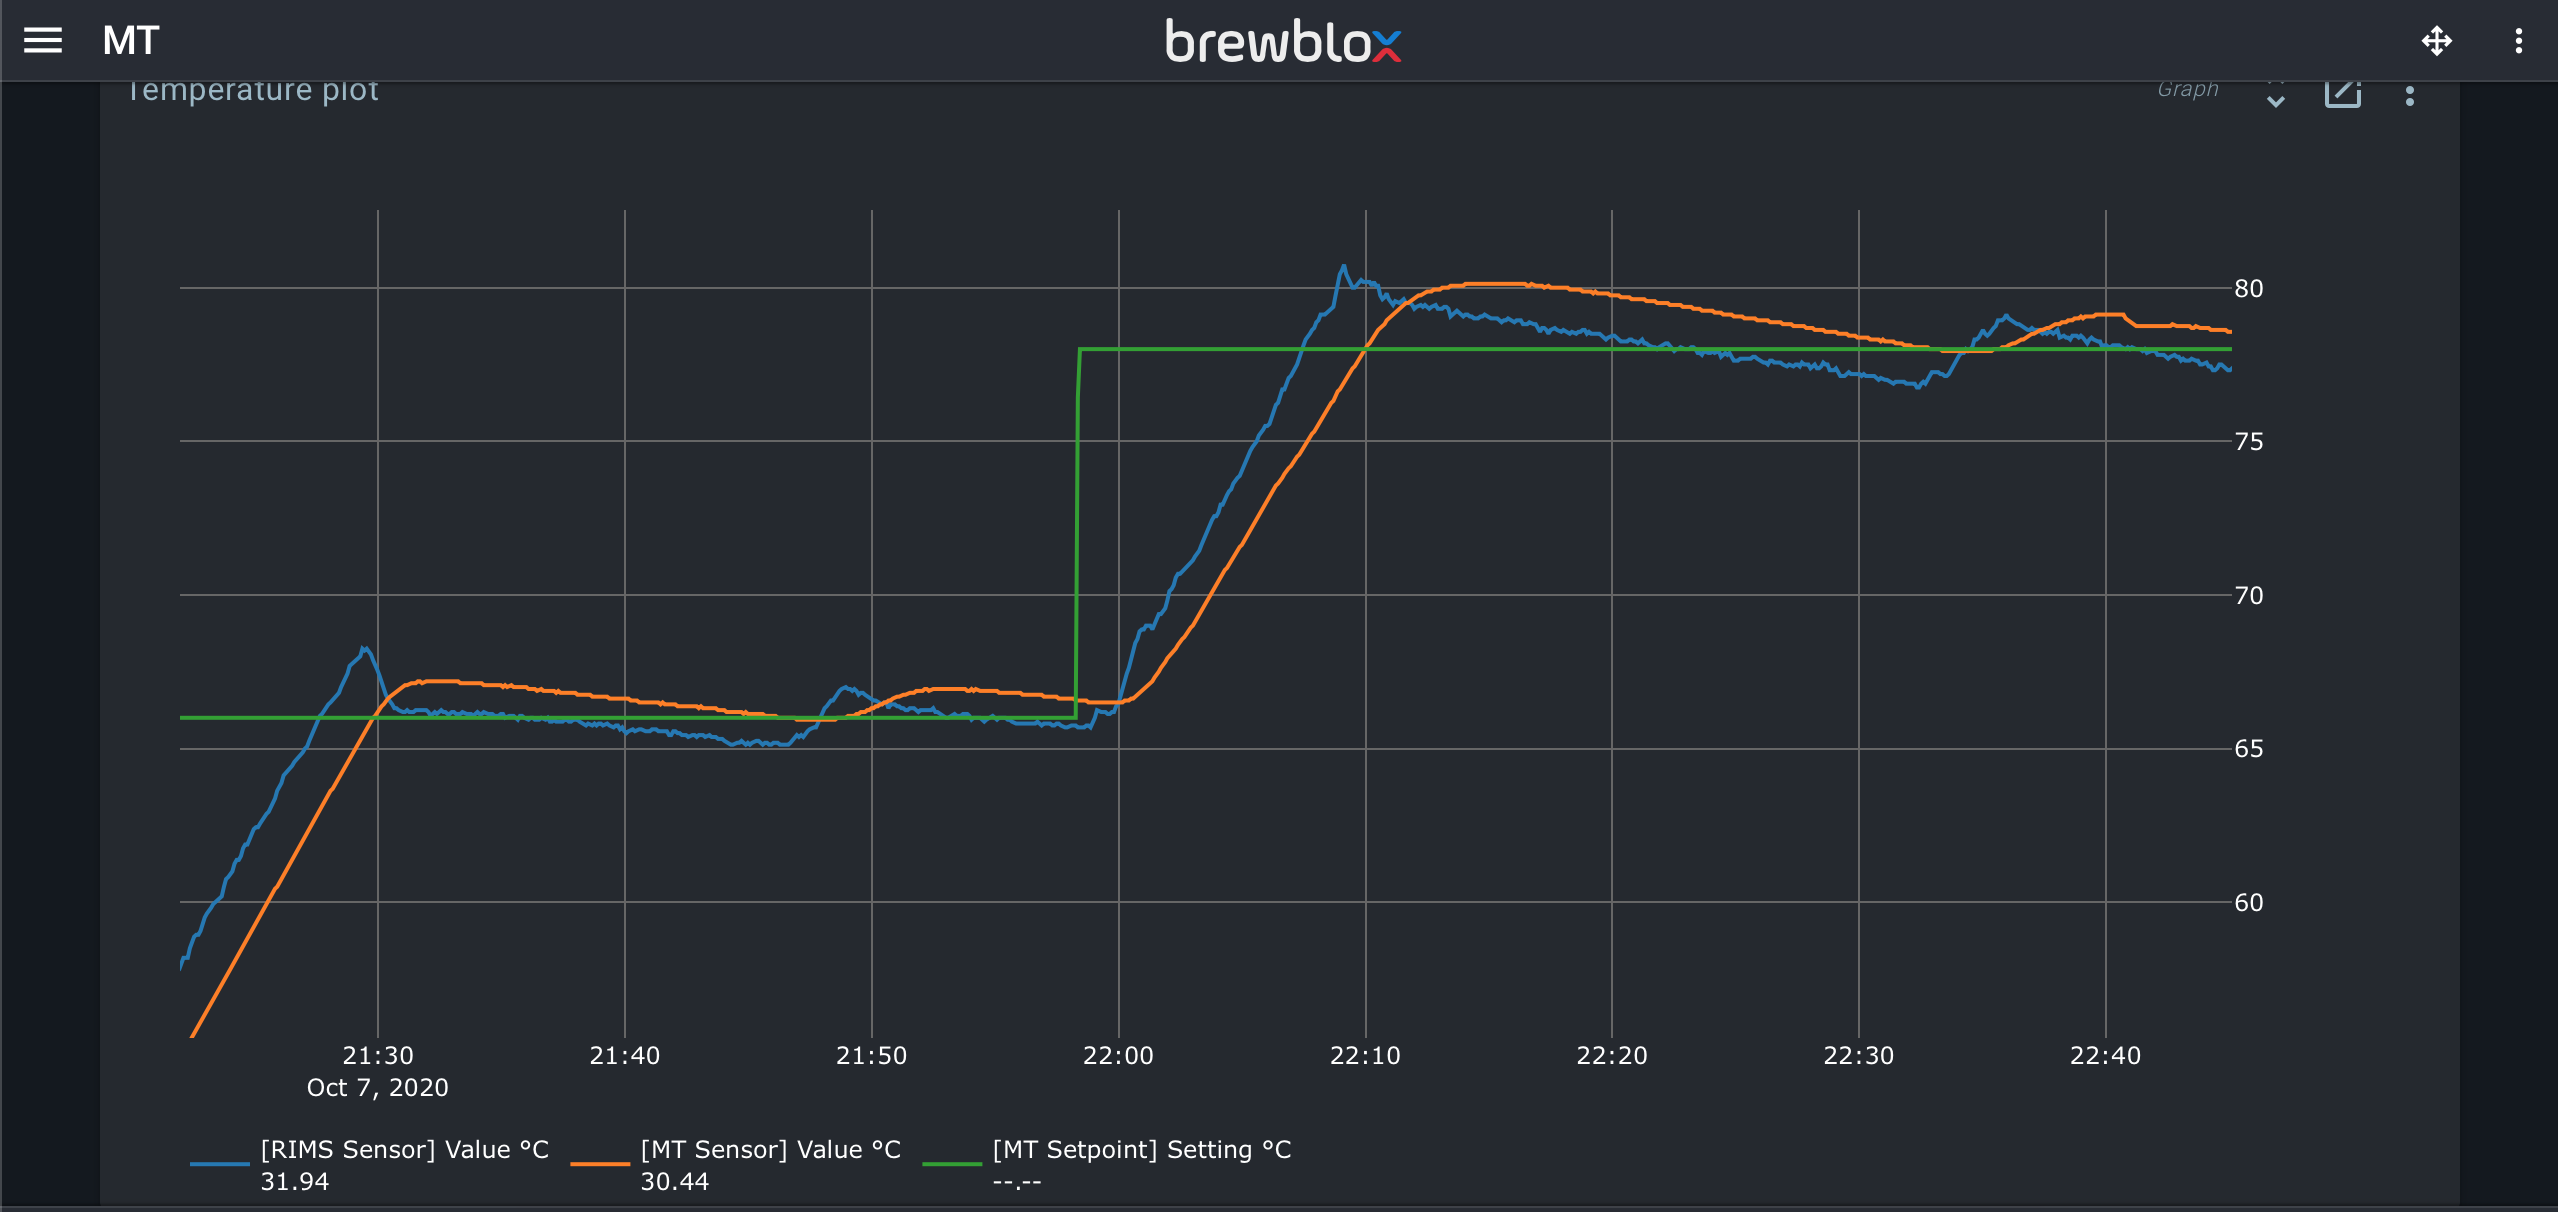
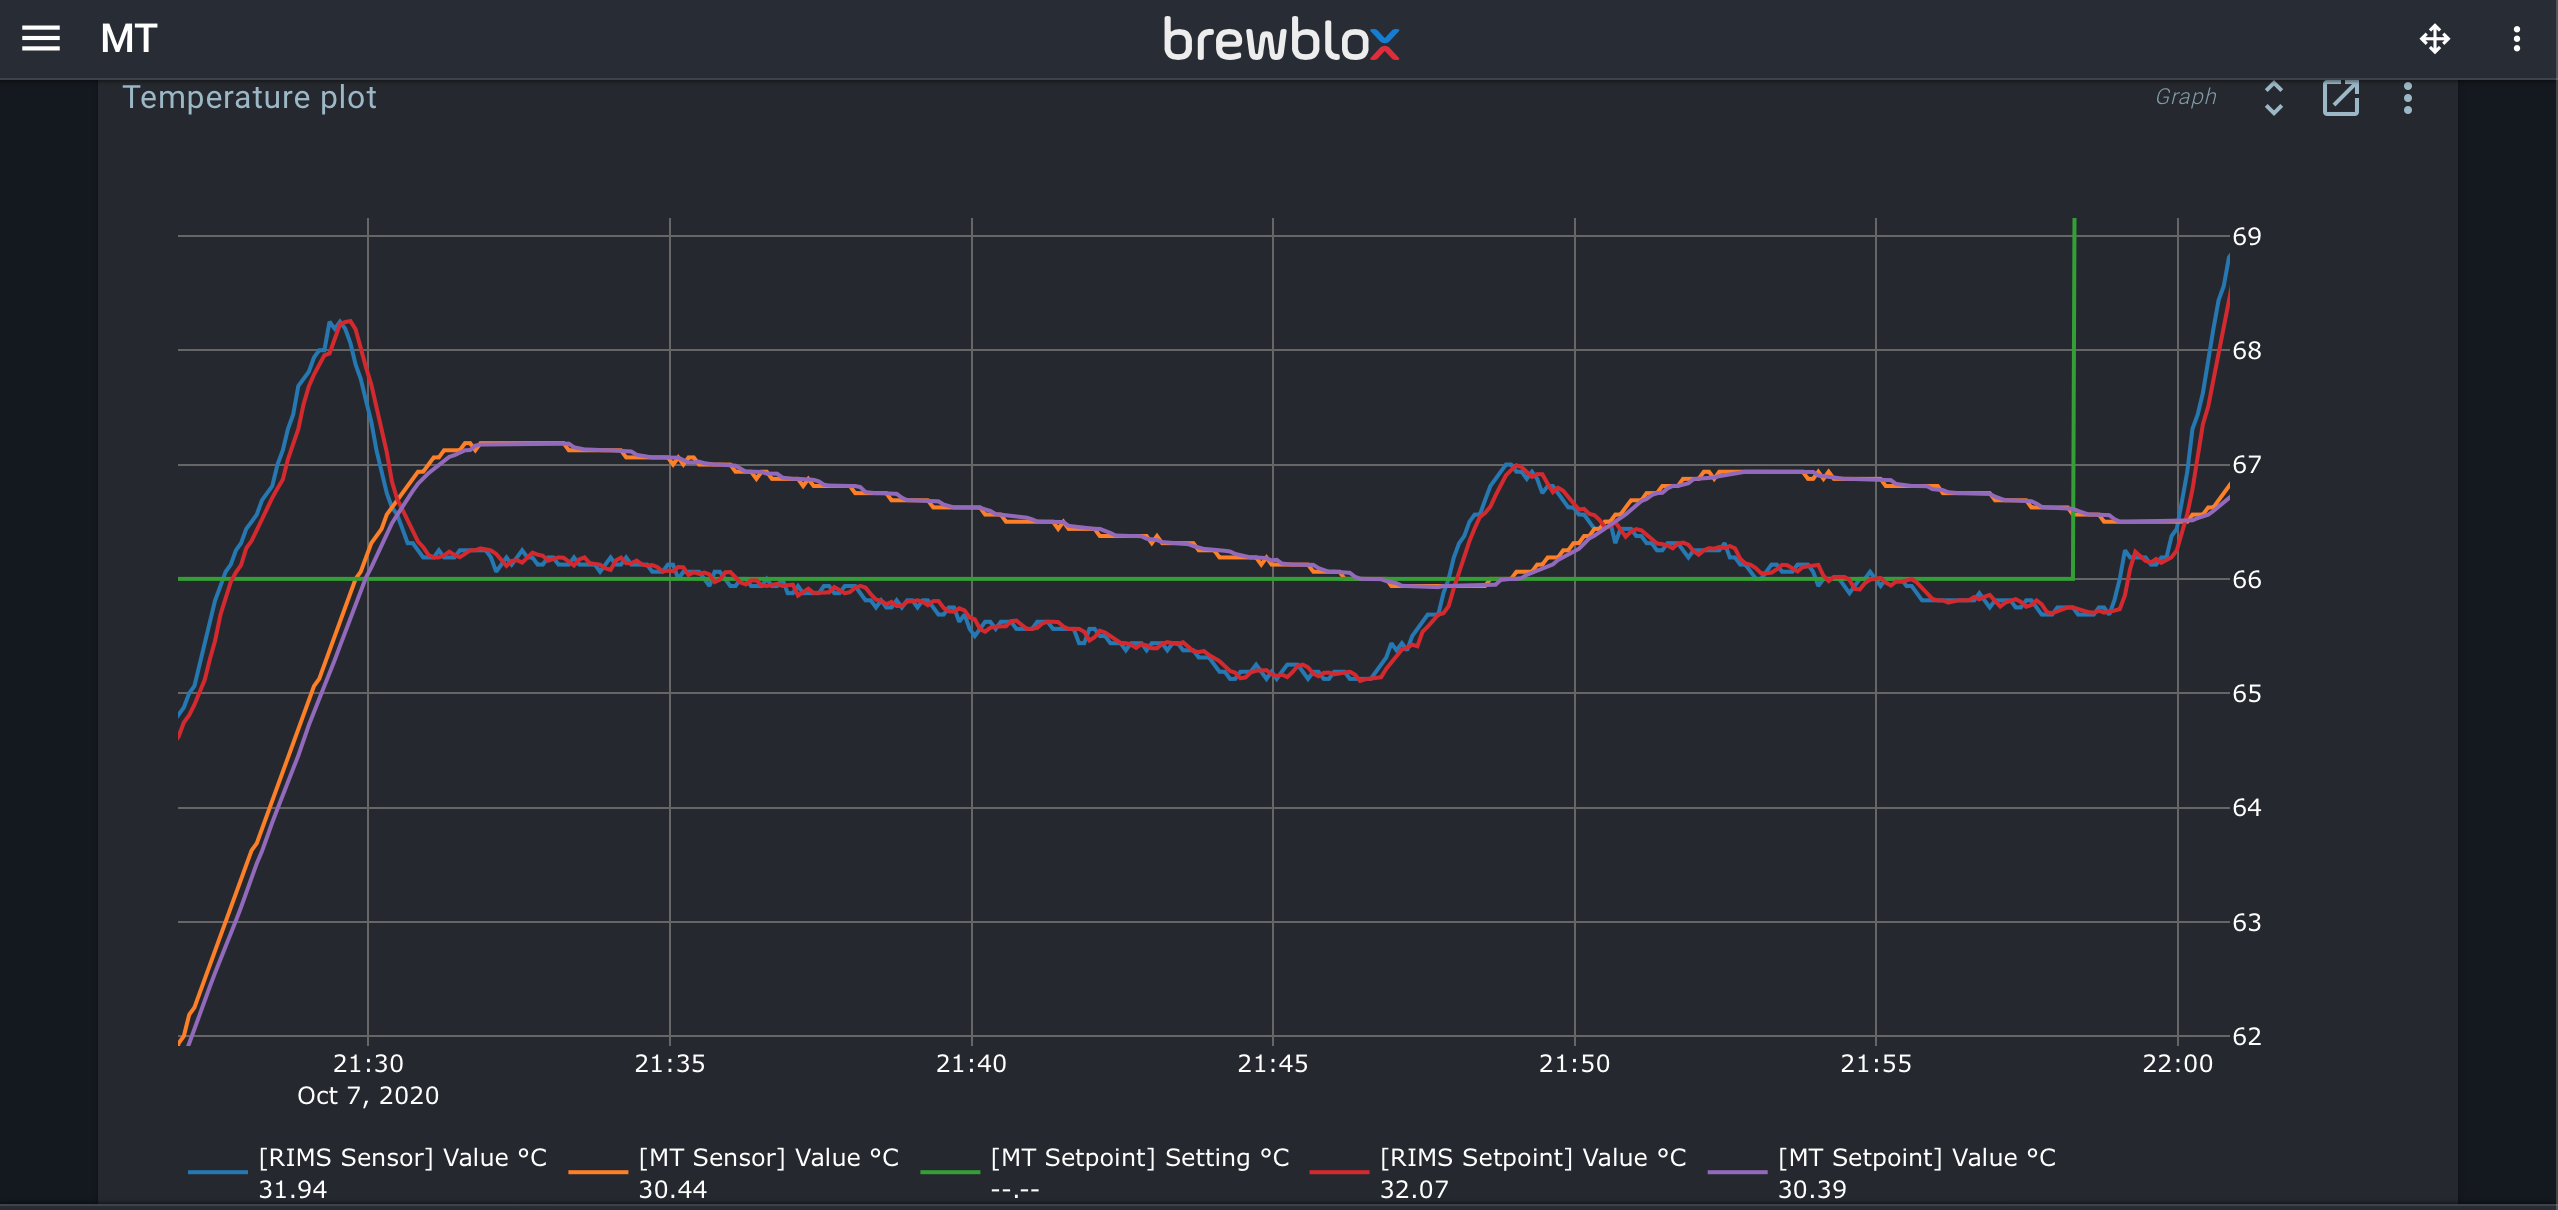
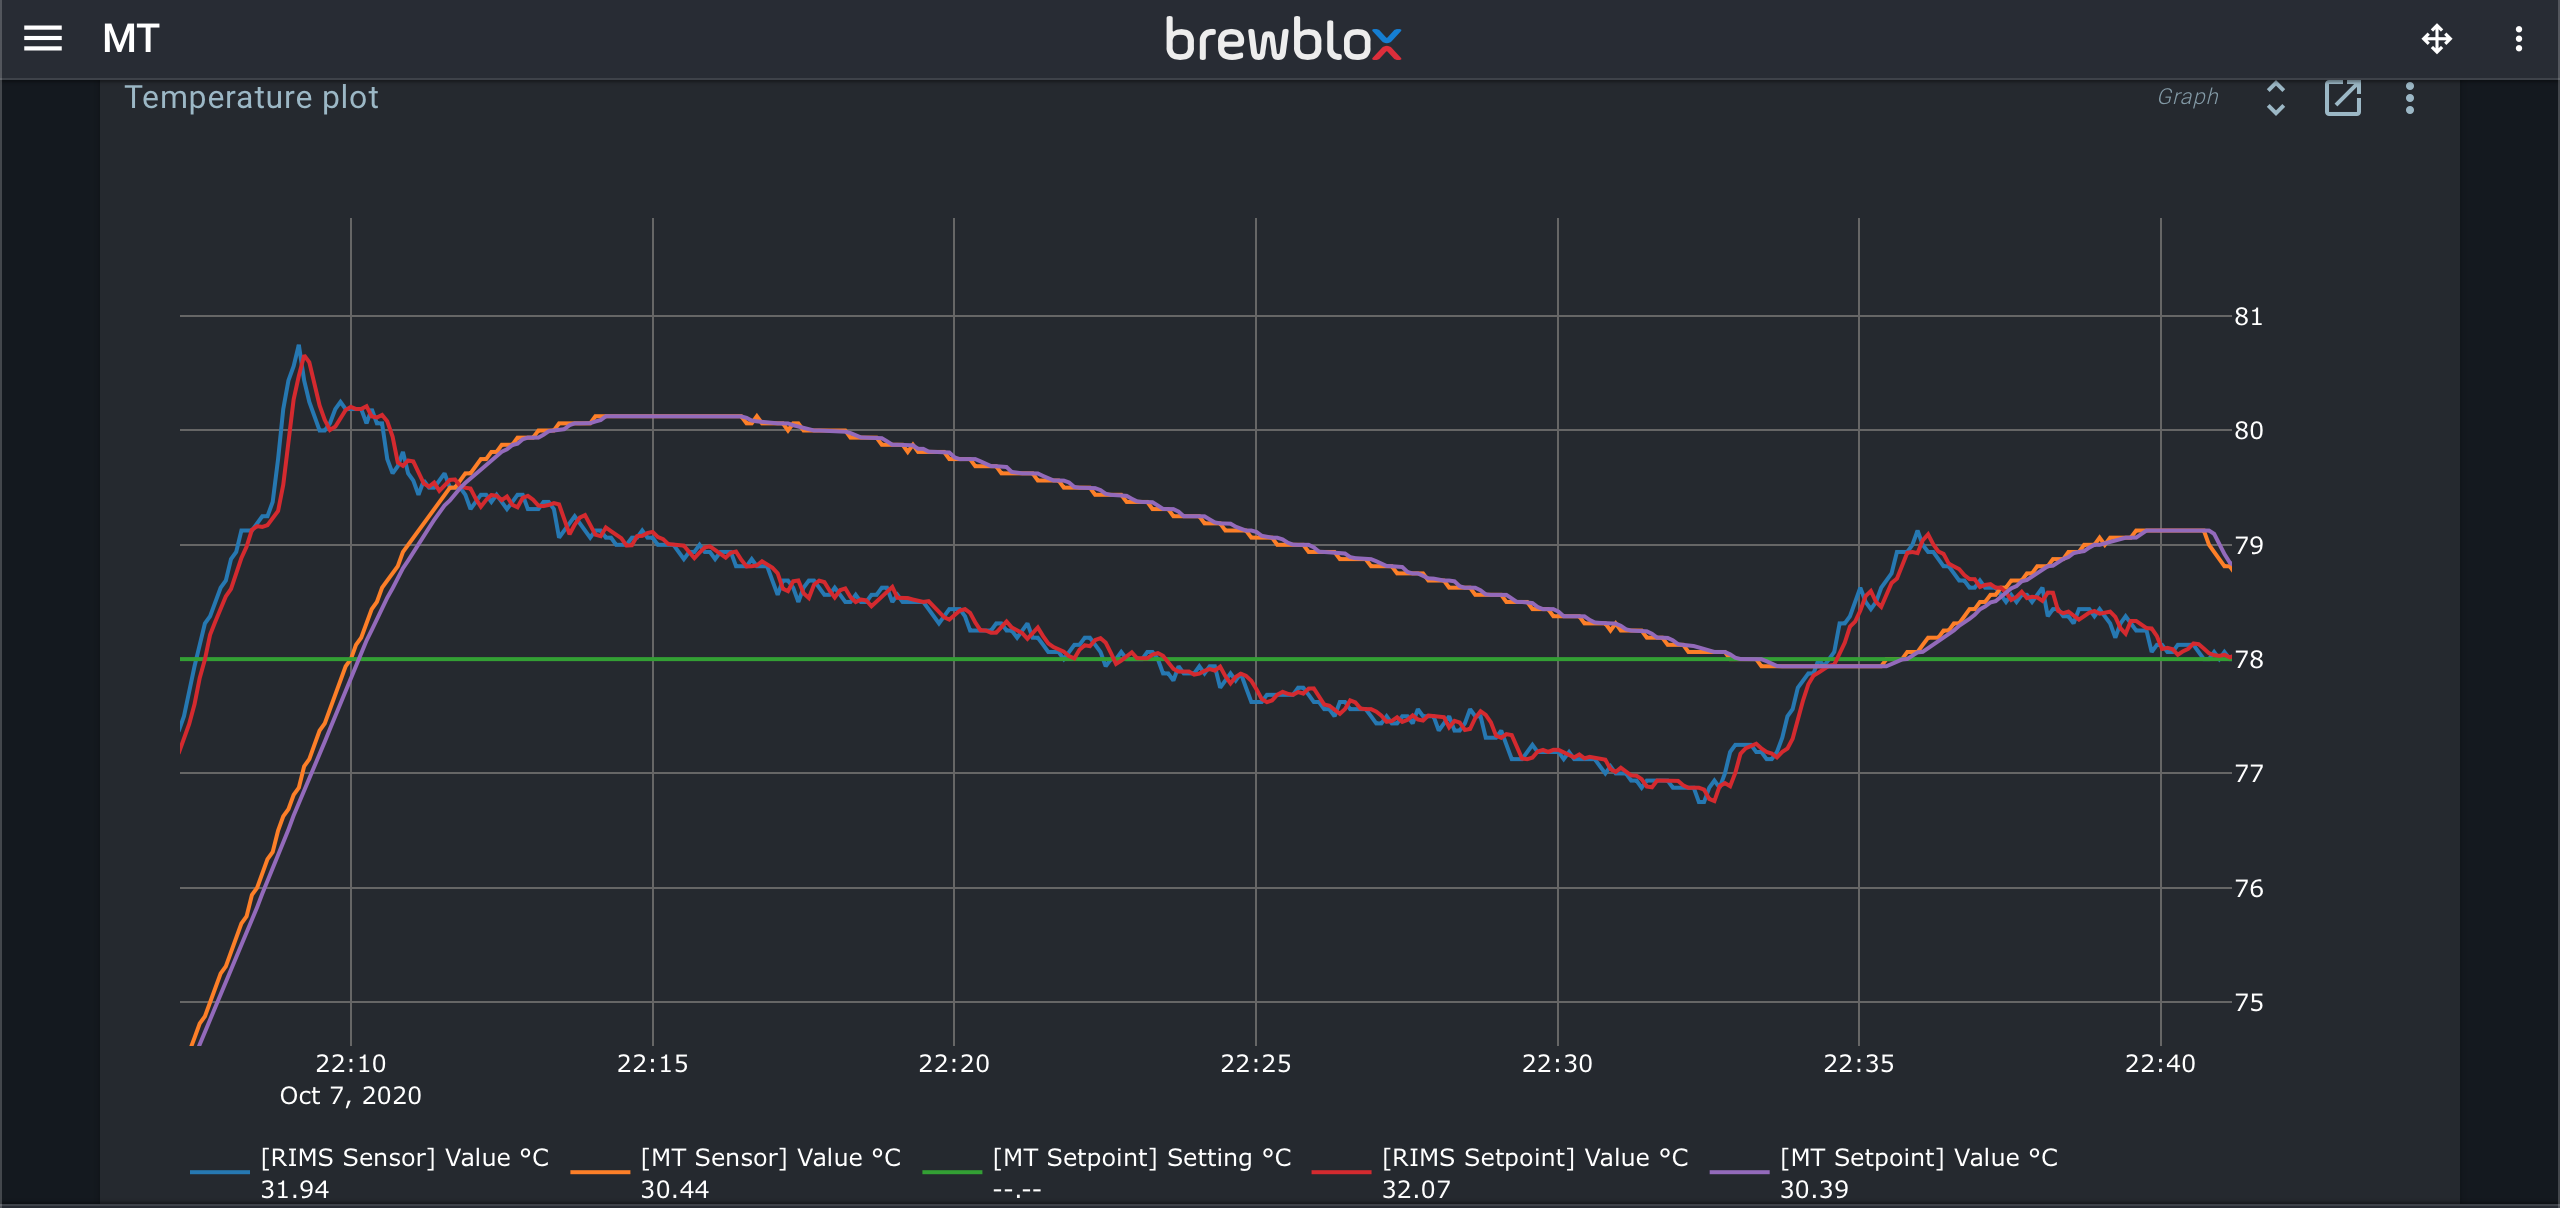
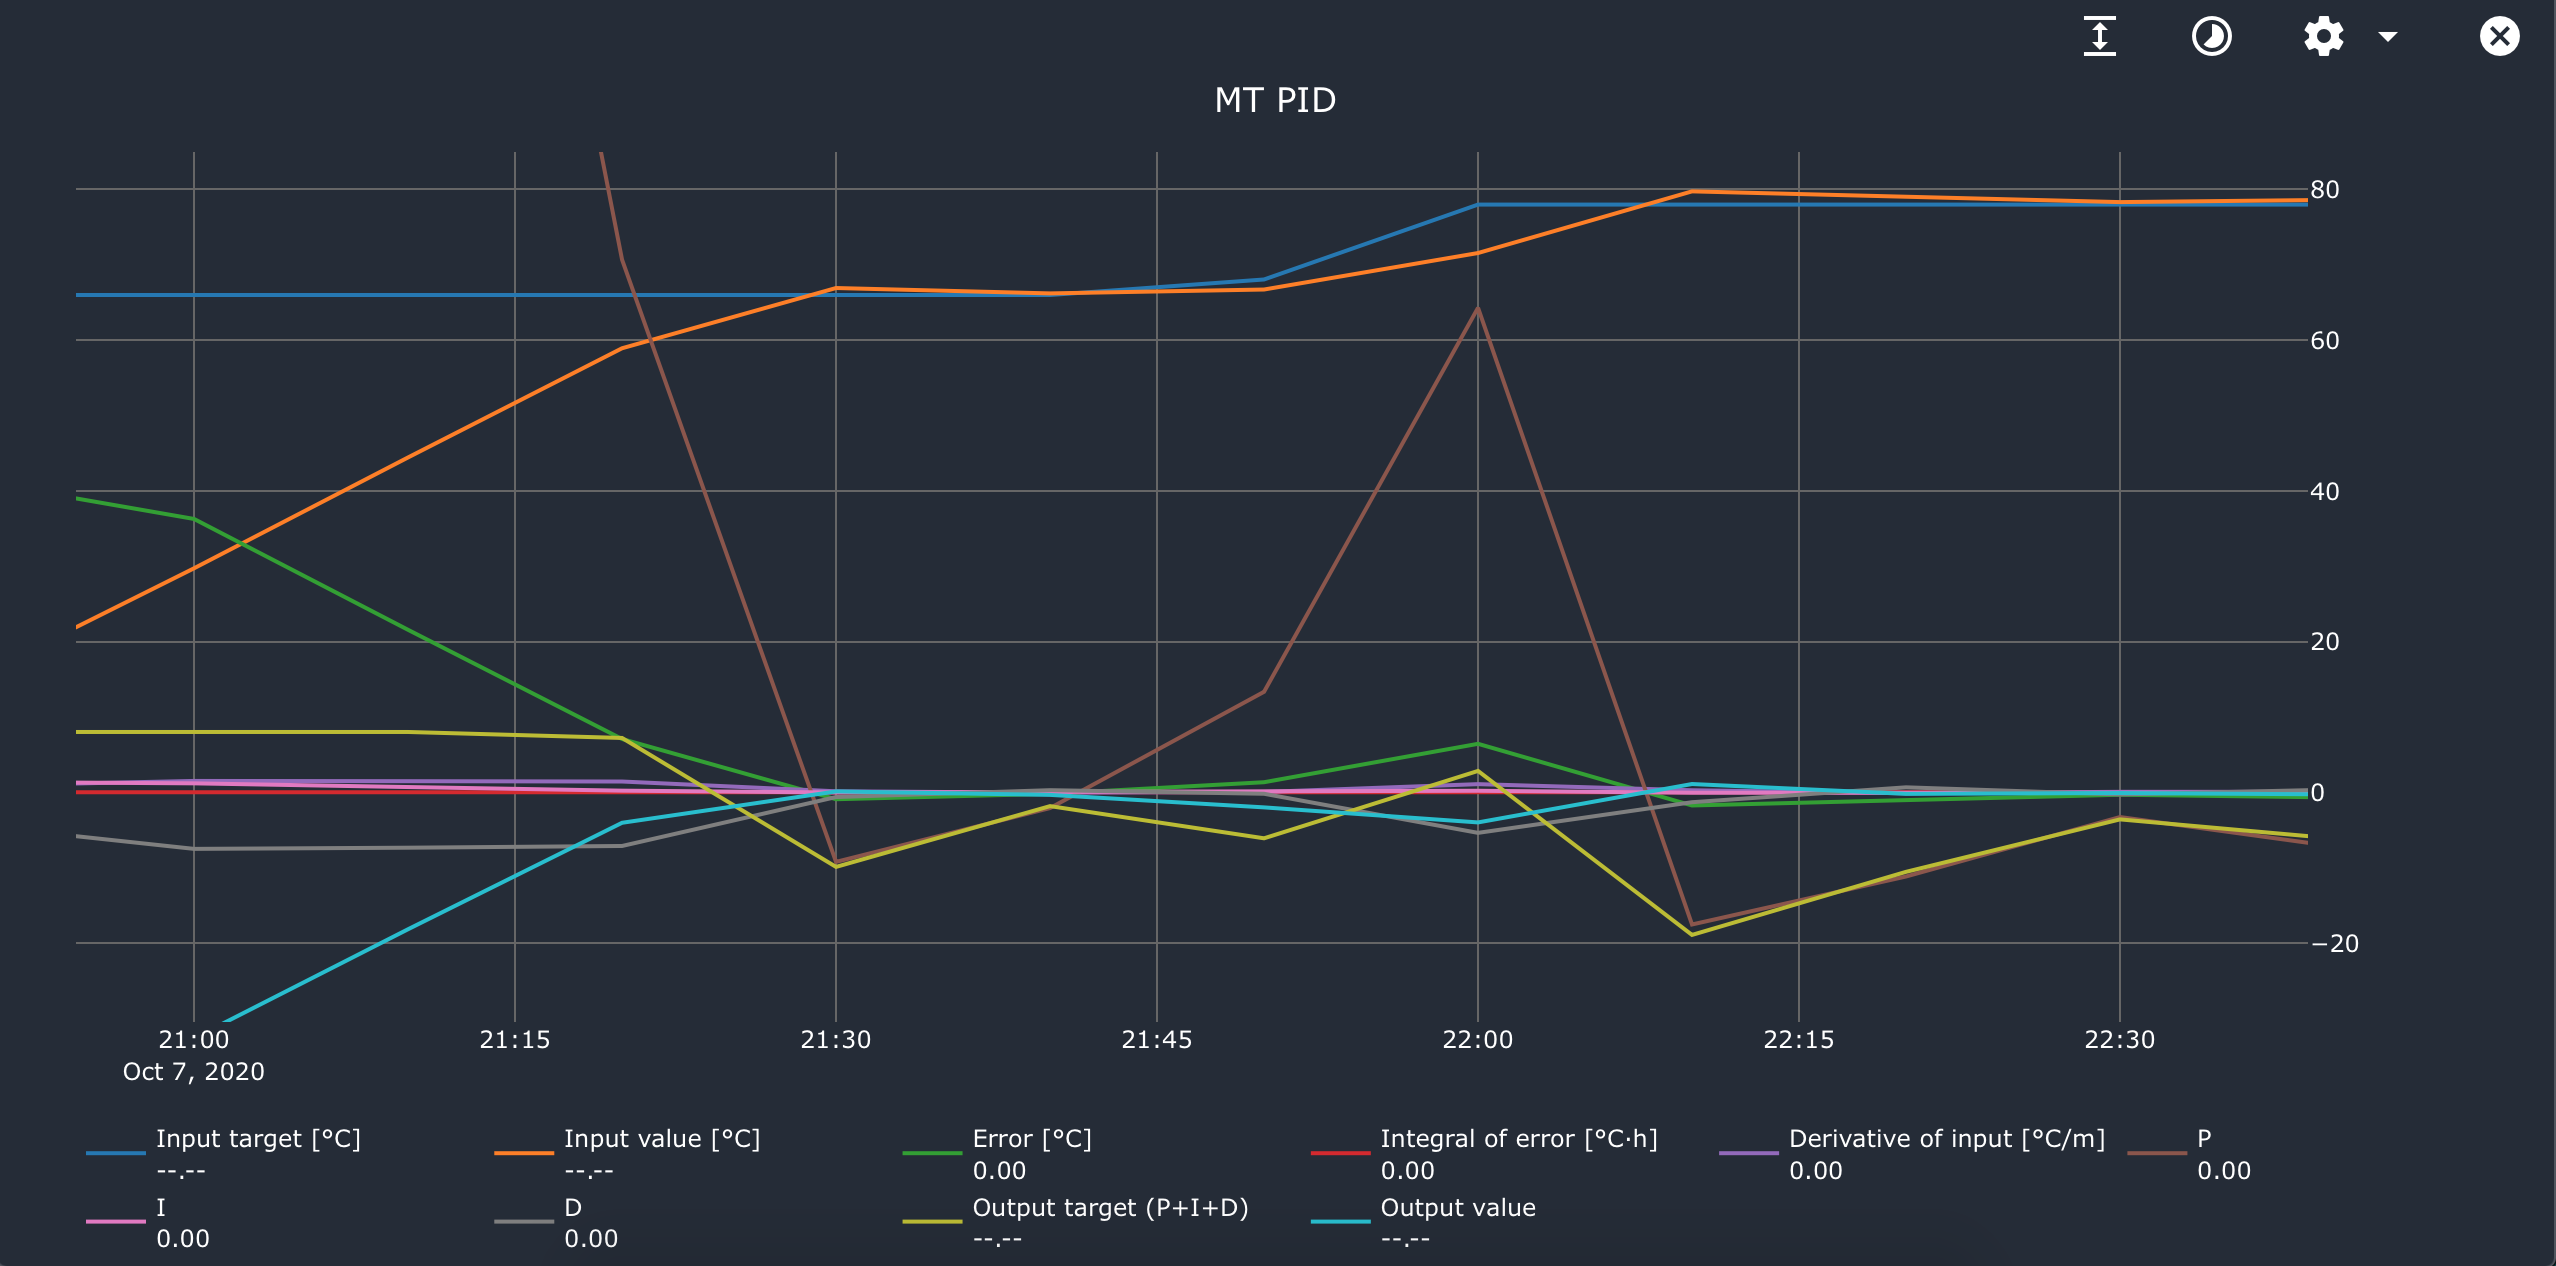
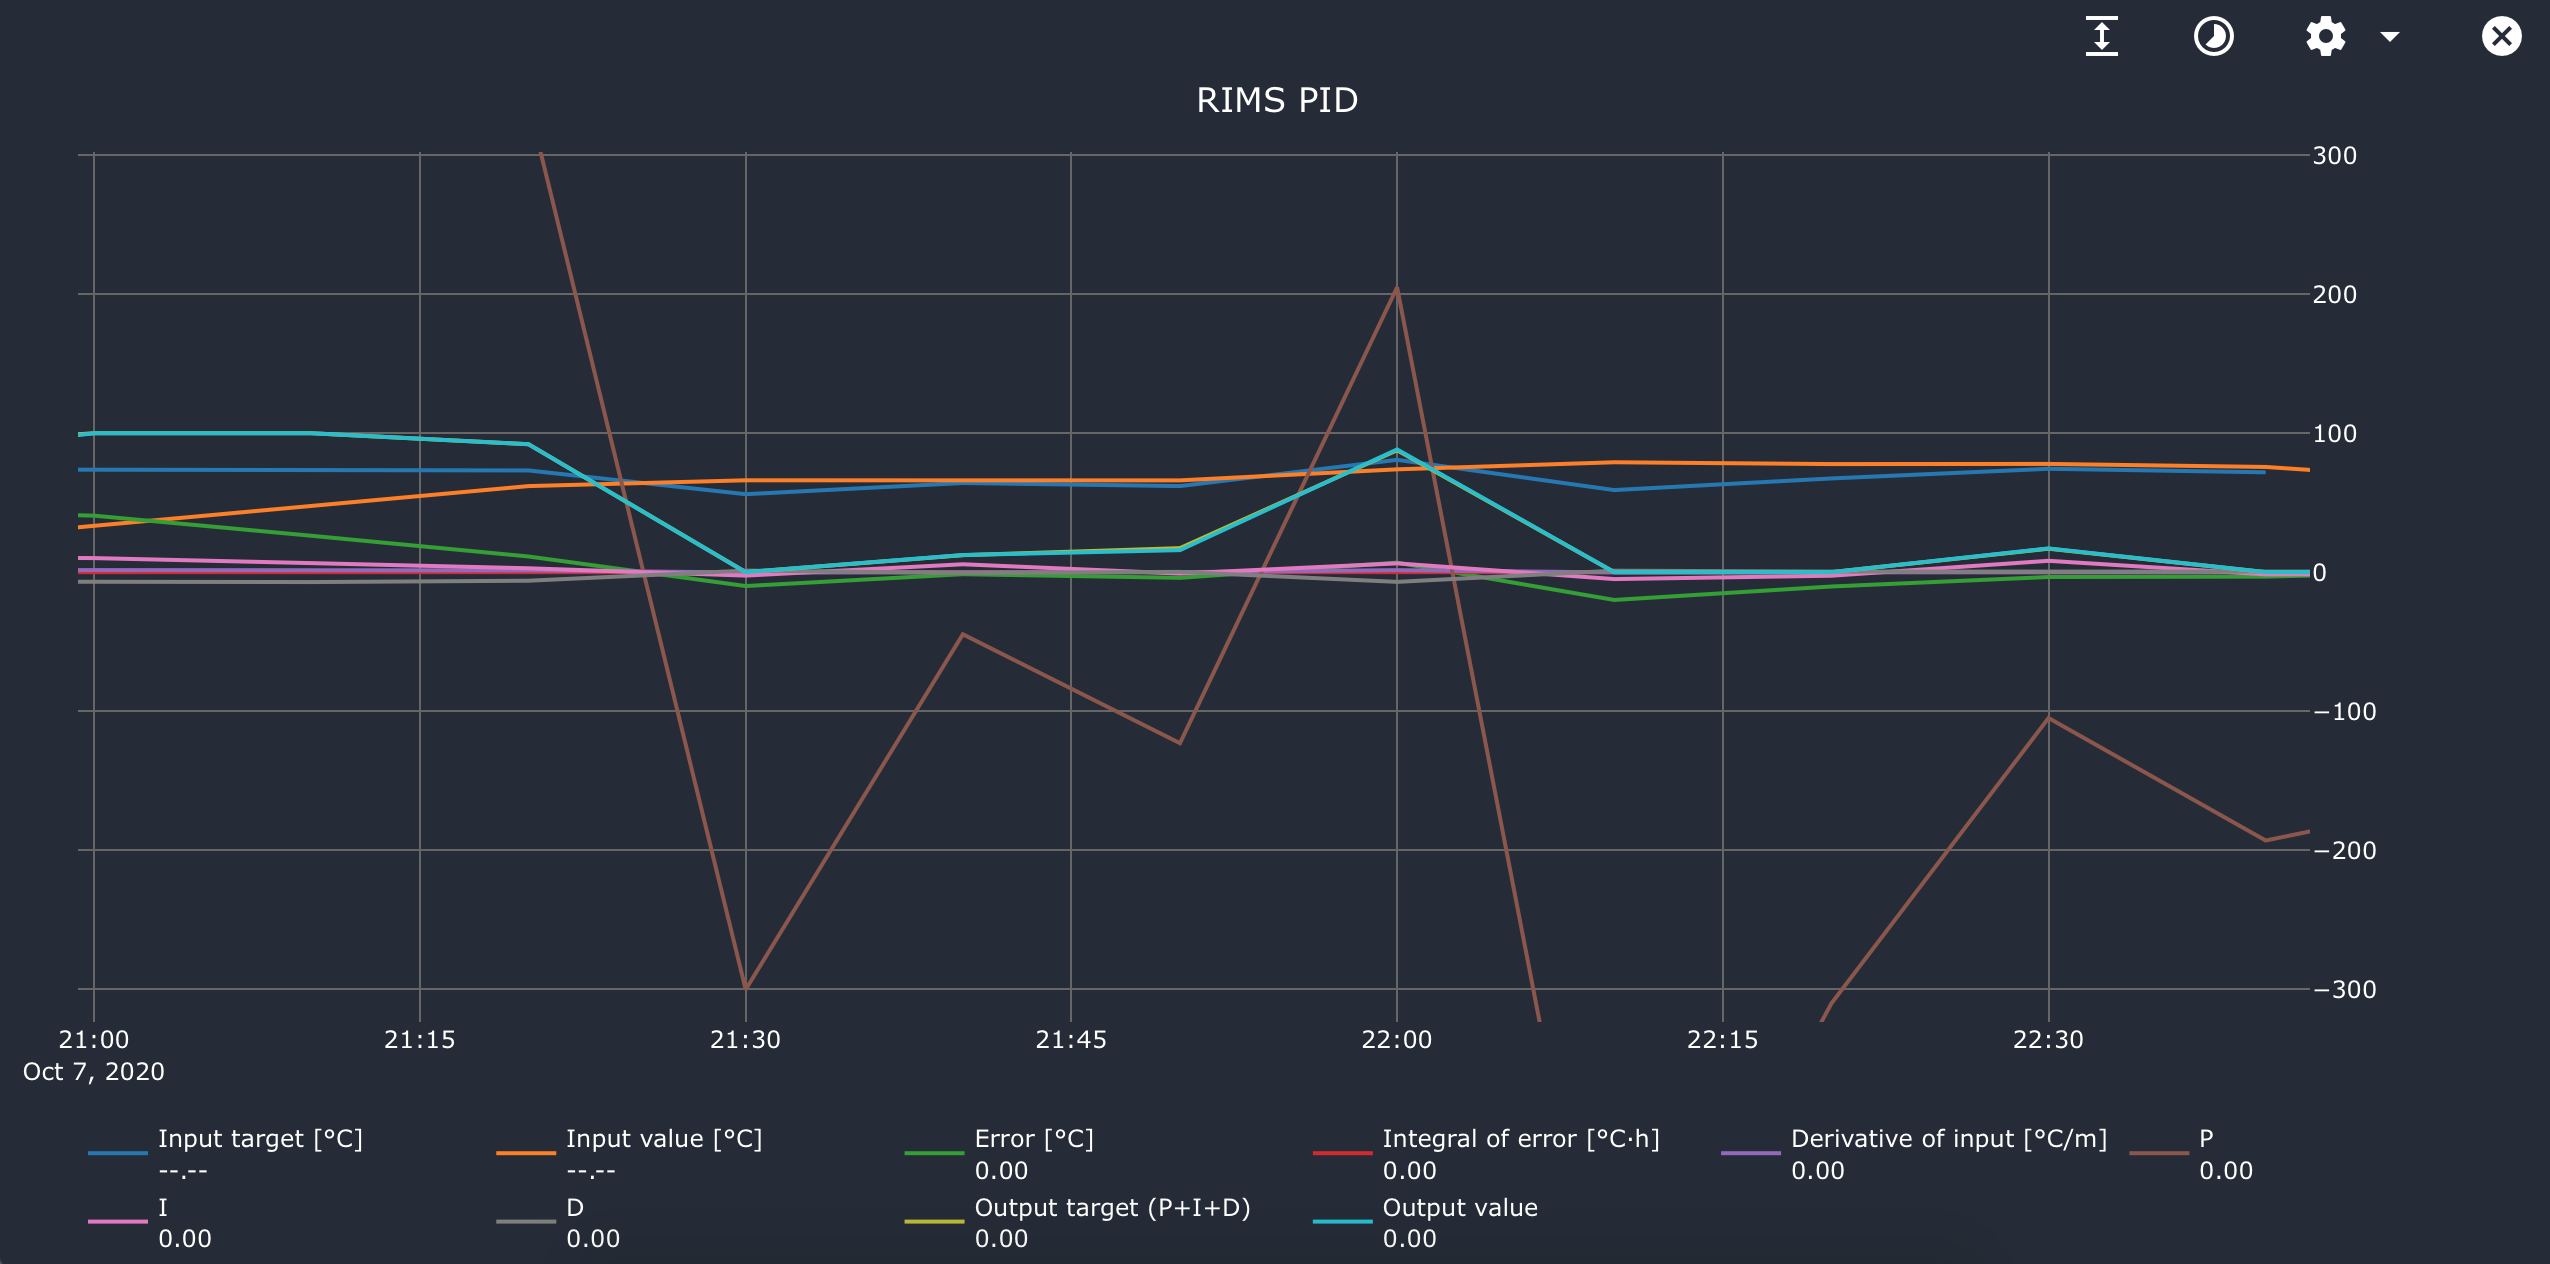
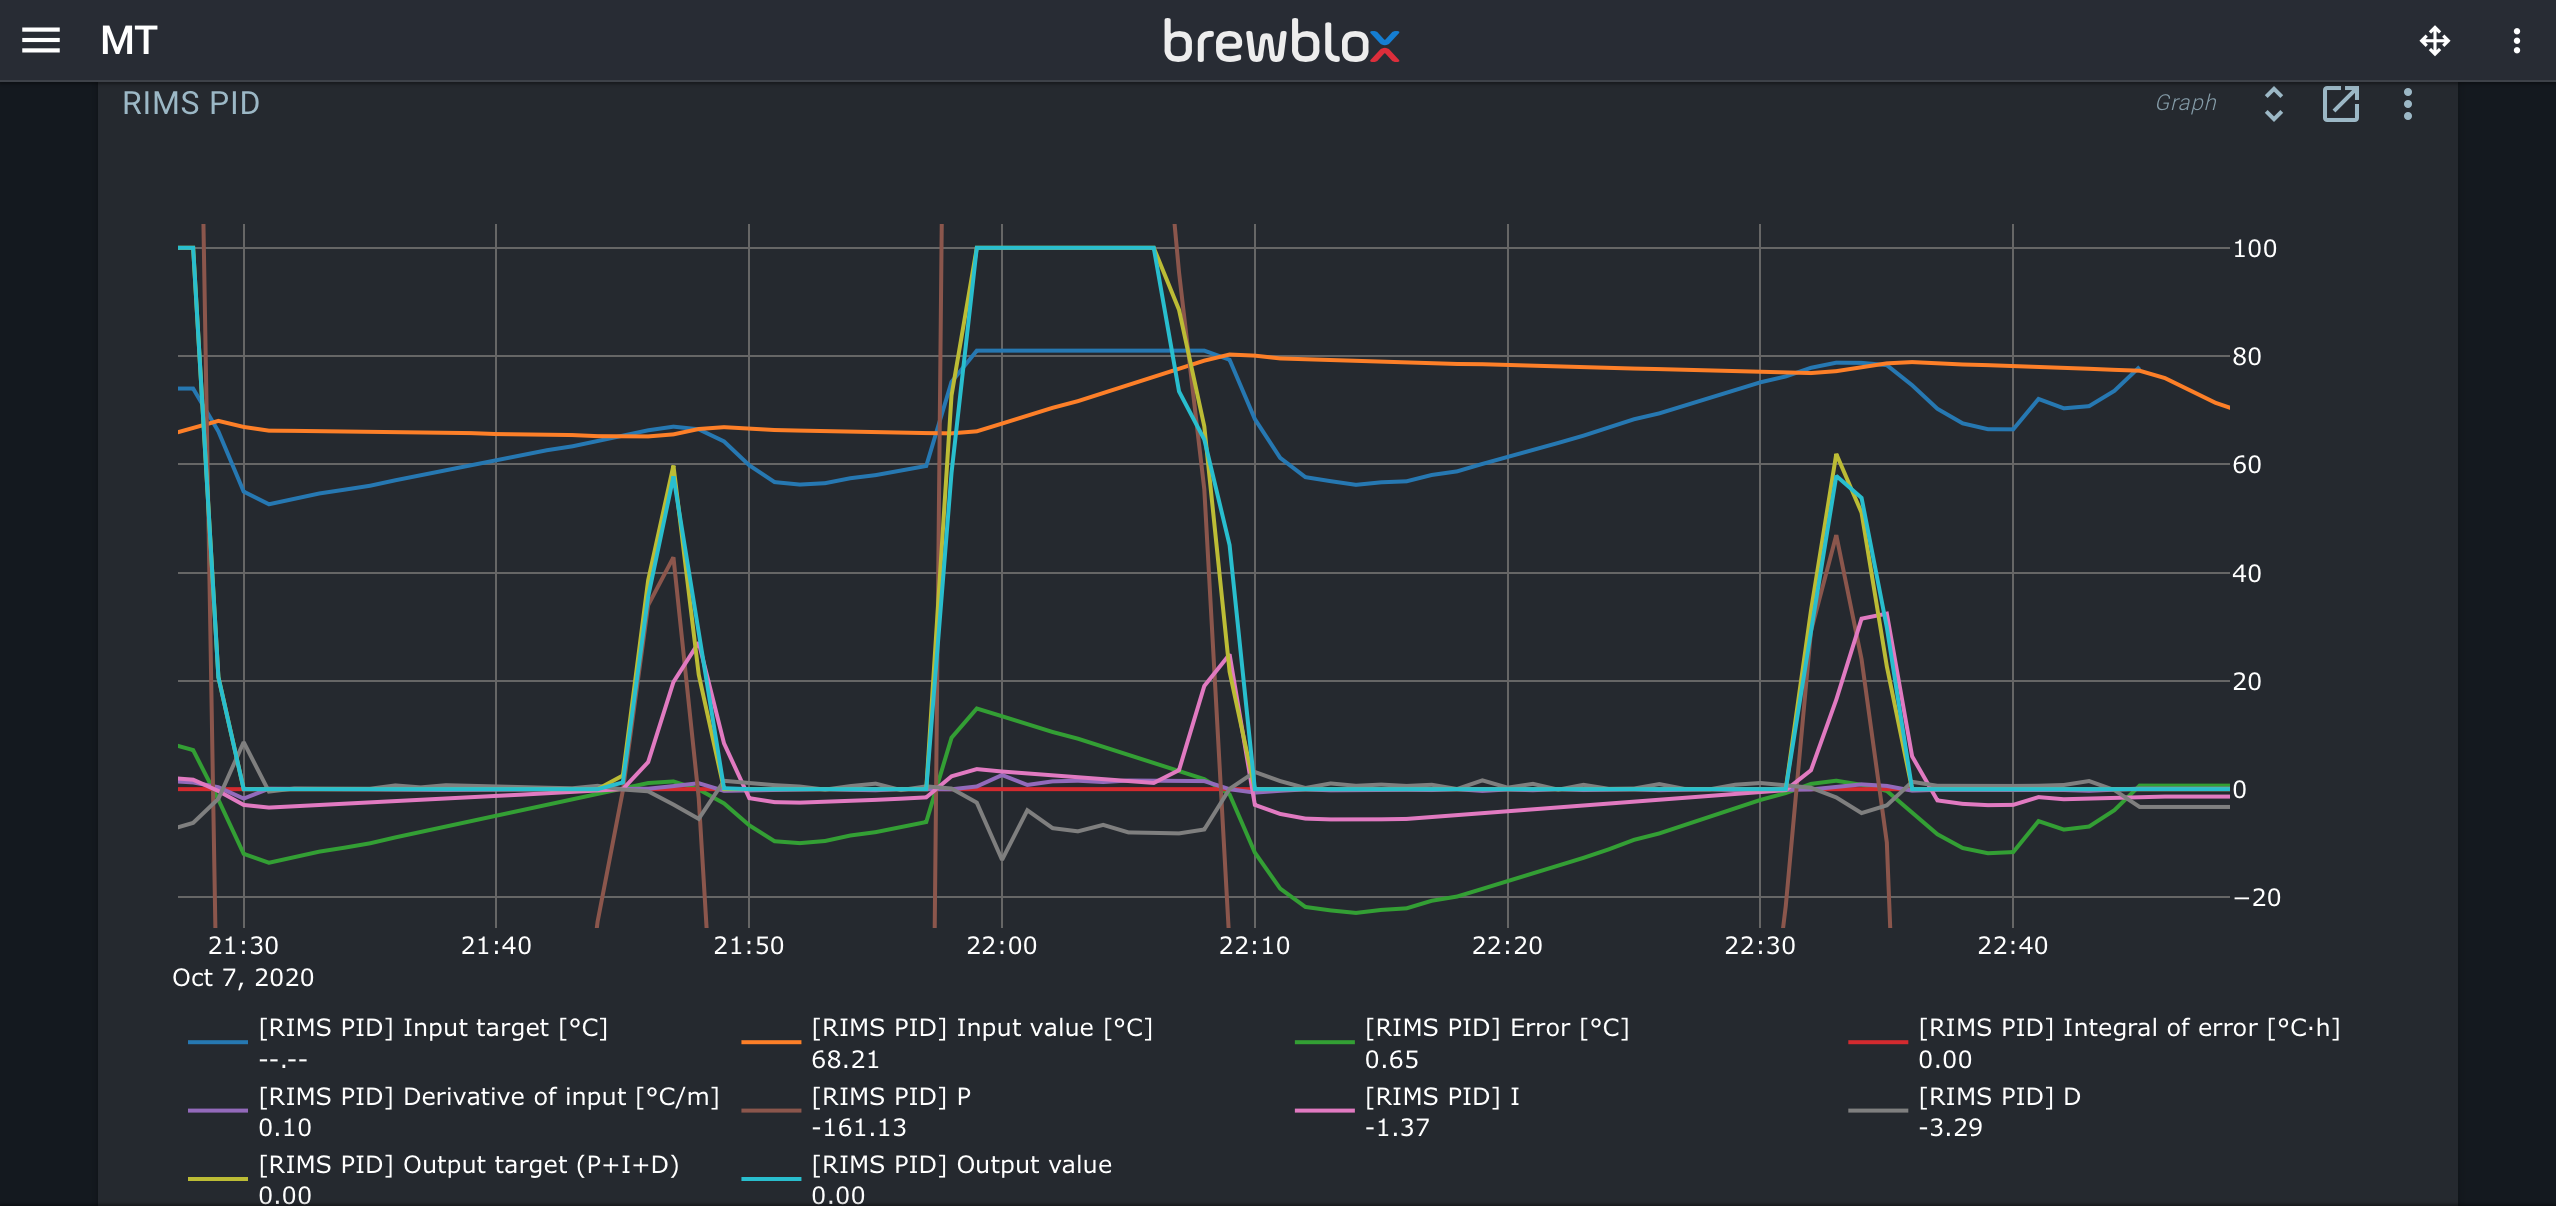
The system is fast and responsive and I was impressed with its general performance, but it overshot when reaching mash temperature and again when trying to settle at desired mash temp. I didn’t run the test long enough, but looking at the graph I’m not sure that it would settle at all. Not within the time frame of a normal mash. The same thing happened when I simulated the step to a mash out. A little overshoot wouldn’t bother me if it settles within a few minutes time, but the heat loss from my setup is so low that the temperature didn’t fall back down to the desired mash temp until 15 and 20 minutes after it overshot. That is too long for a 60 min mash. Let me provide some pictures:
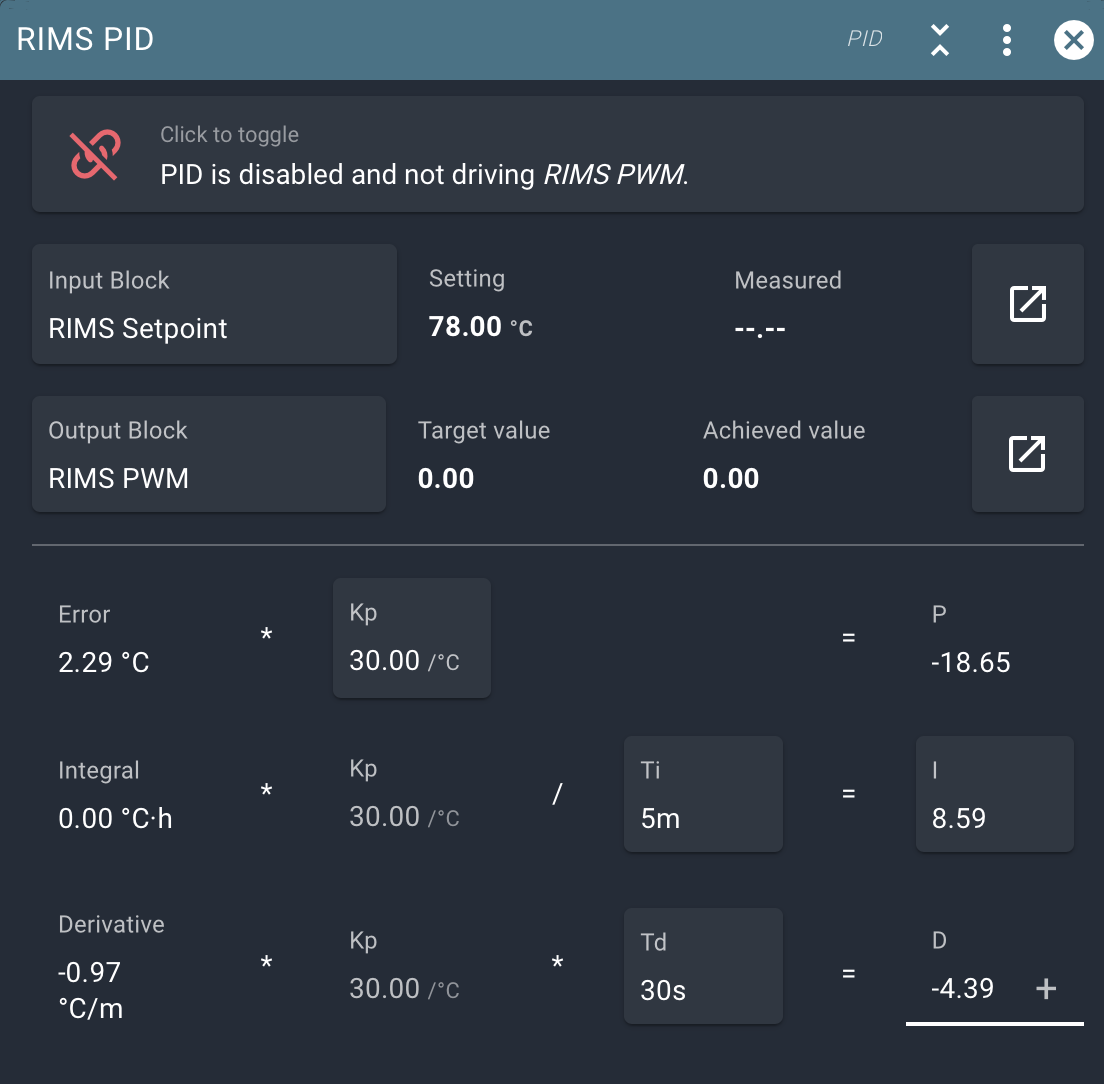
I was tempted to try some manual tuning using Ziegler-Nichols method, but I realised that I have two PIDs working in a pair here: The MT-PID is driving the RIMS-PID setpoint. This got me confused on how to proceed.
Any help on the tuning and on how to proceed with reducing the overshoot and decrease settling time is greatly appreciated!
If you open the block graph for the PID (actions menu in PID toolbar), you get the internals of the calculation. These tend to be very useful for tuning.
The dynamic setpoint doesn’t complicate tuning too much: the two chains can be tuned sequentially.
First, disable the RIMS Setpoint Driver block, and manually set the RIMS setpoint. You now have a single control chain based on the RIMS PID. This can be tuned independently.
When the RIMS control chain is tuned, re-enable the Setpoint Driver. Your RIMS control chain in its entirety can be considered a black box heater element controlled by the MT PID. You can now tune the MT PID without having to worry about RIMS settings.
I’d have to see the PID graphs to be more specific about what PID settings to adjust.
In addition to what Bob said (first tuning rims output temperature separately), the graphs of the PID widget are most useful.
Also consider your sensor placement. I think it is best to have a sensor in the kettle under the filter and one above the filter. Then you will never overheat the bottom part, regardless of flow.
Also install a float switch as dry fire protection in the bottom part. If your filter bed is stuck or you are sucking air into the bottom part, you will ruin your heating element. It should automatically turn off when there is no water.
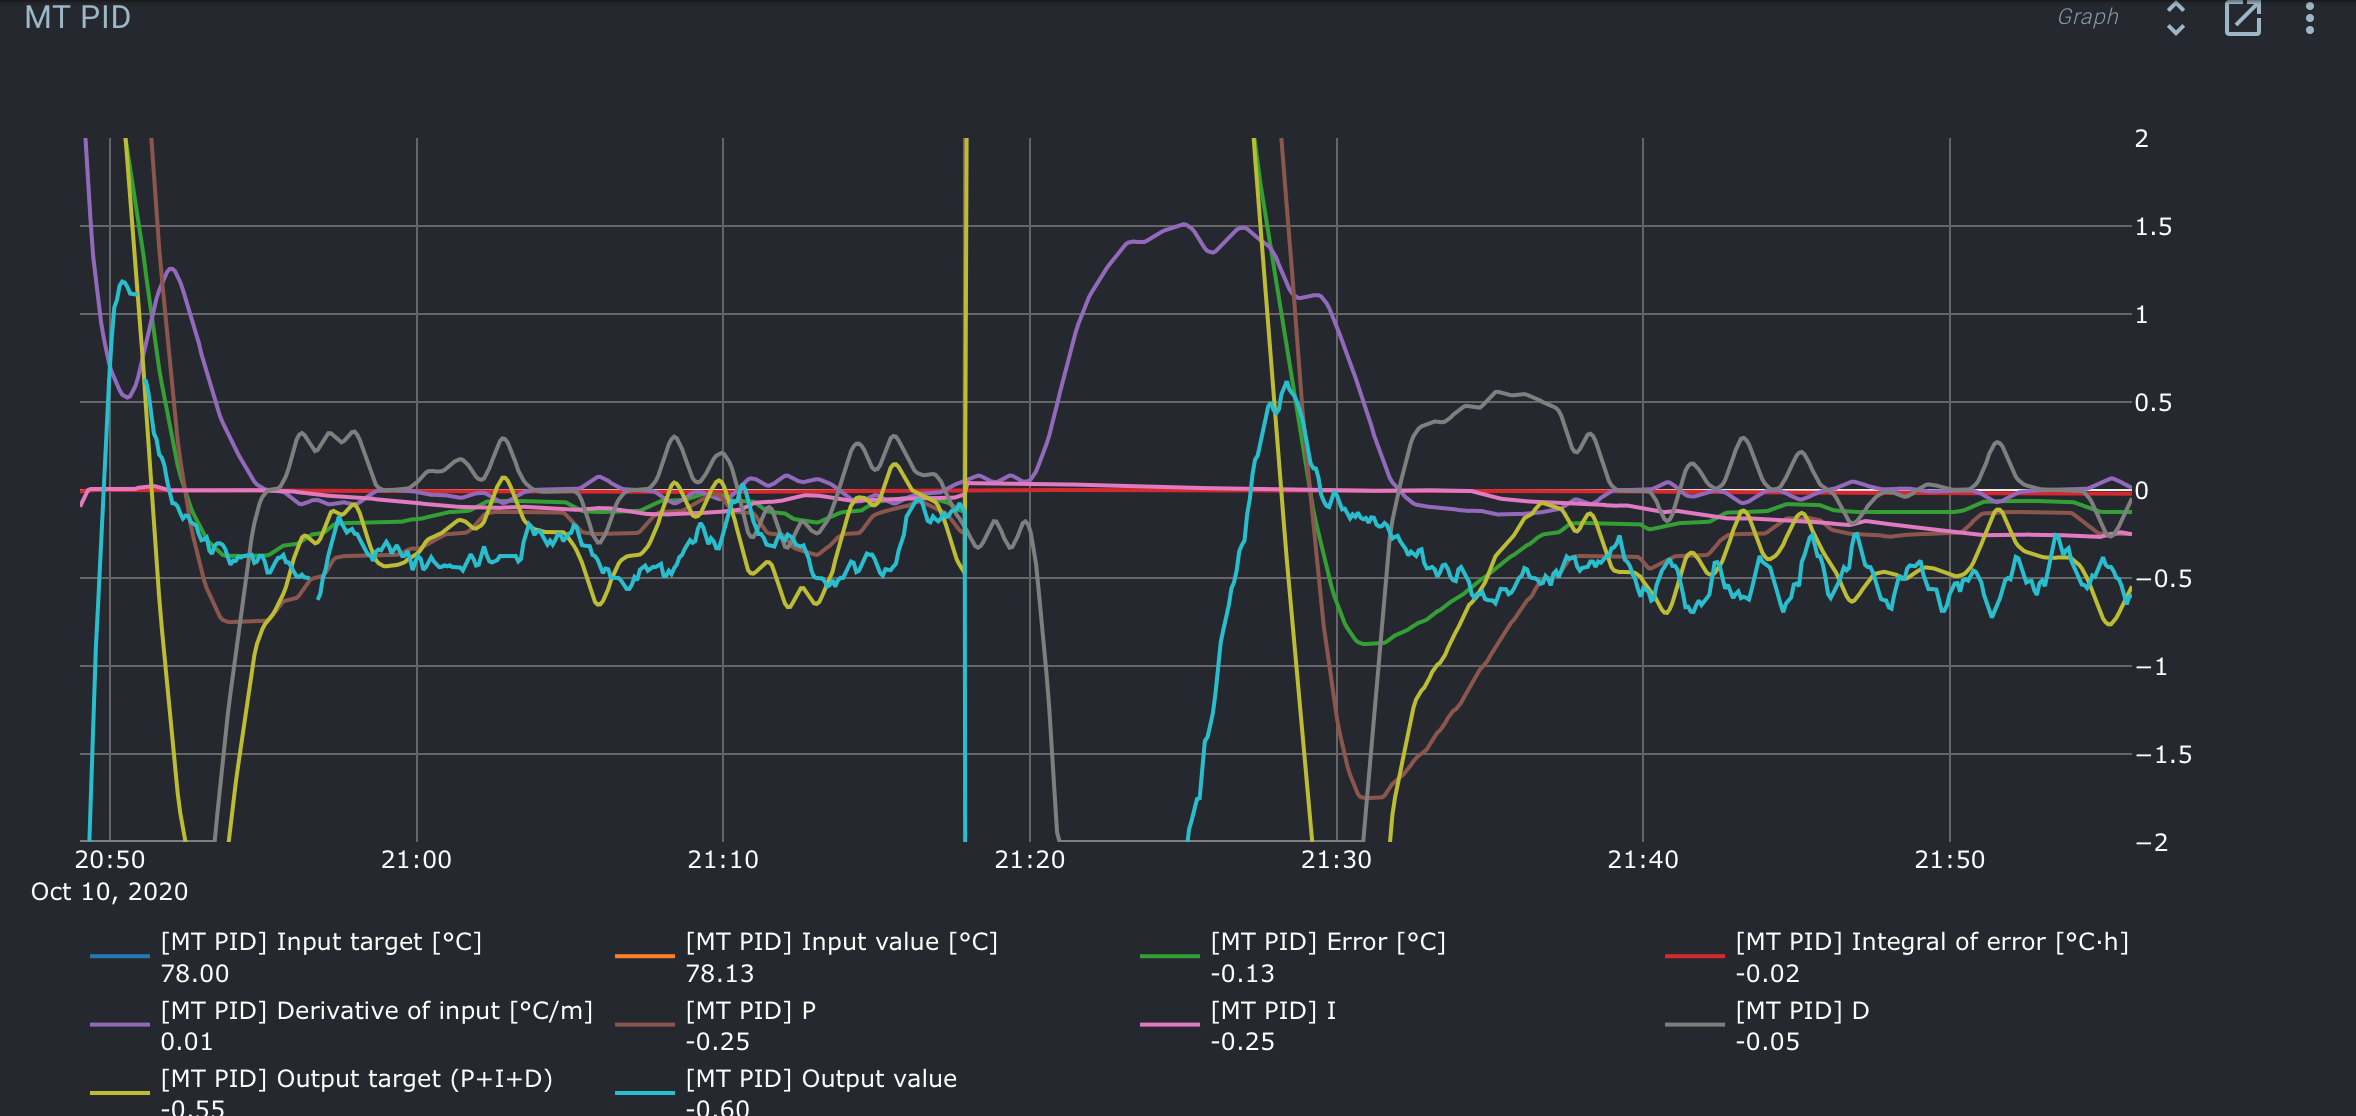
From what I can tell, both PIDs react well in advance of hitting the target temperatures, but overshoot because of the “inertia” of the system. The main difference between the two PIDs is that the MT PID doesn’t have matching Output target and Output value while the RIMS PID does. Is that a clue on where to begin tuning?
Thank you for the suggestions, Elco. That sounds like an ideal configuration!
The layout I drew in brewblox is a bit misleading. My mash tun is actually a boiler with an electric heating element mounted inside the bottom. The mash is kept inside an inner mash cylinder with a filter in the bottom. Since I can see the wort level outside cylinder, I can manually dial in the recirculation flow rate to obtain a fairly steady state. My idea was that the temperature reading on the outlet would hit its constraint very quickly if the water level goes low and shut off the heater that way.
The boiler still shouldn’t dry fire, so I will have to pay close attention for the time being!
The graphs are a bit too coarse to see what’s happening.
Which duration did you select (the clock icon)?
Even if you select 1 day, you should get a point every minute. If not, that could be a bug @Bob_Steers.
Your Ti is too fast and could be the cause of overshoot. The integrator should increase slowly, not while you are still approaching the setpoint.
For the heater, try starting with these PID values: Kp: 30 (if the temperature is 1 degree too low, the heater can be at 30%) Ti: 5m (every 10 minutes the output value increases with P) Td: 30s (we expect roughly 10s over overshoot from the P part)
For the PID driving the setpoint for the bottom part, try this: Kp: 2 (if the top part 1 degree under setpoint, the bottom part’s target is 2 degrees above setpoint. I picked too because I assume the volume of the bottom part is about 1/2 the volume of the top part) Ti: 10m (mixing the top/bottom liquids probably takes about 10m of pumping, so we need at least 10m to reach steady state. The integrator should ideally only affect steady state) Td: 5m (take into account 5m of expected overshoot)
Sorry about the coarse graphs. I don’t think it is a bug as I didn’t make a session log. I can’t track the live graph backward two days to the time of the test at 1h and 1d durations, so unfortunately the duration setting had to be 3d.
Thank you for the suggested corrections to the PID values. I can’t wait to try this out (while logging data correctly!)
I see, this is indeed a missing feature on the graph provided by the PID widget. You can only select a duration, not a start point. We can add that.
You can still access the data. The session only stores a start and end date, all the data is still in the database. It is logged continuously regardless of settings.
A graph widget can still access all the data an does have a start/end option. Steps:
Go to a dashboard
Add a graph widget
Select “Add block to graph” and select the PID
Set your time range
But I think it doesn’t add anything here, try running with the suggested values first.
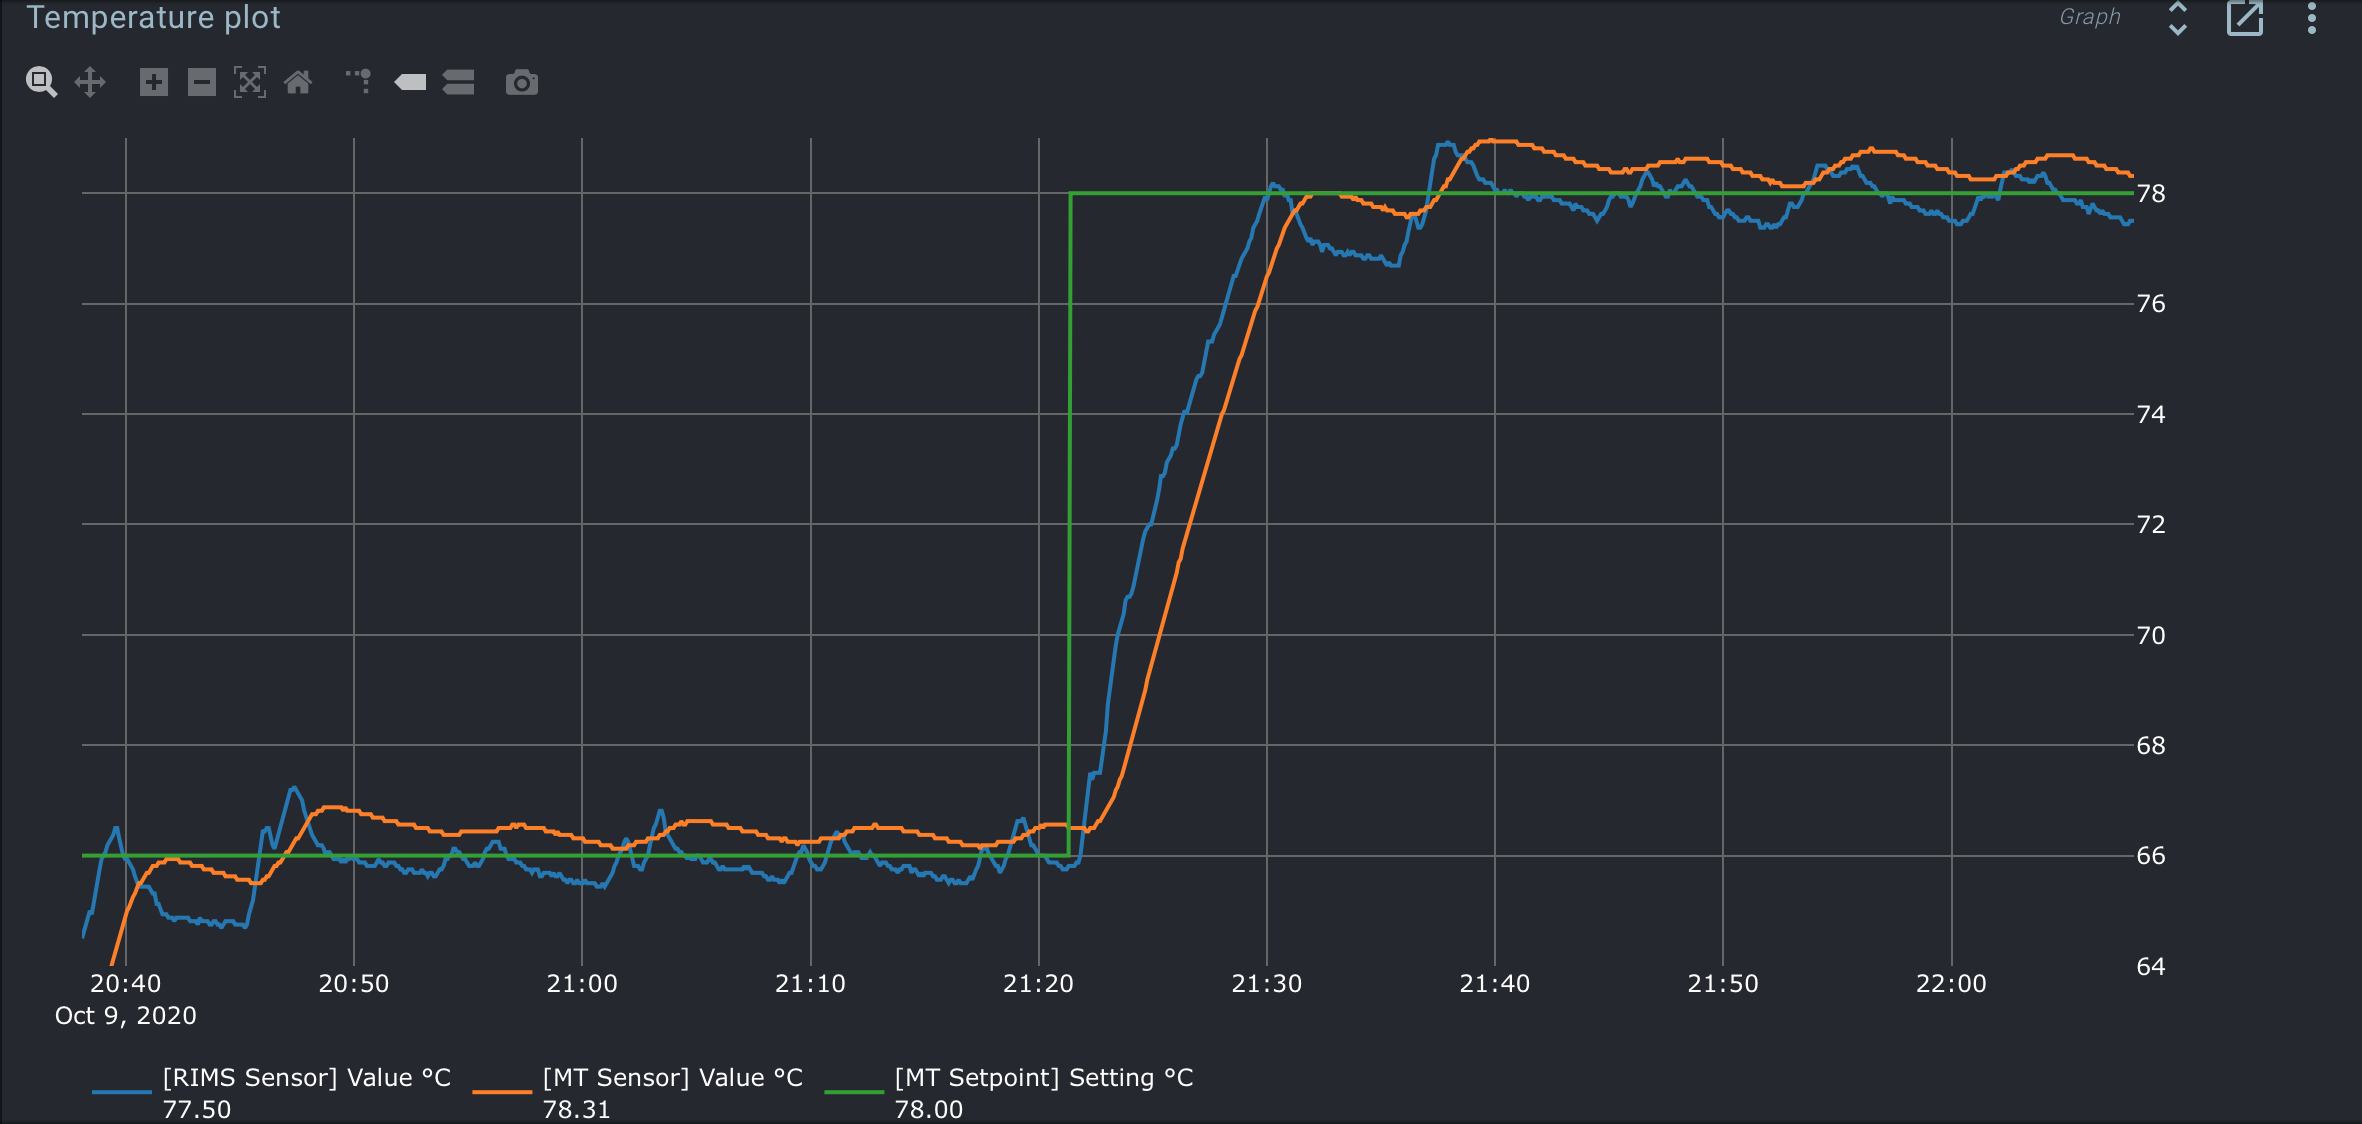
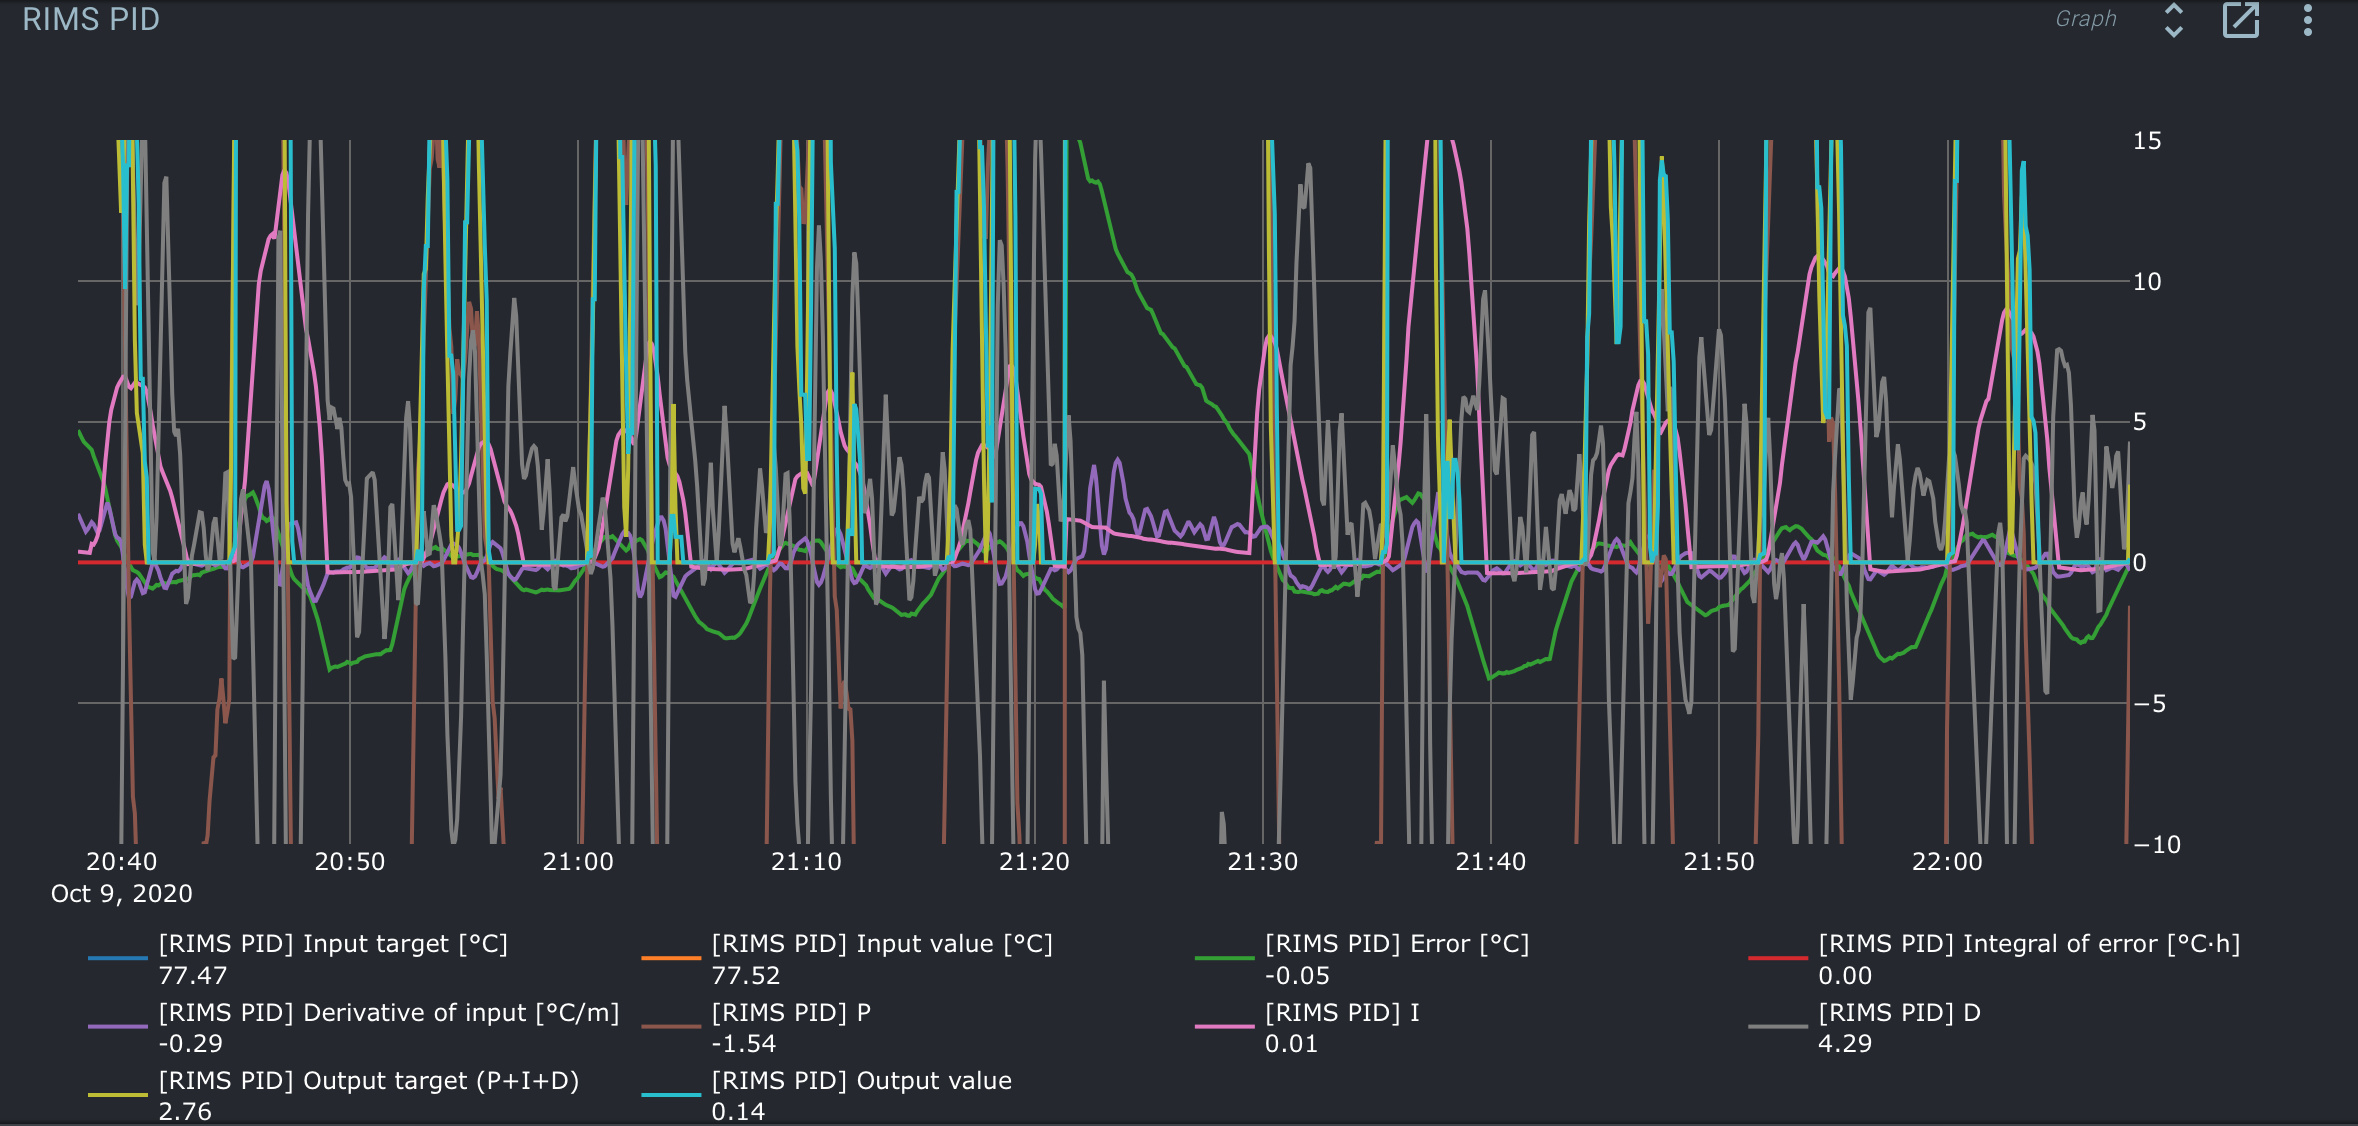
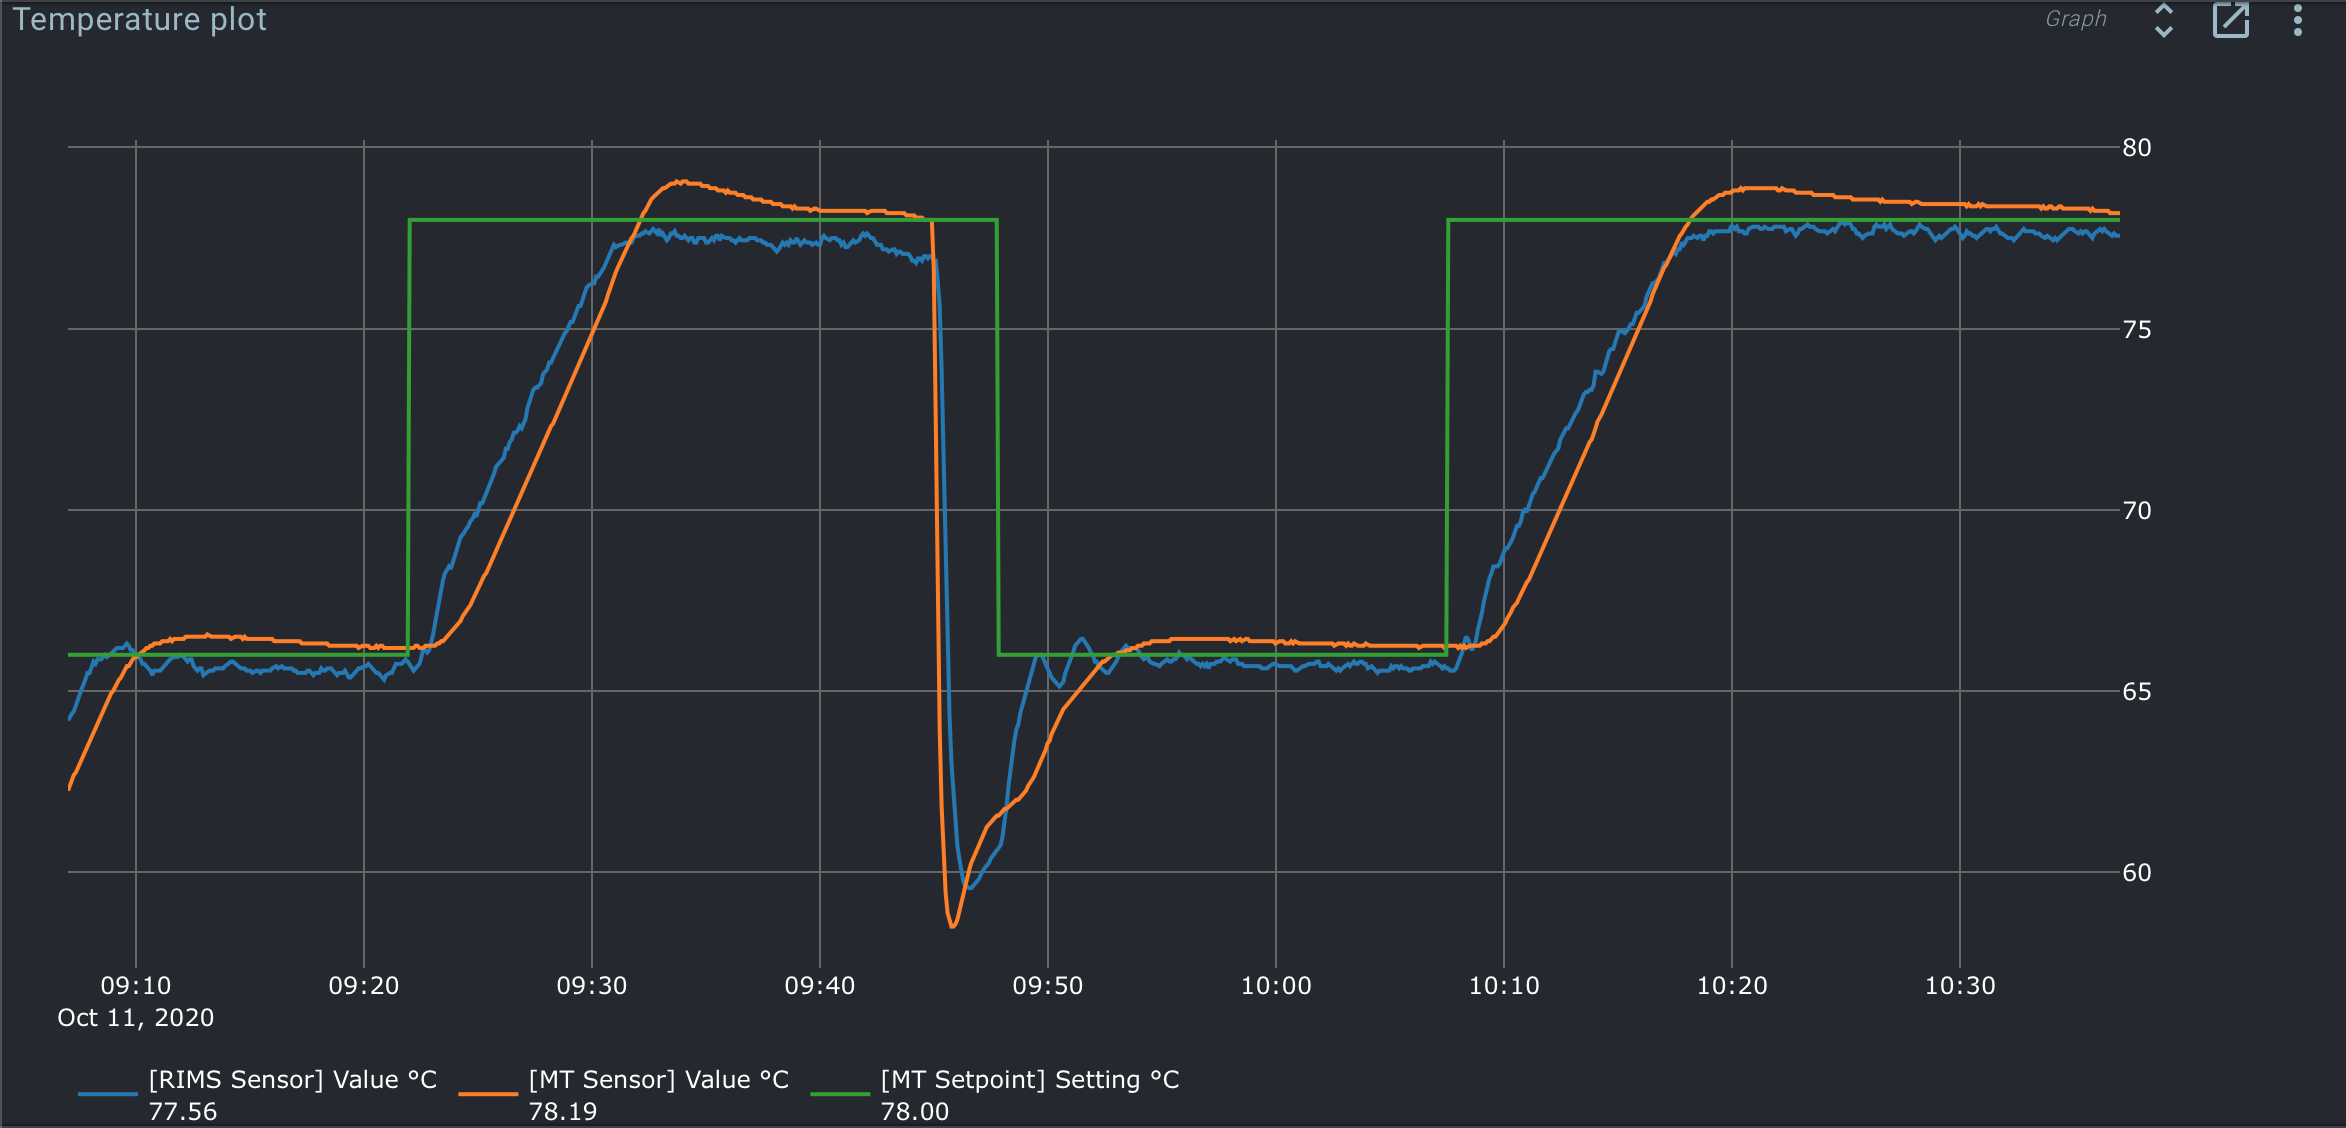
The results are in! Used the same volume of water and setup as in the test performed two days ago. The temperature approach to the MT setpoint is now near perfect, but the temperature won’t settle at setpoint. Looks like a steady state error:
Made a curious observation when looking at the overview, the RIMS keeps firing even though both MT temperature and the RIMS temperature are both above the MT setpoint:
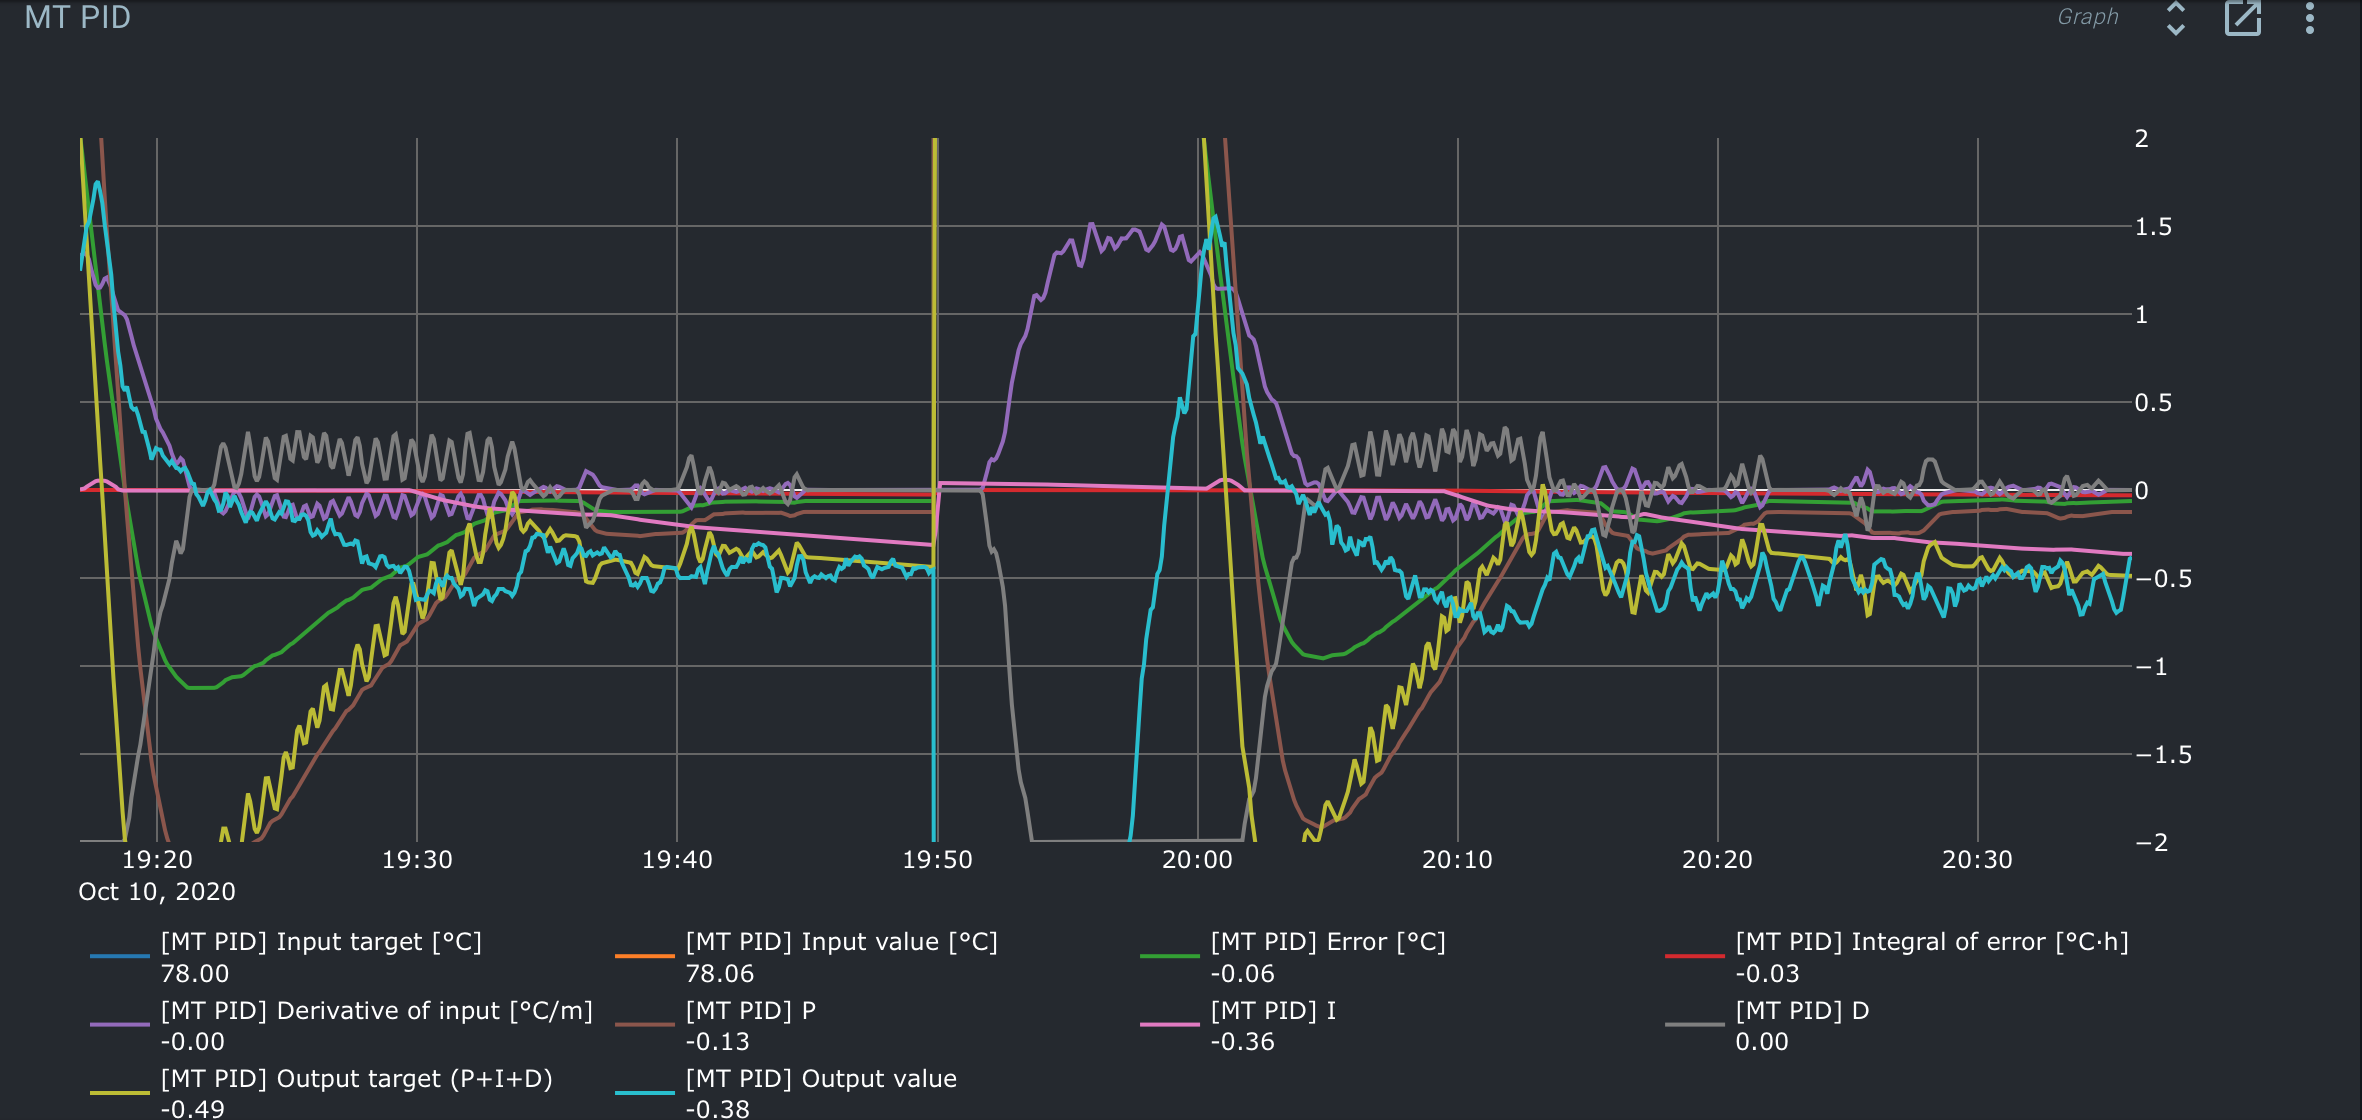
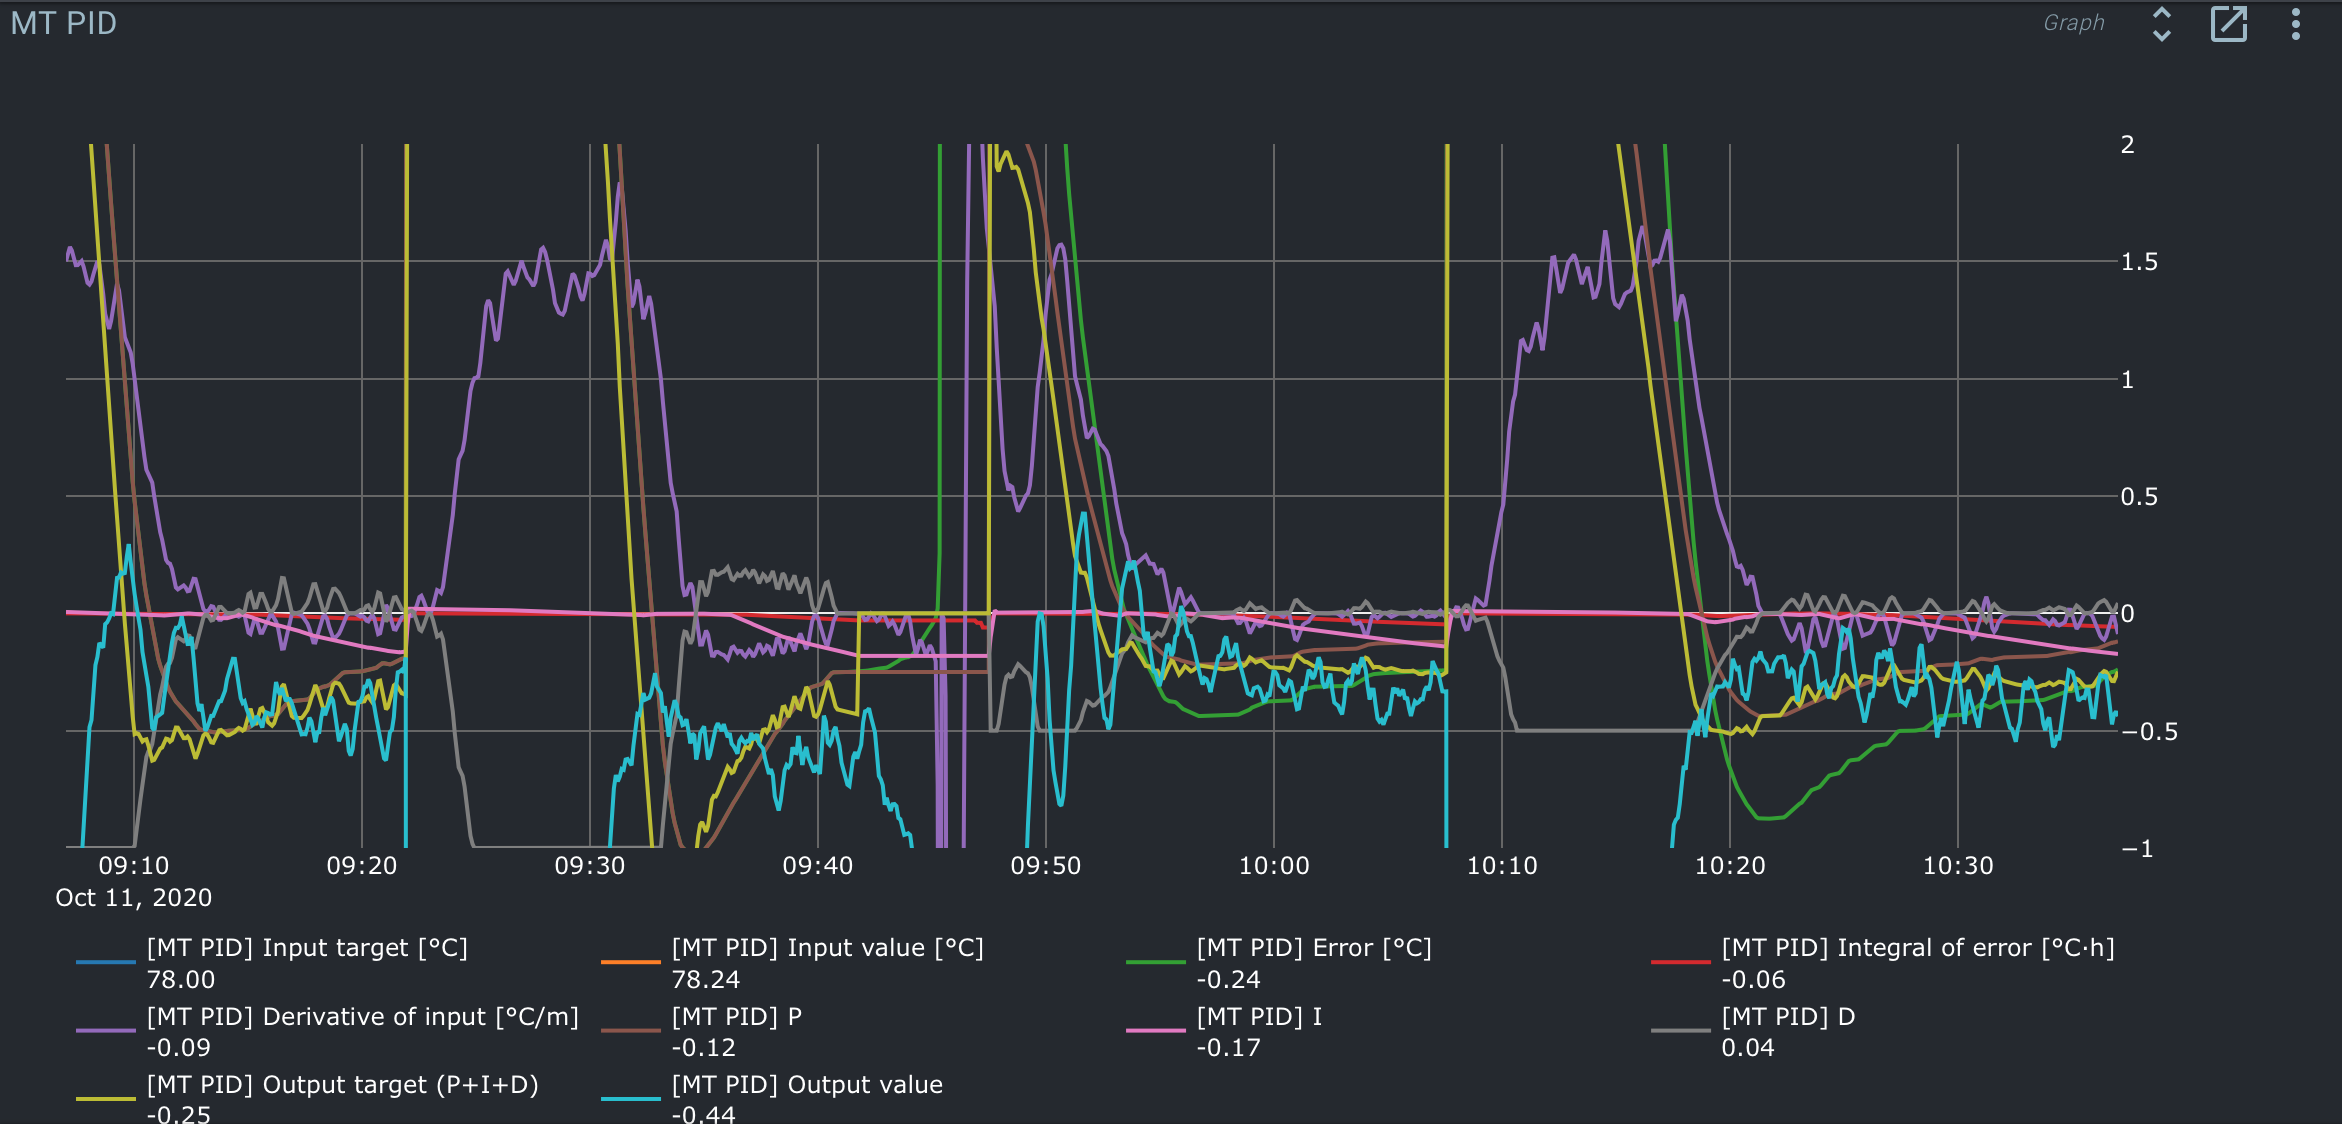
You can see from the PID chart that the D component is by farge the largest. It should only temper the P part a bit.
Try reducing TD, perhaps even try zero first.
In the MT setpoint, what is the filter? I think 30s would be a good value to filter out some small fluctuations.
Still some overshoot in both tests, but much better steady state behaviour. The temperature settles just above setpoint, but never reaches it. What are your thoughts on further improvements and tuning of the MT PID? Is increasing Td further the only way to avoid the overshooting?
Could a slight reduction of the Ti increase the power of the integrator enough to have the temperature oscillate exactly around the setpoint? This is extremely fine tuning of course, a mash temp of 0.1 degC above setpoint is more than acceptable. I’m just curious from a technical point of view.
Try reducing MT Kp to 1 first, leaving the rest the same.
The reason I say that is because I see that the output target (= bottom temp - mash target) is not reached for a long time and then the lines cross sharply and the temp for the bottom part is too high.
So the difference between top and bottom is too aggressive. Once the bottom target and actual temp seem to overlap more, then you can worry about Td and Ti.
Right now the target temp is so far out of reach that you are heating at 100%, then drop to 0%.
I hope you get it, because I’m finding it hard to explain.
That makes sense to me. I suspect that a part of problem lies in that all of the heat provided from heater doesn’t go through the MT outlet when circulating, but is transferred to the inner cylinder.
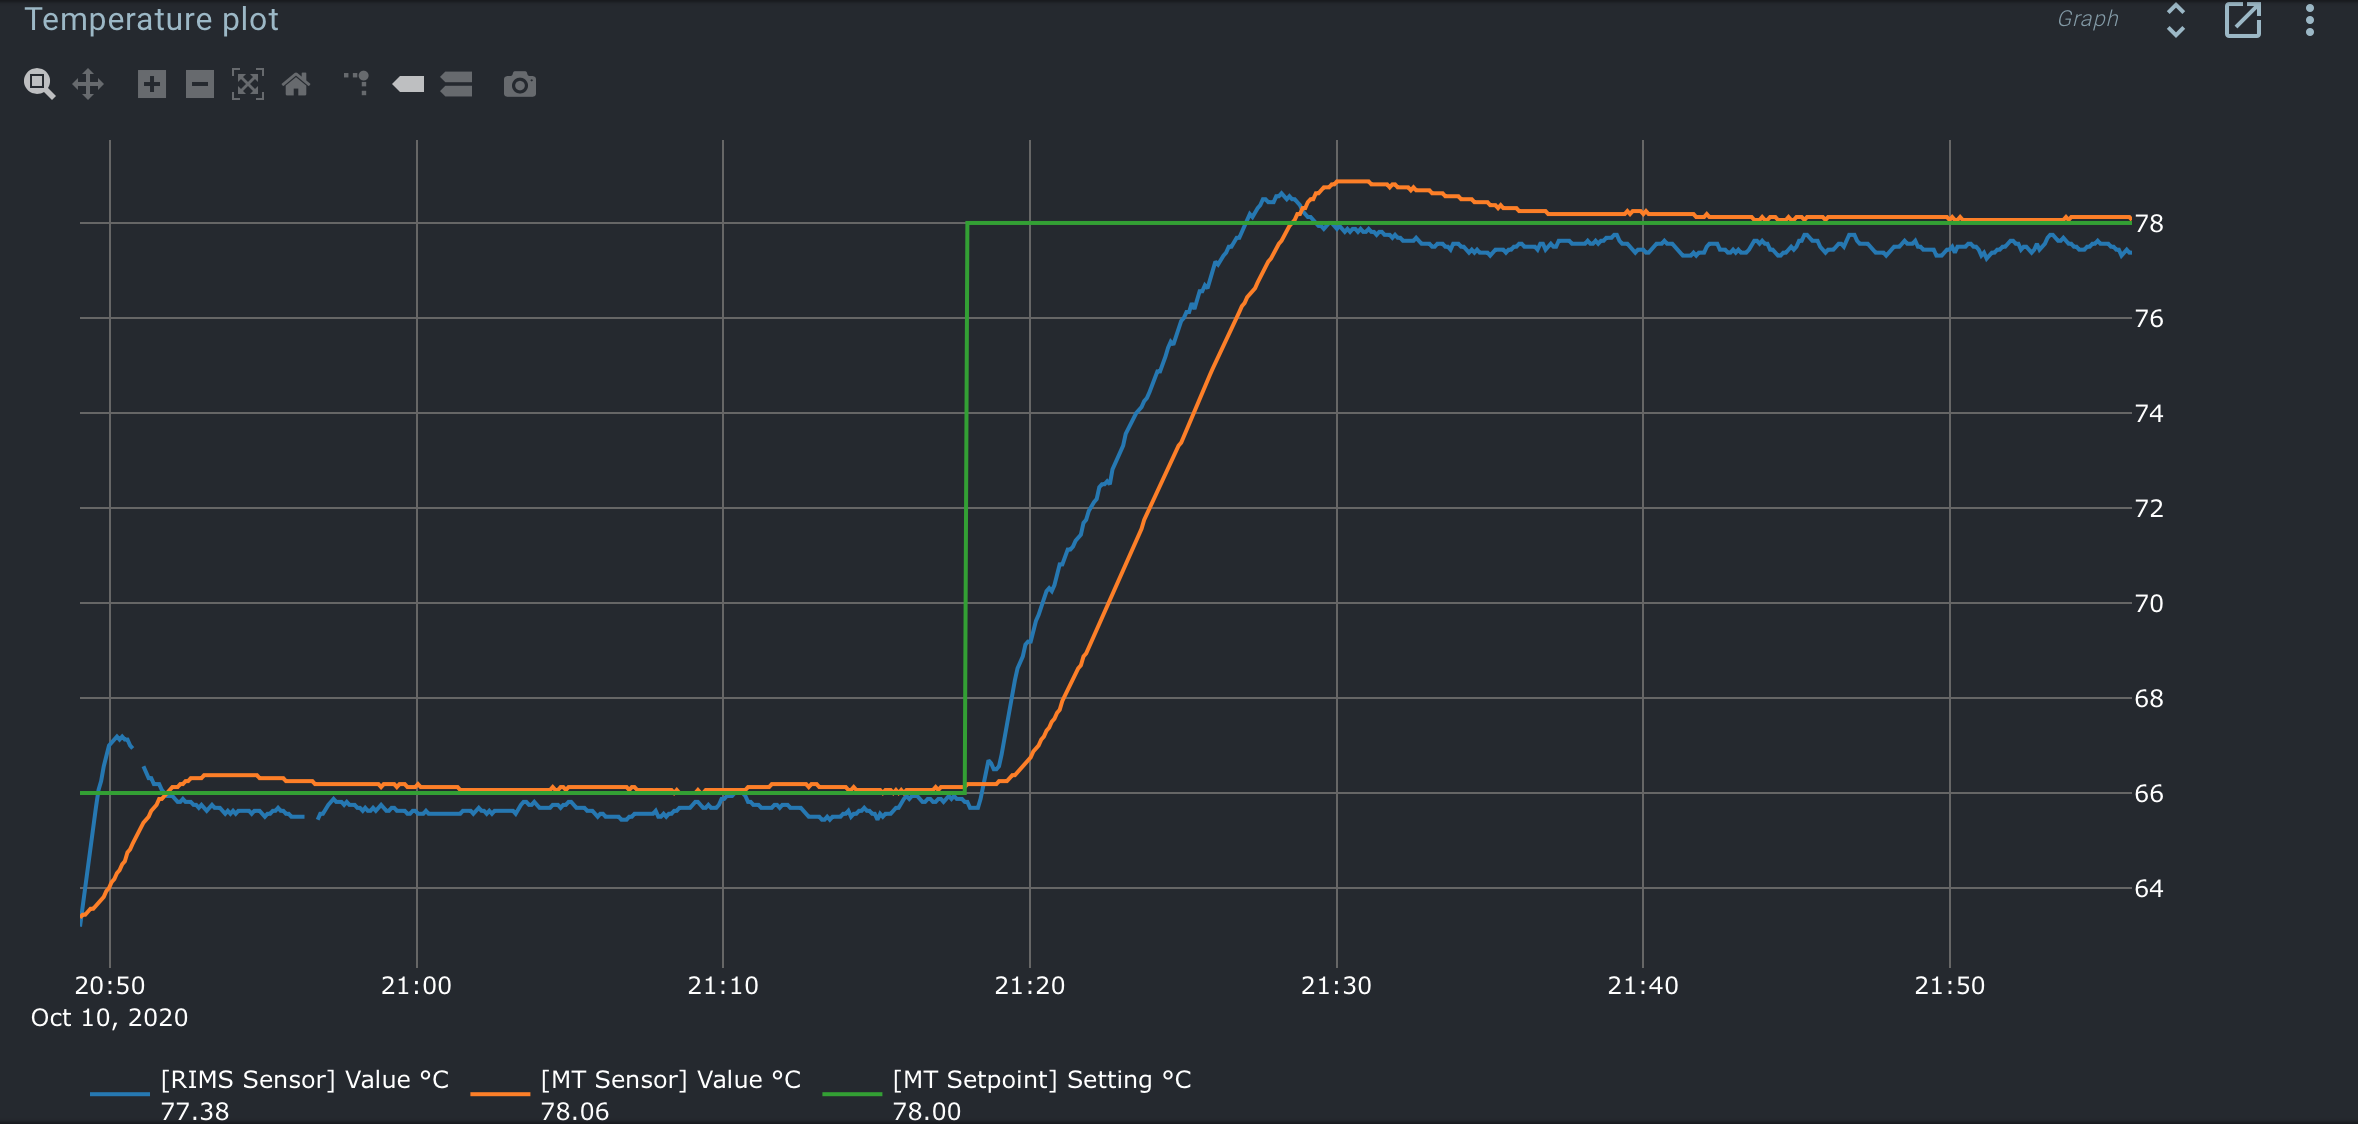
I did two consecutive test where the first test ran with a setting of Kp = 1 and the second test (from 09:48) ran with Kp = 0.5.
When heating to reach the setpoint, I notice that the D part stays clipped all the way until the temperature crosses the setpoint. As the P is dropping, wouldn’t an increase in Kd remove this clipping and let the D act a bit sooner to reduce the overshoot? Shouldn’t it mirror the “Derivative of input” at all times?
It looks like your mt sensor reaches a higher temp that the output sensor ever does. This could be because the output sensor is slightly cooler due to heat loss to the air or the heat rises.
Anyway, the premise that the bottom temp is a precursor to the top temp like a hlt in a herms seems not very applicable here.
The temperatures are close too, so you might be able to use a simpler scheme and just use a single PID driving the heating element directly and remove the cascaded pids and the setpoint driver.
We recently added a combi sensor block too, so you could even use the average or max of the two sensors as input to the PID.
I think you are right - this setup probably isn’t the best fit my brewery. I just went with the K-RIMS preset and adjusted the layout. (-:
My initial idea was to use the outlet temperature sensor purely as a temperature constraint, because I was afraid that the temperature of the bottom part would get critically hot. I assume that the circulation rate will be a bit slower in a real mash, so overheating the wort is likely to be a problem.
Is that possible to configure? A single PID + an “external” probe as constraint?
I don’t think it makes sense. You’ll overheat the bottom if the flow is too low. When the flow is too low, a sensor in a tee on the output will also read too low.
It would only work if the bottom sensor measures inside the kettle pretty close to the heating element.
Perhaps using the max of the two as PID input comes closest to protect against overheating.
I read through this post because I too have been using a K-RIMS setup, but mine is different from the one that Jonfrol describes here, and utilizes 2 vessels, where the MT recirculates through the BK, which has the heating element. Anyway, What Jonfrol’s system looks more like is a BIAB system. One vessel, one heating element, one pump. I use BIAB as well, and it was very easy to dial-in the PID settings starting with the BIAB wizard in Brewblox.