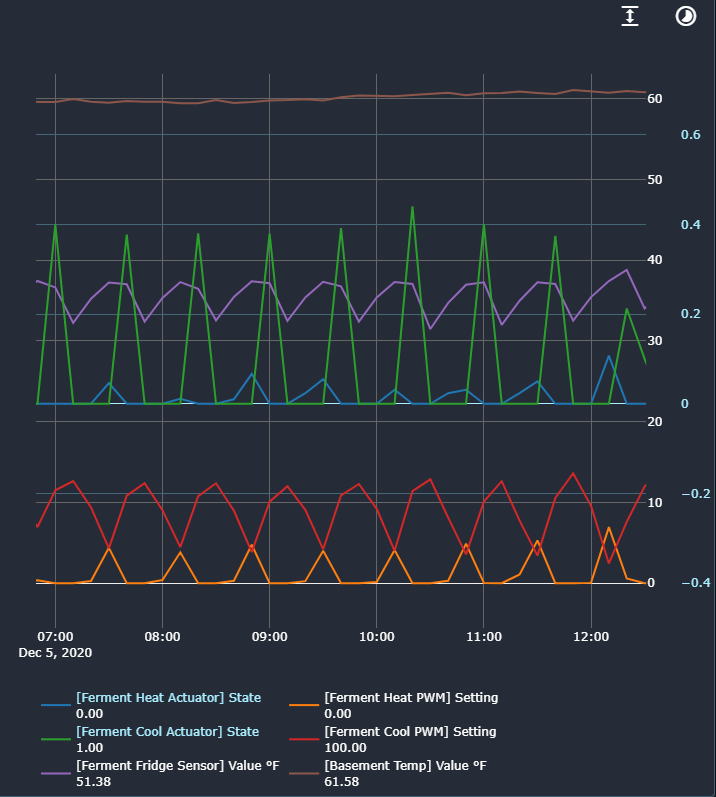
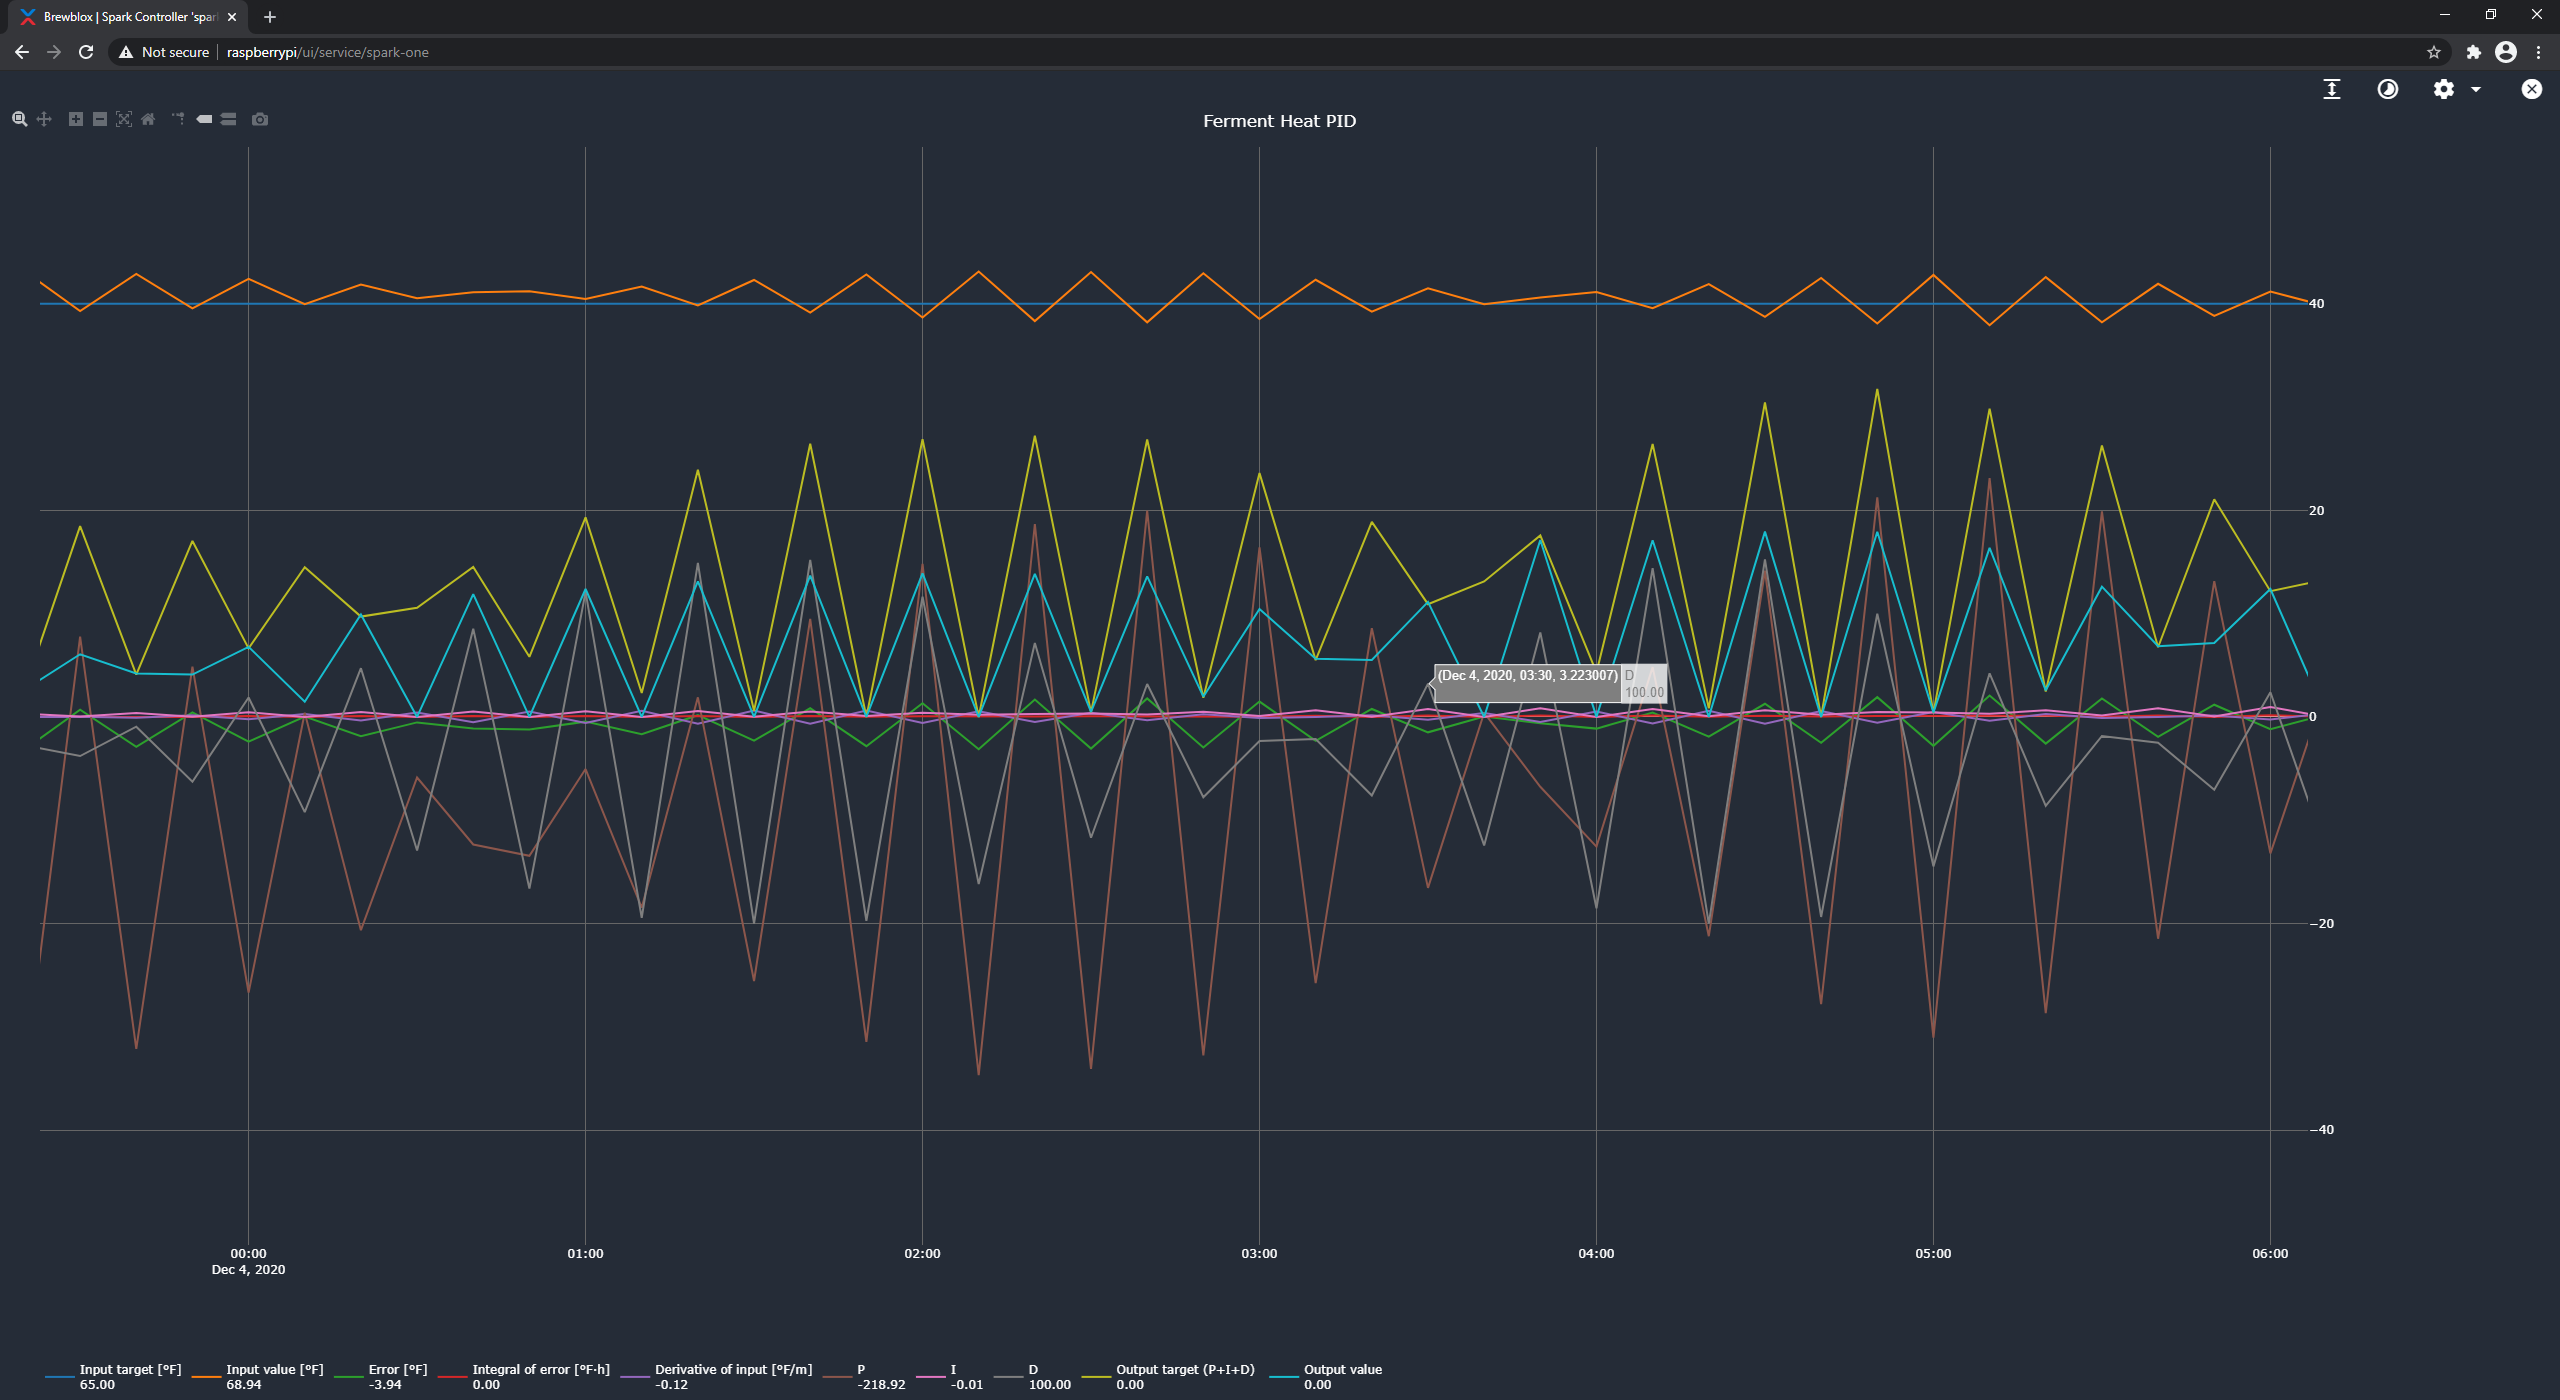
Can anyone help me out with adjusting my PID configuration for a fermentation chamber? It is a chest freezer with a reptile heating tape. What I’ve been seeing is something like the following where the system yo-yos between running the heating and cooling element (maintaining a cold crash in this case):
Its less pronounced when setting for beer temperature because of the thermal mass involved, but it still feels like its wearing out the freezer compressor more than it should. The brown line there is an extra probe I have for the ambient temperature which the PID doesn’t use but I think would be really cool if it could take that into account.
I started out with the out-of-box wizard then tried reading through the wiki page and taking what I thought would be corrective action, but it seems I simply don’t get it.
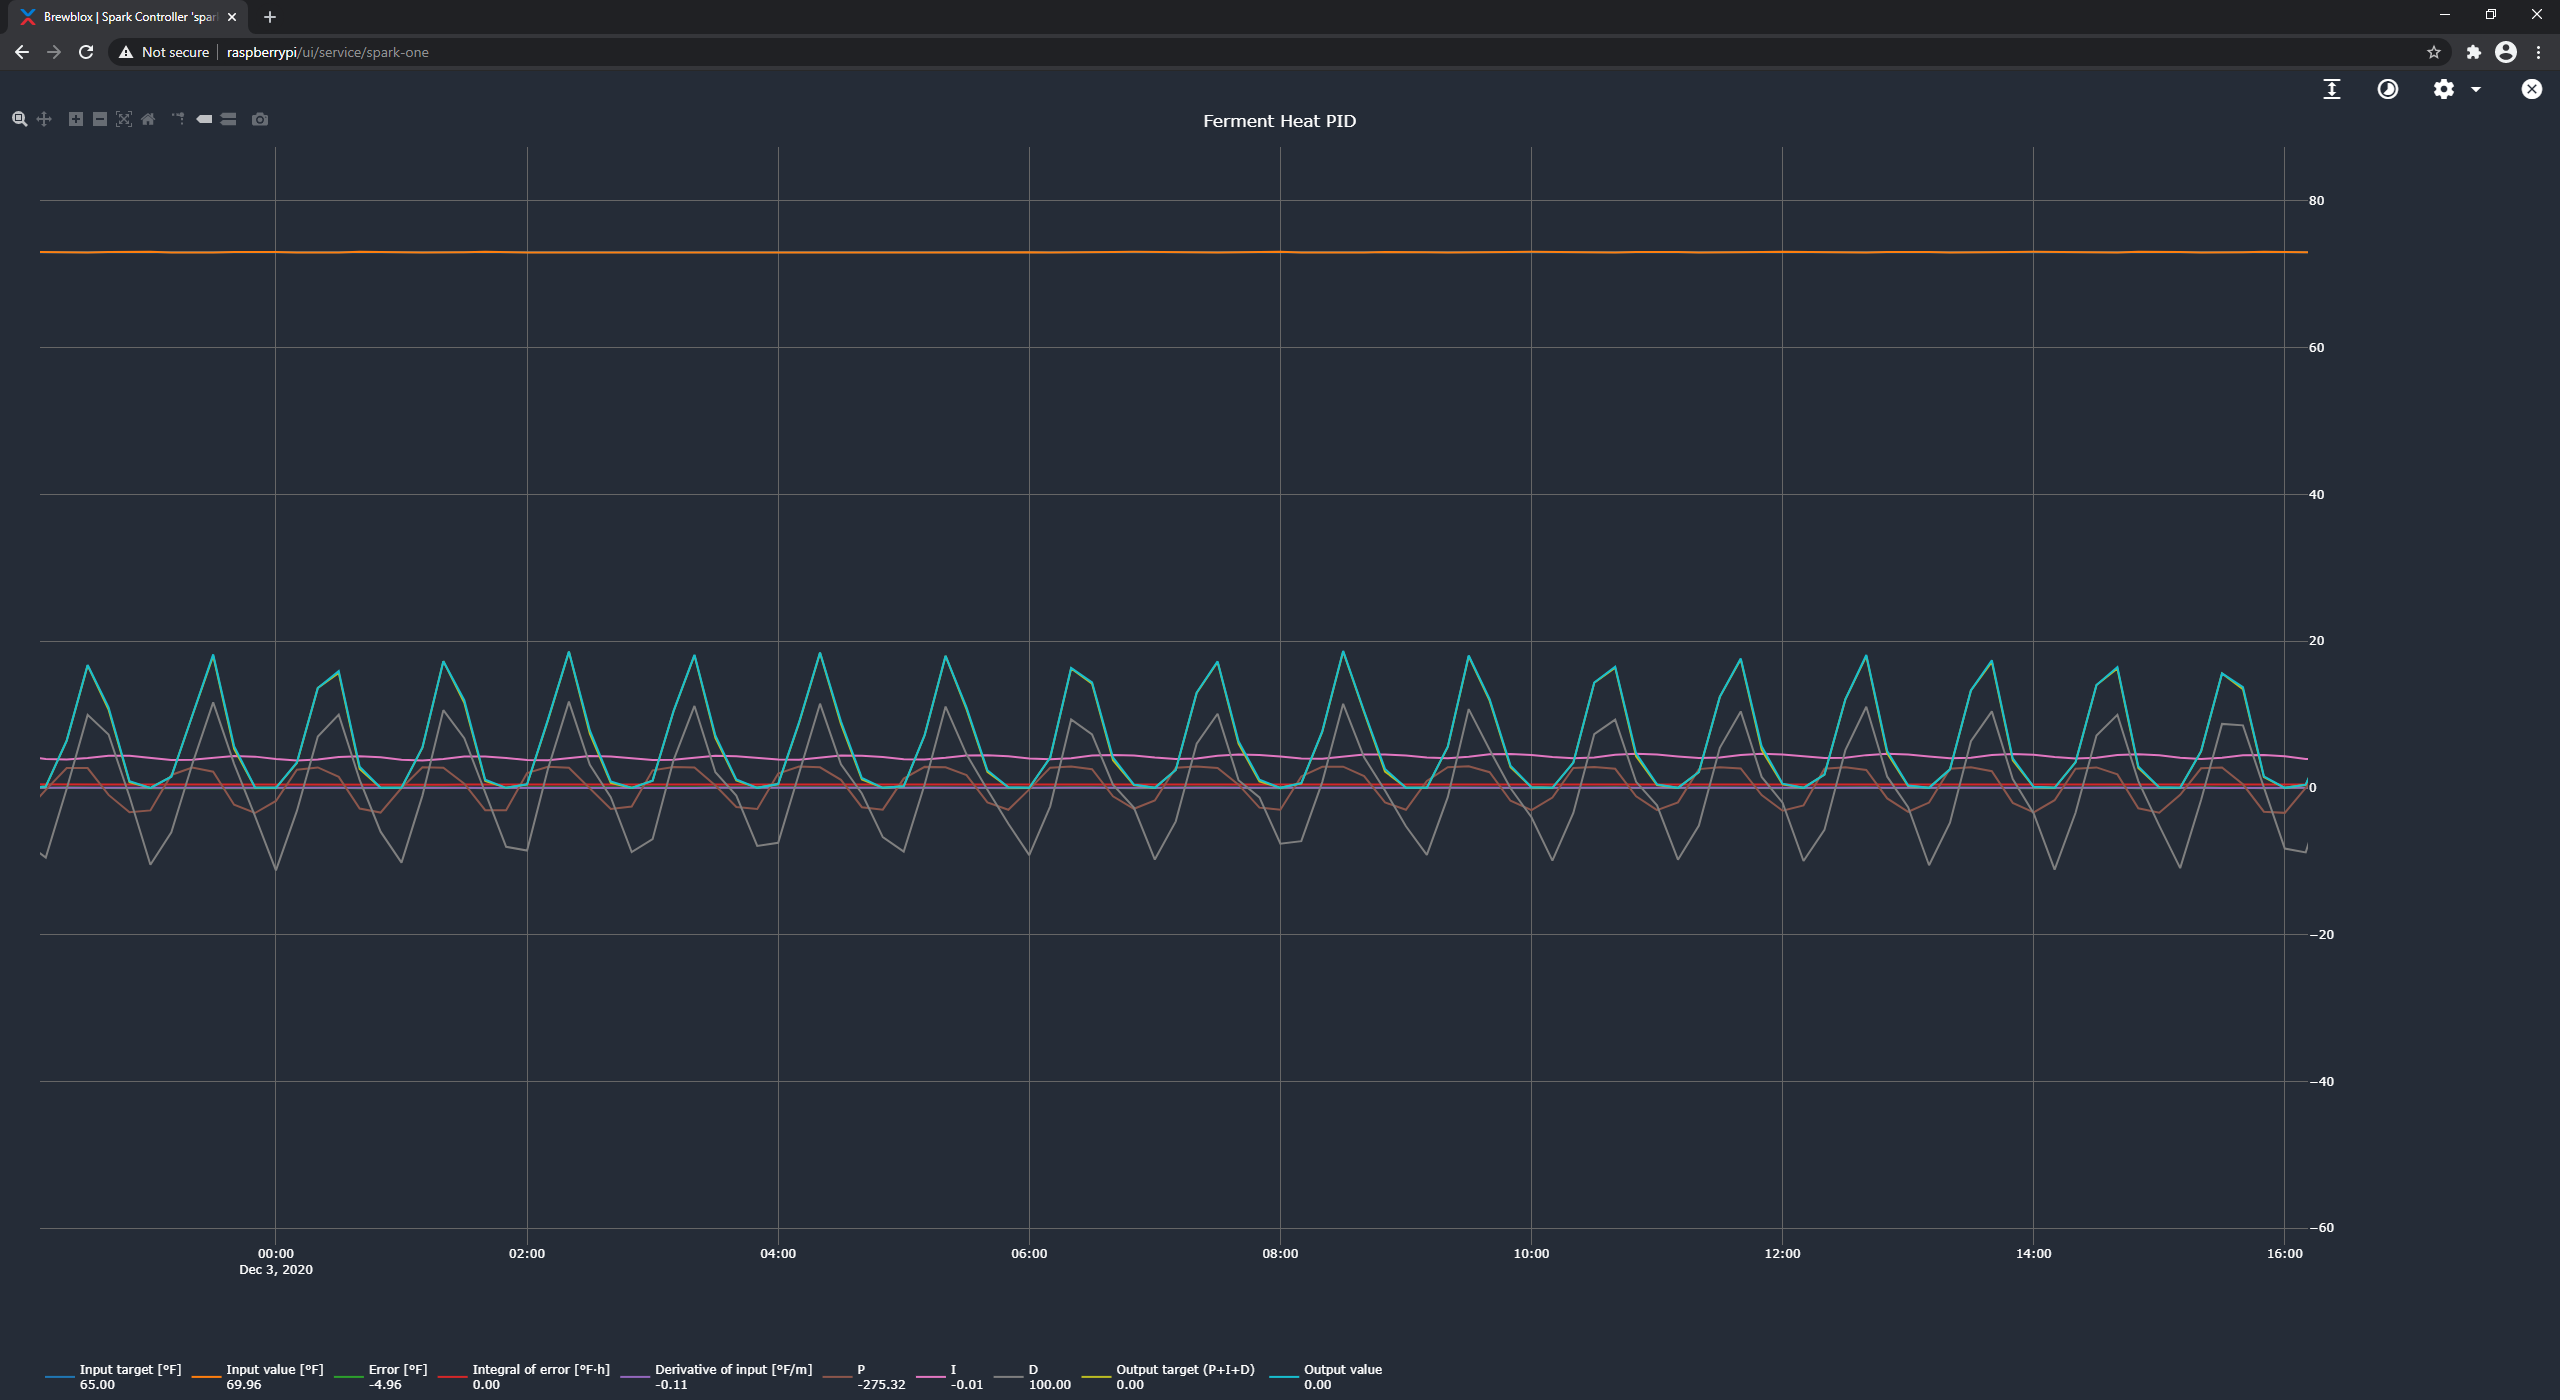
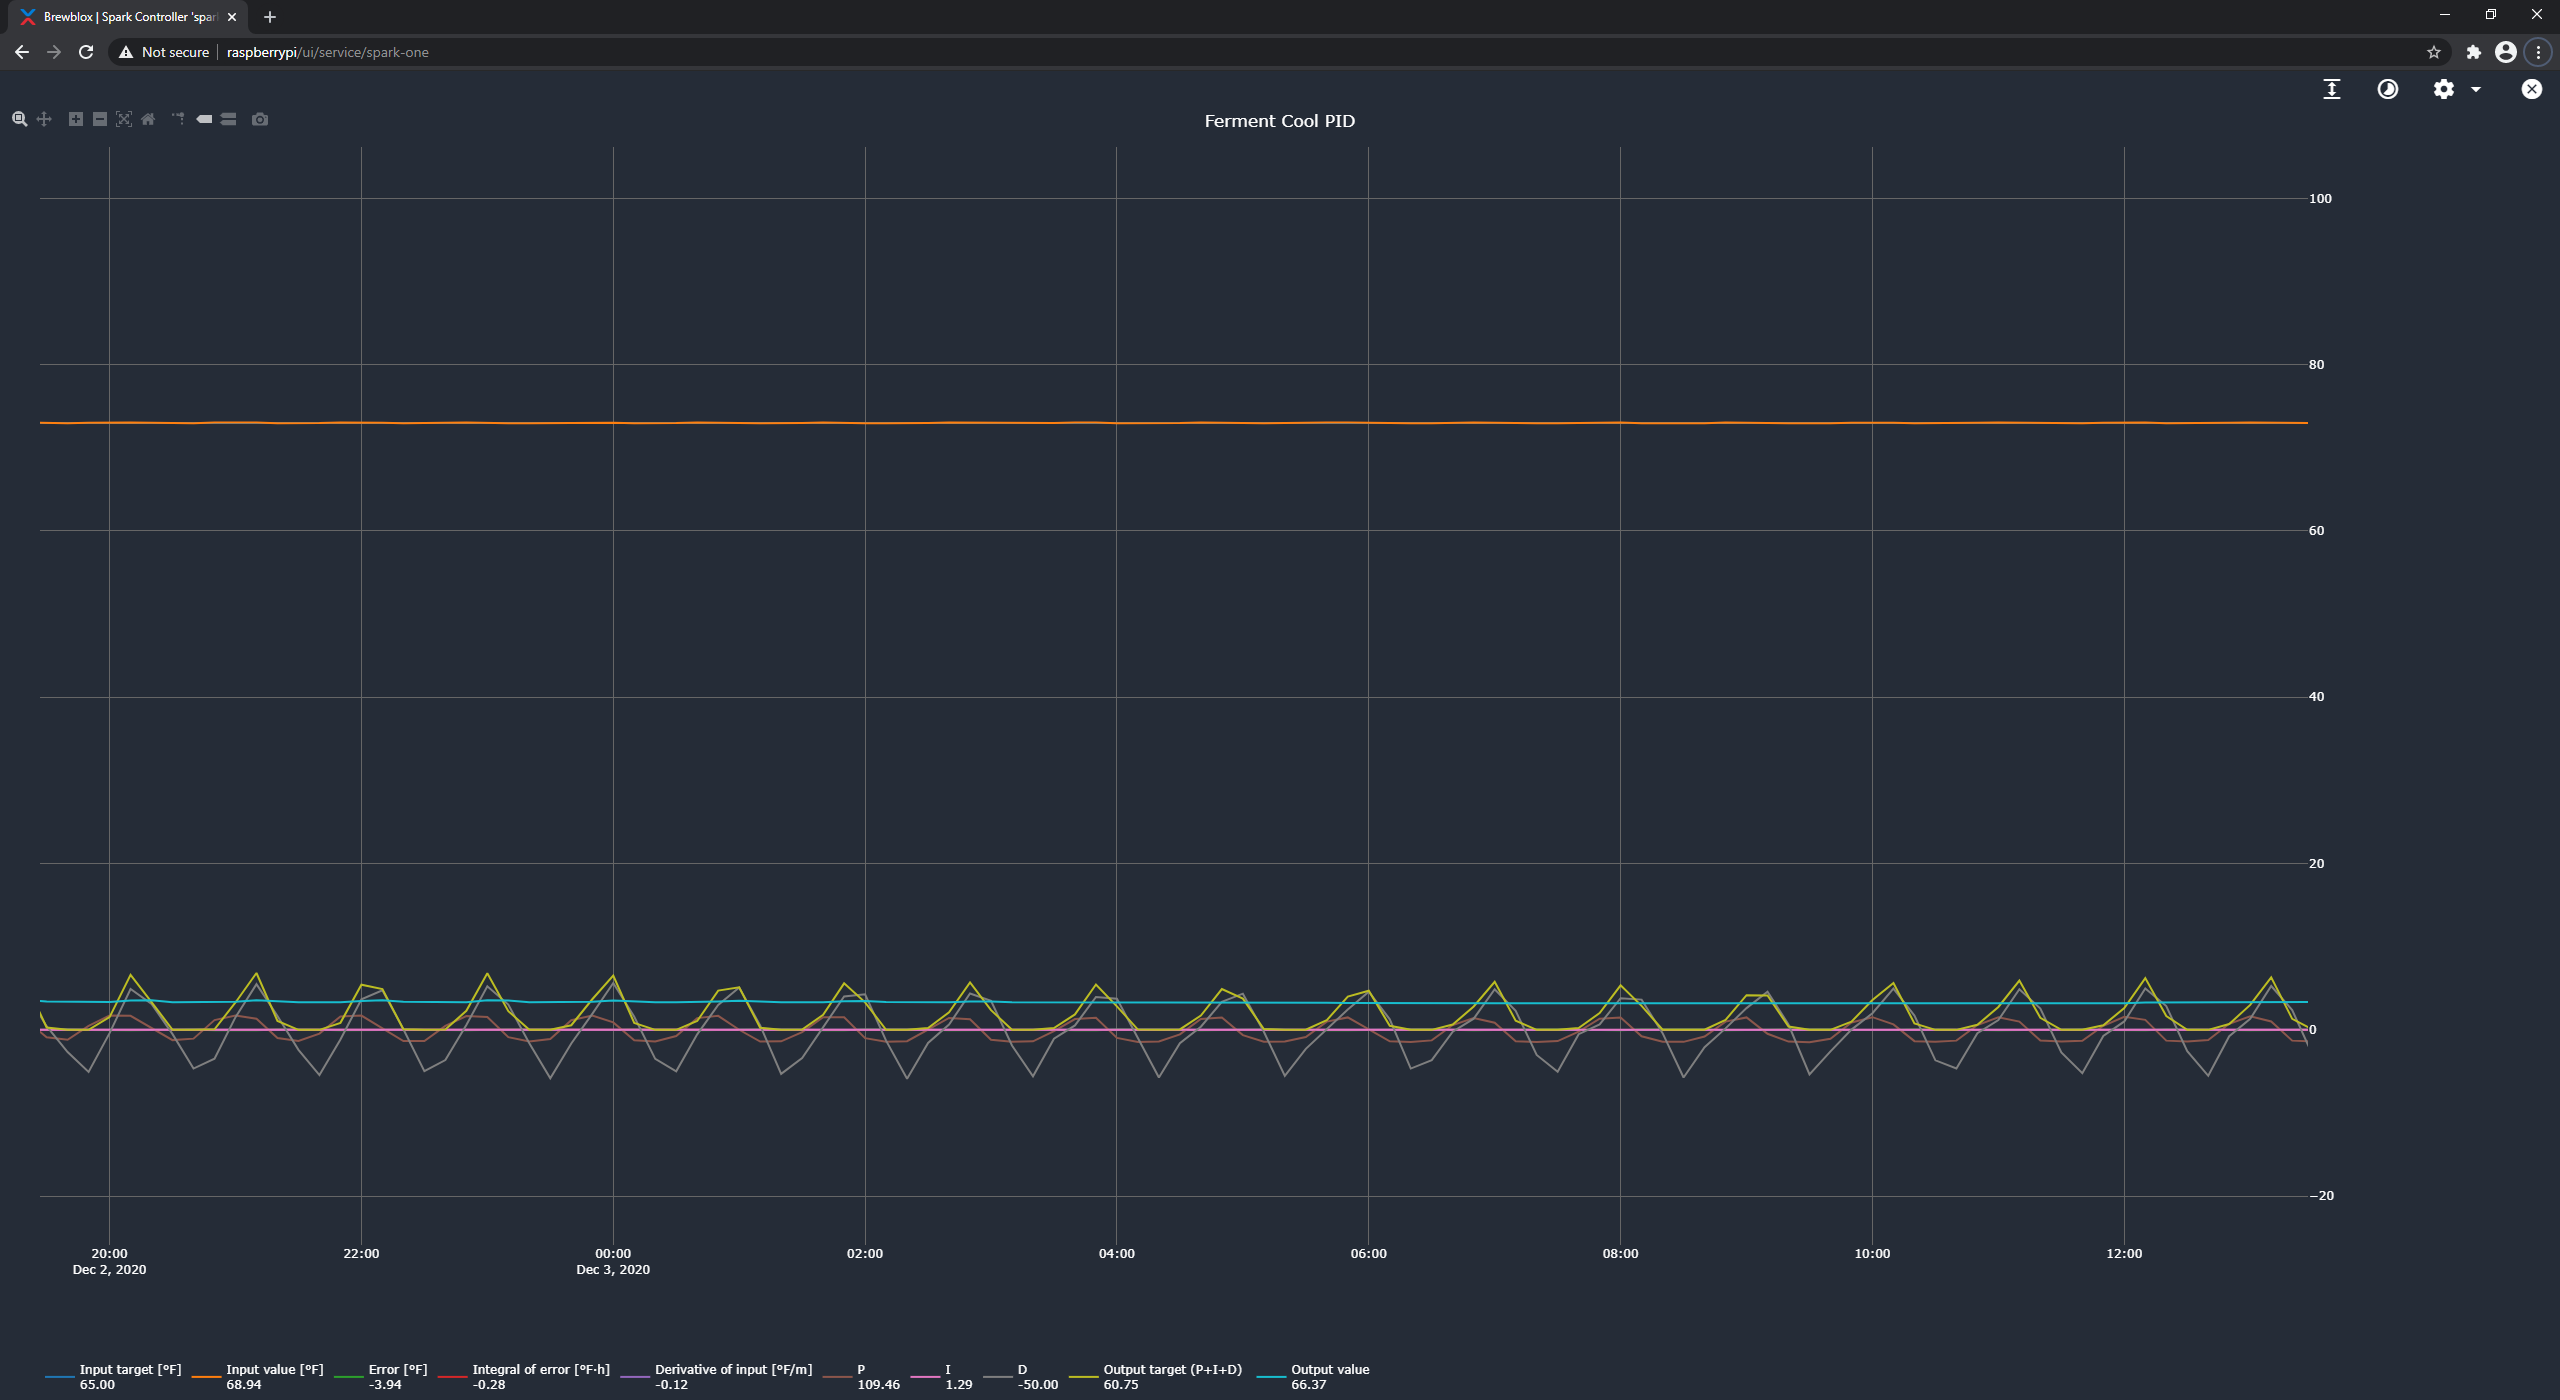
Could you please post the block graphs for heat and cool PIDs? Go to the service page, select the PID blocks, and open their graphs from the actions in the widget toolbar.
They are on different time ranges but during a cold crash. I intentionally adjusted the Ferment Mutex time because I wanted a more reactive temperature control during the exothermic portion of fermentation than the default 30 minute range.
Or wait… I was mistaken. The previous screenshots were at the end of fermentation prior to a cold crash. These ones are of the cold crash itself after it stabilized at the desired constant beer temperature setting:
To start, I’d recommend keeping your mutex lockout at 30m (or 45m for cooler, and 20m for heater). The lockout protects your compressor, and reducing it does relatively little for long-term temperature control.
Also do keep in mind that fridge air control requires different PID settings than fridge beer control. Your listed settings are typical for beer control. For comparison, the default values are:
From your post I guess you’re currently using fridge temp as target. In that case, you’ll want to bring your settings in line with air temp defaults, and go from there.
Current settings do look like there’s too much Kp. The output is mostly driven by P and D right now. In a steady state, P and D should be low, with I taking the lead.
To prevent confusion, could you be somewhat more explicit about current and desired situation?
Is this with beer / water in the fridge? If water, is it the same amount you’re planning to ferment?
For actual usage, do you plan to use beer or air control?
The readings I provided were from beer in a brewbucket fermentor with a thermowell, so that is the real-world use case there. I typically use beer control because that’s what I want to actually target. I’m not sure if the documentation mentioned what the levels should look like between Kp, P, D, and I, but that definitely helps me know what to shoot for.
My general process for fermenting is to look at the temp ranges White Labs provides (e.g. 65F-68F for WLP004) and build a profile to ramp from the low end to the high end over 3 days. Then I let it ride for another day or two before cold crashing down to 35F for a few days prior to kegging. Within that process there’s two goals around meeting the desired target temp: during the exothermic portion of fermentation where the PID needs to account for heat generated by the yeast (usually like 8-ish hours?), and the rest of the time where the yeast isn’t generating heat (e.g. holding at a higher temp for byproduct cleanup or cold crashing)
I definitely adjusted Kp a bunch, so I’ll revert those back to something more normal. This type of yo-yo effect is why I would often run my Inkbird controller without the heat element plugged in because it would over-compensate. I feel like this wasn’t as apparent with the old BrewPi setup but maybe it just didn’t show the problem as much.
I understand that a lot of people have all sorts of equipment and configurations just for fermentation control, much less hot side. These types of situations always makes me wish there was some kind of calibration process to follow that would feed real-word readings (e.g. time to drop water from x to y degrees and/or raise from y to z degrees) into some sort of algorithm that would spit out the “right” settings for the individual’s specific setup.
Then you can leave Ti / Td as-is for now. You’ll still want to reduce Kp. Apparently your setup is more efficient than the one we use as model for default settings.
“normal” vs exothermic steady state typically doesn’t require changes in settings. During the exothermic part of your fermentation you’d expect the I part to climb a bit more, but that’s about it.
Other than that, you have two significant sections of control: step response when cold crashing, and steady state. During step response you want the PID output to be mostly based on P (with some D when approaching setpoint), and during steady state it should primarily be governed by I.
Yo-yo effects can be counteracted by the mutex lockout, and by decreasing the Kp. Your P is kicking in too much in steady state, leading to overshoot, leading to overcompensation.
The Ziegler-Nichols process is popular for calculating PID settings, but there’s a definite learning curve involved for people (such as me) who check out when math starts using symbols.
It’s possible to automatically calibrate PID controllers, and it’s something we plan to implement. It’s a non-trivial feature, so no ETA on when we find the time for it.
Thanks again for the input and feedback. I feel like that’s enough information to help me get things squared away. If nothing else, I think this kind of information would be useful in the documentation to not just say how the formulas work, but how the variables should come in to play to make things work as desired (e.g. P vs D vs Kp for traditional situations). I totally understand and empathize on the math stuff for an automatic calibration situation. I’m not suggesting its easy, but it is a definite nice point for new or technically-challenged users around how to best configure the equipment they have.
This is not entirely correct. The minimum OFF time in the cool actuator protects the compressor.
The mutex lock time ensures you don’t heat directly after cooling and the other way around.
When the cooler has been turned on, it blocks heating for the next 30 minutes for example.
I think your settings are not that strange at all. You just need to have a much larger mutex lock time to avoid heating after cooling and vice versa.
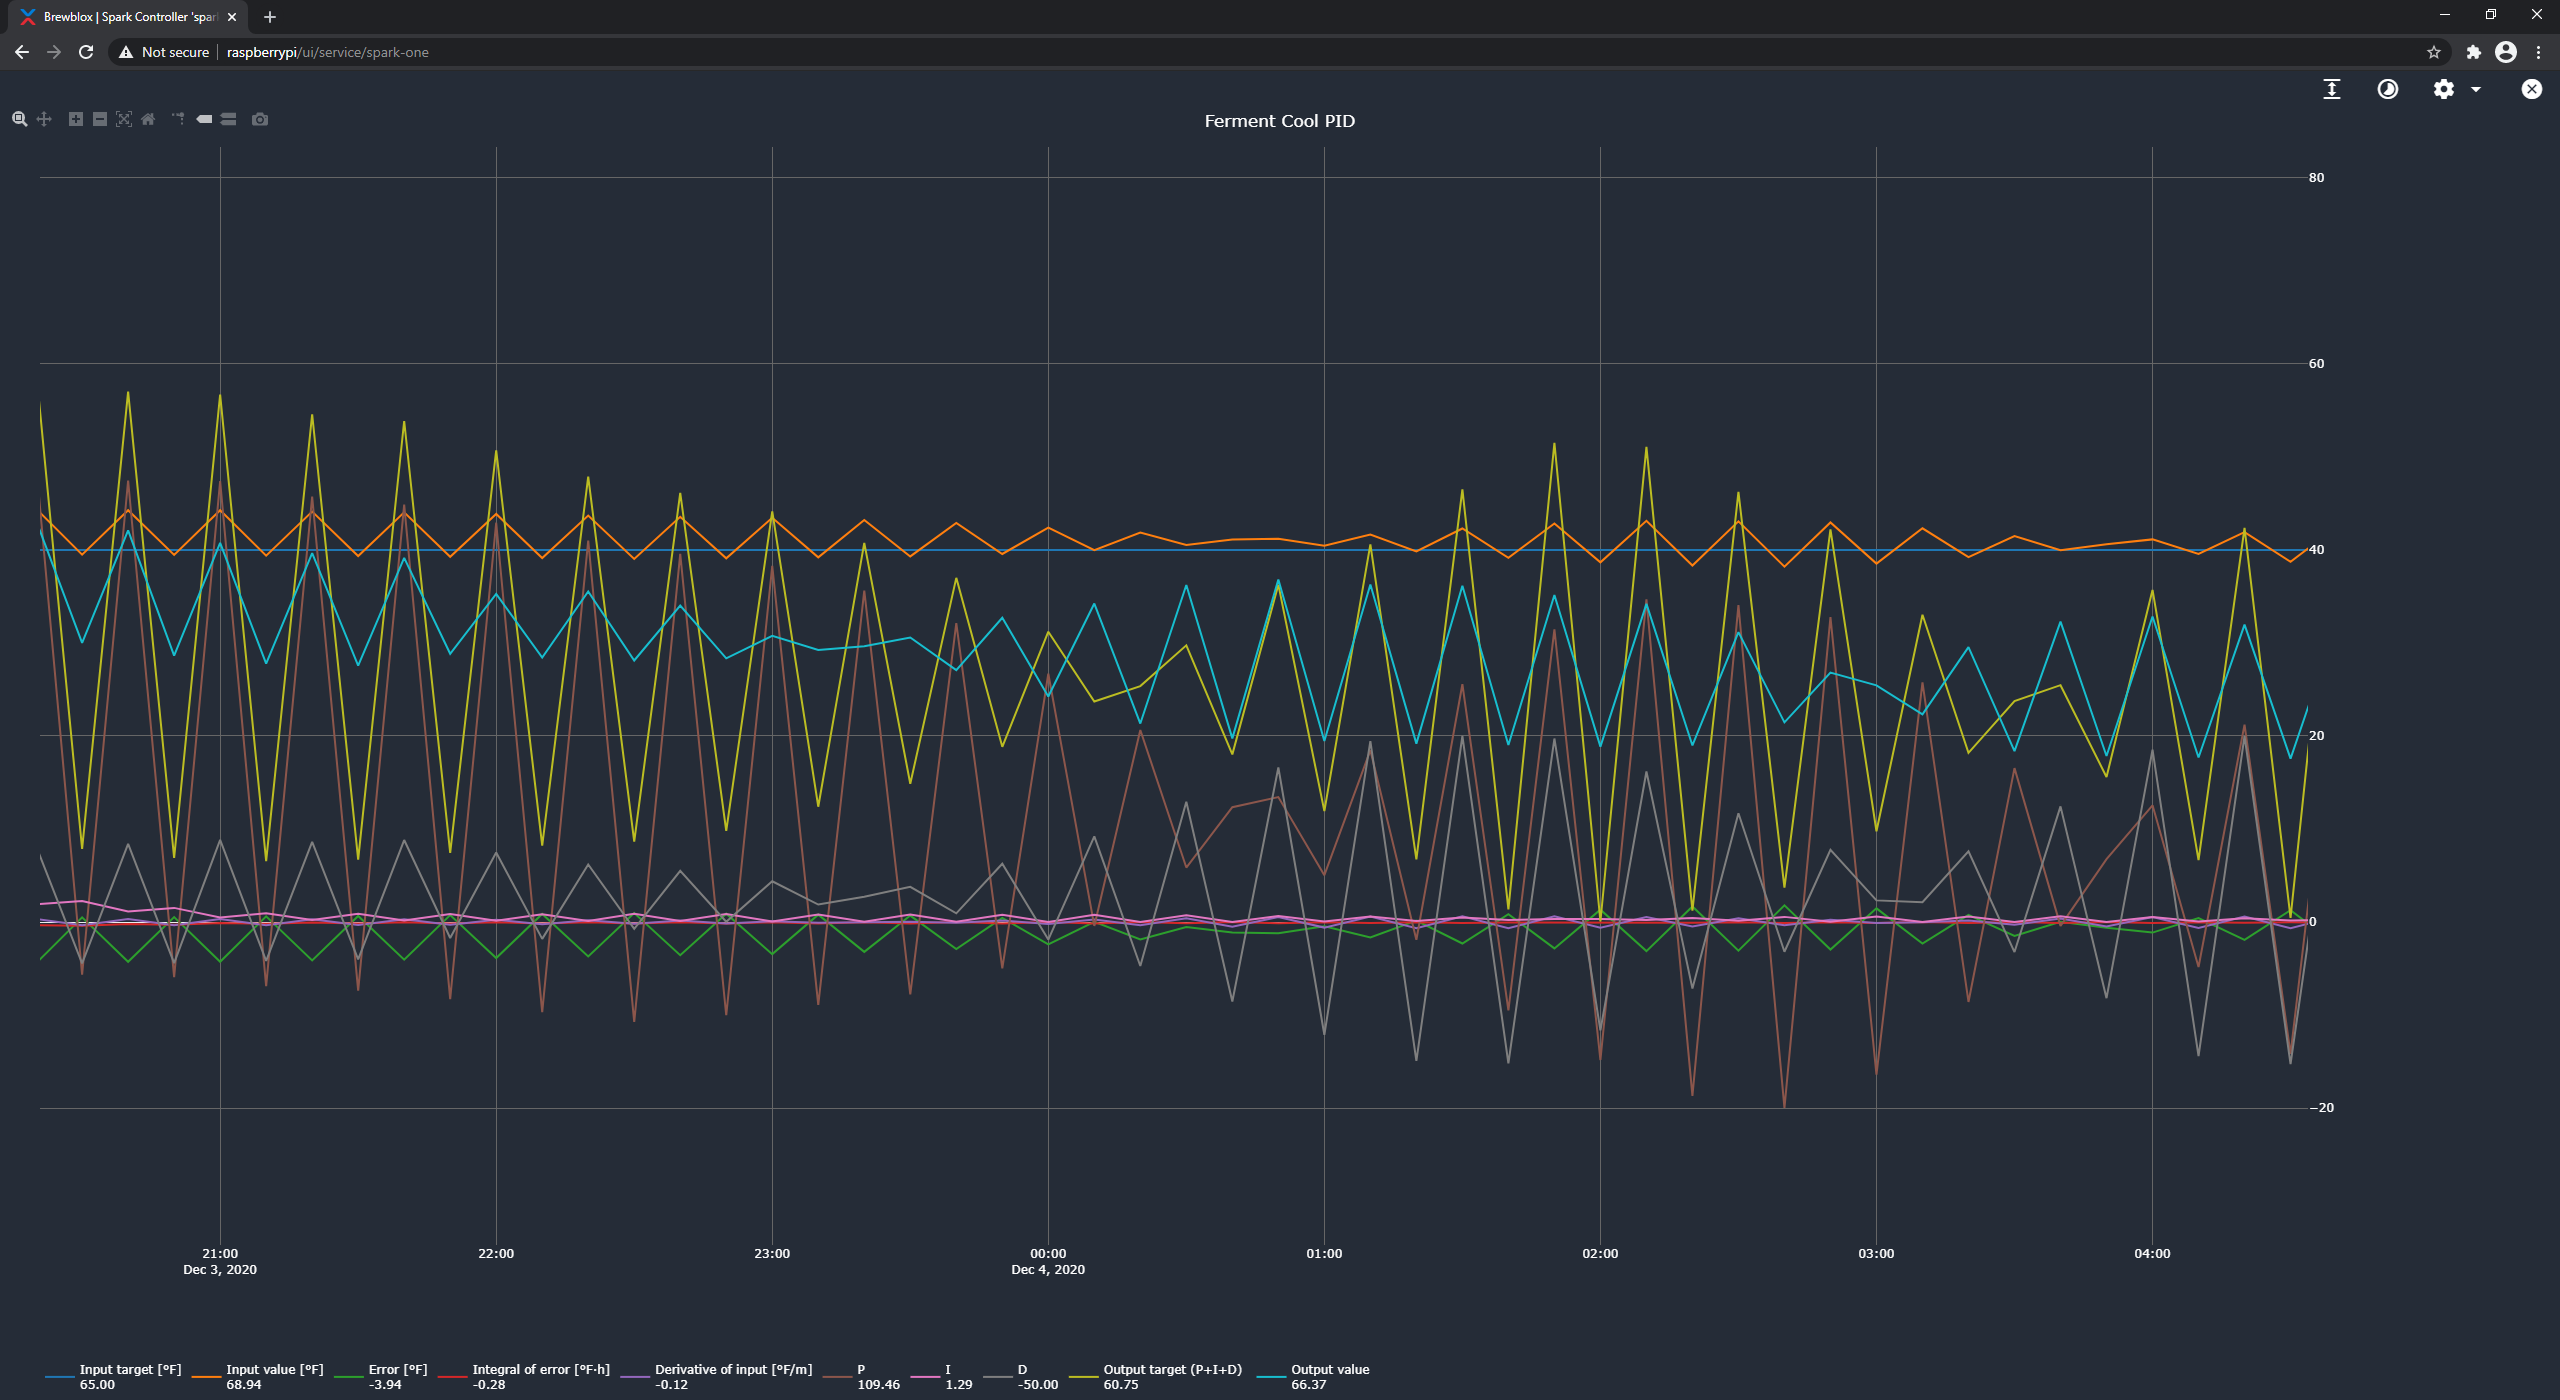
Your graphs for the PID seems to have very bad time resolution. What time frame was selected for these screenshots? Possibly it is a bug.
@Elco, those were just some random times I happened to pick out – so 7-8 hours. I have another beer currently fermenting so I intend to play around with things, as Bob suggested, to get P and D low with I being the largest contributor when holding at a steady temp.