Preliminary PWM actuators release

I have just pushed a preliminary release to GitHub with support for PWM actuators. I am not sure it is a good idea, because I will be going on a 2 week holiday! So this release will come with bugs and without support. :wink:
Anything that is broken will be fixed when I get back.

You can read the details on GitHub:

I have been testing the PWM actuators with sous vide cooking. I have not tested this in a mashing setup, or in a fridge.

I have tested in Fridge Constant mode: one sensor, one actuator.
This means the beer PID is not used. The heater and cooler are driven by a simple PI controller.
You will have to tweak the PI gains yourself, there is no autotuning.

It might be possible to use this release in a HERMS, with the beer sensor in the mash and the fridge sensor in the HLT. The HLT temperature setting will then be automatically adjusted based on the mash sensor, similar to how the BrewPi fridge algorithm works. I recommend setting a max temperature of 70C in that case, so you will limit the HLT temperature to the temperature at which the enzymes denature. I have not had the time to actually test this in my HERMS. It might not work at all. I have just finished the code and have no time to test before I fly to Vietnam/Cambodia.

Now for something that I have tested a bit:

Sous vide cooking with BrewPi
My setup is very simple:

  • A BrewPi Spark
  • A OneWire Temperature Sensor
  • A 40A SSR
  • A cheap rice cooker (700W)

In the video, you can see BrewPi give the rice cooker very short pulses to keep the temperature steady.

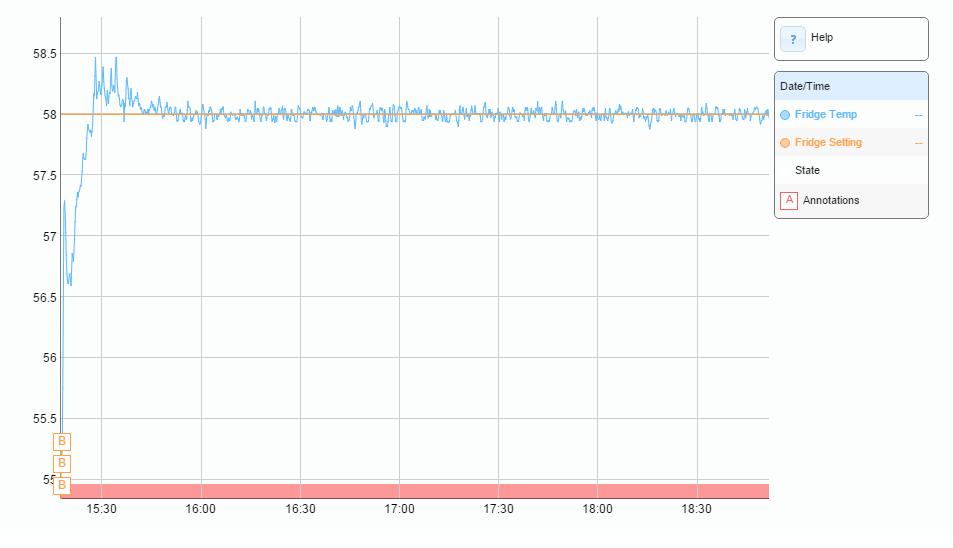
Today, I had marinated pork tenderloin for diner. When cooked at 58 °C for 3 hours, it is pink all the way through and very tender. After cooking in the sous vide, you just have to sear it at high temperature in a skillet.

And this is the result:

And the temperatures:

If you have a rice cooker, I really recommend trying this some day. Super easy, and super tasty. You don’t need a vacuum sealer, you can just use zip lock bags and the ‘water displacement method’.

I’m not sure if I should be excited or hungry…

Thanks for the action, right before you depart for your well deserved holiday! I’ll test this when i’m going to brew a new batch next weekend.

There is a minor error in the path shown in the instruction by Elco. The ‘s’ is missing from the ‘utils’ folder in the path, just correct it to get the commands running.

I couldn’t get the update to work. I tried through the web interface and I get:

Checking hex file size with avr-size…
avr-size error: avr-size: /var/www/uploads/brewpi-0.3.0a-core.bin: File format not recognized

I tried using DFU method and get:

Opening DFU capable USB device… Programming done, now resetting EEPROM to defaults
Opening serial port
Aug 06 2015 20:29:57 Opening serial port
Aug 06 2015 20:30:08 Errors while opening serial port:
Could not find compatible serial devices

:frowning:

I have removed some posts in this topic to provide a summary here: @Brewer has been a great help finding the flaws in my instructions and apparently my dev system is a bit different.
I have updated the instructions (see release on github) and hopefully the second person to try this will have a smoother ride.

1 Like

Hey @Elco just wondering what is the theoretical upper limit for PWM period? Not an issue for this release but in the future we will want to use PWM actuators for controlling fans and pumps etc. This will require a much faster period.

Longer term it could be worthwhile displaying the PWM duty cycle for used actuators on the screen (and maybe have the ability to easily manually adjust it for fine tuning).

Enjoy your break!

Hi Dan,

PWM could be very fast, if it is offloaded to internal PWM controllers in the processor.
If the main processor is involved, this would require all other code to be non-blocking, or multi-threading.
But I have not looked into hardware PWM capabilities for the Spark/Photon yet, because for AC current, it is not suitable anyway.

What I think would be a better approach would be to release a PWM pump/fan controller board: a simple board with it’s own microcontroller to do PWM, and a few output options: 0-5V, digital PWM and open drain PWM. So a board with transistors and diodes to handle switching large currents. And for example a molex connector for PC fans.

The board can communicate with the BrewPi Spark over RS-485 and even speed control could be offloaded, for fans that support it.

Before I go, some quick tips for tuning the PI controller in advanced settings:

  • tune in fridge constant mode
  • you can view the current PWM value in the device list if you check ‘read values’
  • Start with Ki at zero to tweak Kp, set it so you get minimal overshoot on a temperature step, but still approach it quickly enough. The steady state value will be slightly under setpoint.
  • increase Ki so after the step it will slowly increase the PWM value to compensate for energy losses and the temperature will slowly reach the setpoint. Don’t make Ki too high: it will go to setpoint quicker, but it could cause it to oscillate.
  • tune at the setpoint you intend to use later

@Elco, this PWM works only in Brewpi Spark? Or it can be used in Brewpi Arduino+RPi?

Thanks,

Fabiano

Thanks Elco.
I had a bit of a play at the weekend. I managed to get the latest release installed OK, and had a bit of time to play around with the settings. It was working great controlling my BIAB kettle, testing with about 12 litres of water. I had a bit of a tweak with the PID settings and was getting it dialed in quite well. I still need to do a bit more testing, but am impressed with how well it was working.

Hope you’ve had / are having a great (and well deserved) break! Looking forward to more updates.

It is Spark only for now.

@SwiftPint
Thanks for the feedback. Had a great holiday. I tested the PWM release on my fridge, but there is a bug in the cooling PWM generation… stay tuned.

Is the bug still present in the PWM release with fridges? I’d like to try this system with my HERMS, but I don’t want the fermentation control to cause an issue and ruin a batch of beer if I apply the update, as I’ll be using the same Spark for fermentation control after mash.

Alternatively, if it was possible to easily switch between modes (old control and new PWM control) that could be quite useful, as we could turn on the experimental pid class for mashing and revert to the reliable fermentation control for fridge control.

The bug is still present. I am doing the proper refactor this and next week that uses the tested PID and PWM classes instead of a hack. Therefore I have decided not to fix the bug in the code that will be discarded.

You can switch to the stable release by running flashDfu again, but all settings will be erased, so you will have to set up your devices again.

Just checking how this new release is going. I’ve been watching the github, but it doesn’t really give an indication of how close you are to the official pwm release at this point. Dying to try it out. :slight_smile:

I expect to test mashing with the PWM code this week. That is without a nice UI for it, but all the control code is there.
A release before the end of the November.

3 Likes

Hi @Elco

I have been using the preliminary release and am not to familiar with PID tuning (tried to use your earlier post advice on Aug 8th with limited success). The last couple of mashes I have done using the latest have overshot the temp and have taken a long time to level out (30min+). I have tried one batch where I let it get up to temp and then turn it off and restart the temp set point. That experience it allowed the temp to drop significantly and would not get back up to the desired temp for the rest of the mash.

Should I just leave the settings you have in their at default or is there a better tuning you have found? Or… does the new update that you mentioned being released before the end of Nov make doing step mashes easier and address this issue.

I am running a single 120v rims system in a 15 gal mash tun with a false bottom. Here is a video of the system in operation.

Thanks for continuing to push this project forward!

  • Nick

It was my understanding that the preliminary release was only proportion PWM control and not full PID. I might be wrong.

Hi,
Just a quick use case for the release. When using mash control, there will be a different set of temperature probes to when doing fermentation. It would be great to be able to give these device id’s and permanently associate them with a mash activity, similar to how there is beer1 and chamber right now.

Alternatively, if we can import/export device settings from a json backup file, we can make different configurations and just load them as necessary, though this requires more GUI work I’m assuming.

Yet another alternative is if you can give us something in the command line that we can run to backup the settings ourselves and we can swap between the configurations ourselves manually.

Finally, how do you feel the development going for the release at the end of the month? In the absence of a development blog, this might be a nice way to get a quick update on progress up to keep the fans quiet :smile:

The new release will be implemented completely different from this temporary PWM release. I do not recommend using this.

@molc: yes that was my plan, a quick dump and reload of settings to switch between fermentation and mashing config.