Hi Elco,
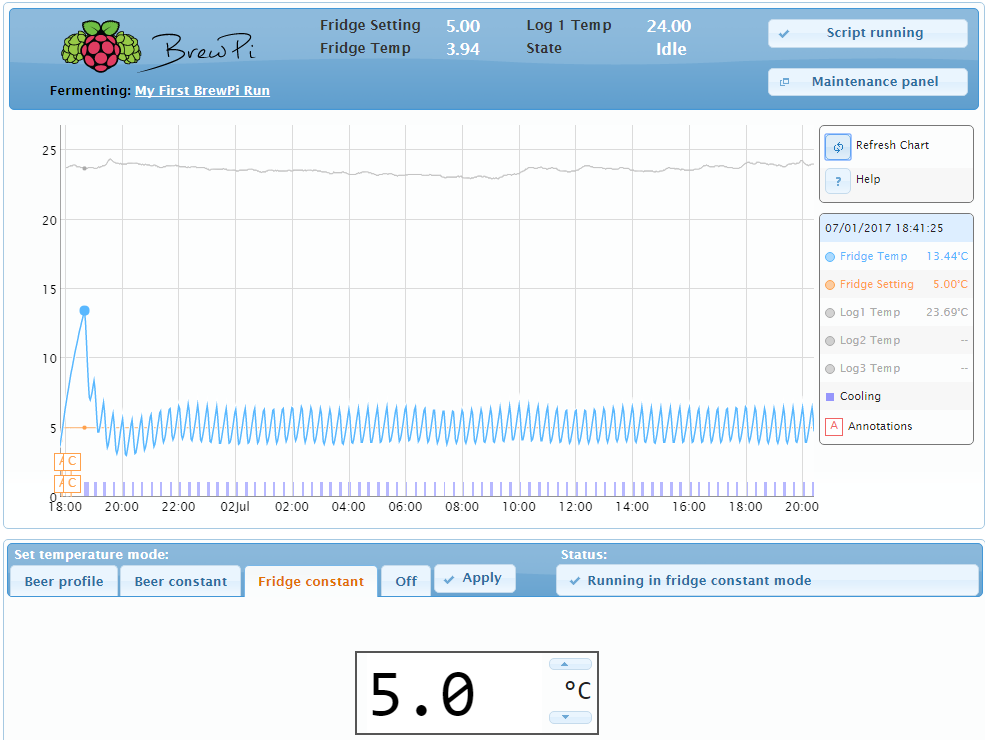
I’ve installed the rc2 candidate. See the graph below. I miss the timer in the interface. Is that coming back?
How can I see if the wifi interface on the Spark is working? Now I’ve still connected the Spark with a USB cable to RPI.
Hi Elco,
I’ve installed the rc2 candidate. See the graph below. I miss the timer in the interface. Is that coming back?
How can I see if the wifi interface on the Spark is working? Now I’ve still connected the Spark with a USB cable to RPI.
Hi Douwe,
To switch to WiFi, you can follow the instructions linked in the opening post of the thread: https://wiki.brewpi.com/how-to-setup-wifi-on-the-brewpi-spark
That timer is not coming back as it was, I’m going to work on an alternative. With the actuators driven with PWM, it didn’t show all the information, like heating at 10%.
Maybe you’ll want to increase the cooling PWM period, to 40 minutes or an hour. No need to control that tightly with short bursts if you’re just keeping a fridge at 5 degrees.
After some testing with @sbron running multiple docker containers, we discovered a bug.
If a TCP client goes down (server loses network or docker container is killed), this happens silently. The socket is not closed and the Spark is unaware that the client disappeared. Because of this, it is not listening for new clients.
I changed the implementation to always listen for new clients and if a new client turns up, drop the existing one.
In the script I changed:
I can confirm that the new version of the firmware and script is running smoothly. 
Tested with 2 different dockers running Brewpi web interface. Closed 1 docker and run the other one. Script starts correctly.
Close docker 2 and restart docker 1, script takes over the connection and runs smoohtly again.
Thanks @Elco for the support and the quick responses!
Can’t wait to buy a new one and run 2 Brewpi’s from 2 dockers 
Can someone explain what is: ‘running multiple docker containers’ ?
Perhaps with an example?
@Elco are we a long way away from being able to connect to multiple BrewPi’s from the same raspberry pi web interface? If it is a long way away is it possible to run multiple instances of the web interface/script from one Raspberry Pi?
You can run multiple instances on one pi.
I’ll write up an article on the new wiki about it.
What is the latest firmware version? Is there a place to find what the latest version number is?
Where do you find what version number your BrewPi is? I think I’ve only seen it on the screen when its in hardware testing mode. It would be nice if it was reported on the logging screen somewhere.
Coming from version 0.5.1, are the updating instructions the same? ssh into BrewPi to run the updater script?
It is reported when starting the script and under the boot logo.
You can update the firmware by running:
cd /home/brewpi/utils
python updateFirmware.py
The latest version is 0.5.2:
Ok, here comes the dense question. Am I supposed to ssh into RPi for this or BrewPi? I dont have that directory in RPi and I get refused connection when trying to ssh to BrewPi.
In the rpi,
If you installed with Docker, you can go to the portainer web interface (<rpi ip>:9000) then go to the brewpi container en click console.
I’m running a BrewPi Spark v2 and switched it over to wifi on the 0.5.3rc3 and I got it up and running but it frequently disconnects from my wifi after an hour or two and doesn’t reconnect. The signal strength while connected is quite strong so I’m not sure what is going on, a simple reboot clears the issue.
Any ideas?
I’m aware of the issue, but don’t know what the cause or the fix is. Sorry, I’ll keep looking!
Can’t restart my docker brewpi image without brewpi connected via USB. Why? How do I switch it over to WiFi properly?
Here’s what I did:
Built a docker-based install on an RPi2b, configuring with the USB TTY device, as my brewpi had v0.4.4 firmware. I used that docker install to run the updateFirmware utility and upgraded to 0.5.2 (latest release listed).
I then updated /home/brewpi/settings/config.cfg with the following port command to override the default:
port = socket://192.168.4.244:6666
I followed the instructions to configure the brewpi for my wifi, and that’s the correct IP showing up on the display.
The status LED is slow-blink green as expected.
When I try to restart the docker container, it’s complaining it cannot find the tty device (since the brewpi is no longer plugged in directly…
$ docker start brewpi
Error response from daemon: linux runtime spec devices: error gathering device information while adding custom device "/dev/ttyACM0": lstat /dev/ttyACM0: no such file or directory
Error: failed to start containers: brewpi
What additional steps do I need to perform to get this working via WiFi? What did I miss?
Any chance I could get a rough estimate of when you’re hoping to release the new software with multiple simultaneous processes/chambers?
dropped the container and recreated without the -device parameter. seems to connect now.
Will there be a way to allow it to connect either way with the same container? if wifi goes wonky and I need to do an update or something, it would be nice to have the option to hardwire it the “old” way without having to rebuild the container.
Did I miss something?
I think maybe running the container with --priviliged will give it access to USB without needing explicit forwarding. I have not tested this yet though.
I have the original brewpi spark core. Am i better off switching the core for a photon? Or going for the full upgrade to the brewpi spark 3. Upgrading just the core will be cheaper, but will I miss out on features etc going forwards?
The core has a lot less memory than the P1 and Photon. That’s our constraint in trying to make all features available on the
core. Currently WiFi is too big to include on the core. We hope to save memory in the future to be able to include it, but no guarantees.
The P1 and Photon are very similar and I don’t see them differing much in features in the near future. I would go with the cheap Photon upgrade first.