@quantum8
See the first post here under “Arduino users”:
So in other words, I have to run the updater script to switch the branch afterwards. Thanks @rdharles.
This information should be collated in the main software install guide for new installs, or at least linked to this other information.
With newer versions of debian / raspberian & Apache2, the default directory has changed to /var/www/html.
I wouldn’t recommend reconfiguring for the old directory name, simply using /var/www/html when needed in the brewpi install/config.
Elco,
settings/defaults.cfg has a variable of wwwPath= /var/www/
Updating the brewpi/settings/*.cfg file path to /var/www/html should be sufficient (rather than modify any 3rd party package configs.)
That said, a couple of files have a hardcoded definition including the old Apache DocumentRoot path (/var/www/… instead of /var/www/html/…) rather than depending on brewpi’s own custom config variable.
including:
/home/brewpi/BrewPiUtil.py
/home/brewpi/utils/fixPermissions.sh
Best to include an environmental vars parameter file that the scripts source, and use that var - or make the scripts smart enough to find either the old & new paths rather than hardcode only the old one.
1 Like
I have the new BrewPi Spark v2 Controller and I am trying to get it to control the Sainsmart 2 channel relay. I notice that the digital output is only @4.8v not 5v … could this cause the relay to not “click”?
First off I understand that you don’t recommend these relays however from what I understand the SSD relays ONLY work with AC output…I am using 2 DC devices (DC heater & DC pump) from a SS Conical Fermenter Temp Control setup.
On the 4 PIN [GND, IN1, IN2, VCC] I connected:
BrewPi Digital Out (set 0) + <----------> IN1
External Power 5V + <------------------> VCC
External Power - <------------------> GND
On the 3 PIN side of the realy [JD-VCC, VCC, GND]:
The jumper was on the JD-VCC & VCC
The GND was not connected to anything
I have verified that the relay does in fact work. I have verified the touch screen on the BrewPi does in fact turn on/off the digital outs (each one is pushing 4.8V).
I am a NOOB when it comes to the relays and the hardware portion of this project I must admit, the schematic found here: http://www.sainsmart.com/arduino-pro-mini.html did not help me.
The problem is that you have not connected the grounds of both boards. This means that the digital output is floating. The 5V has no reference. Voltages are relative, so you need to connect both grounds, so that 5V on one board is the same as 5V on the other board. So the green digital out on the BrewPi Spark needs both wires connected.
1 Like
You can make it a lot easier, and less noise buy using a DC - DC SSR. I’m using two of those to control 2 12vDC items (Pump and Heating pad) and only needs 2 wires from Spark.
Hello, I followed the instructions exactly but wanted to know if now is the time to connect the spark brewpi v2 and if you need to install some other script. I loaded the OS, I updated the Raspberry Pi 3 b (updates, upgrades, and rpi-update) I have given static ip and then I launched sudo apt-get install git and git clone http: // … … the folder is created in the home / pi / brewpi tools but when launch updater.py does not find the home / brewpi tools folder. Now I’m a bit confused because this guide is completely different from brewpi 0.3.0 documentation where the steps to do are much more. How should I proceed? Sorry for my English.
For a single BrewPi Spark connected to a Raspberry Pi is just 3 commands to do the install of the BrewPi Software.
sudo apt-get install git
git clone https://github.com/BrewPi/brewpi-tools.git ~/brewpi-tools
sudo ~/brewpi-tools/install.sh
The update script is only for down the road when they release new version of software or core software companants need to be updated
sudo ~/brewpi-tools/updater.py
1 Like
I have followed the Software Install Guide faithfully but from the BrewPi Browser I cant get the script to run.
In running updater.py I am asked …
*** Updating BrewPi web interface repository ***
The path ‘/var/www’ does not seem to be a valid git repository
What path did you install the BrewPi web interface scripts to?
Can anyone advise what the answer to this question is ?
If you are using Wheezy take the default. If you are running Jessie, it should be /var/www/html.
New RaspPi users may have an issue remotely (outside of LAN) accessing a wifi ONLY BrewPi Server (i.e. not ethernet cable connected). This is because external port forwarding from many routers will have a difficult time forwarding correctly (from external …no issue if within LAN or using VPN).
seems that eternal port forwarding (without ethernet, eth0, connected, REQUIRES the implementation of the static IP to be hard coded (i.e. not via GUI):
static ip_address=192.168.1.XX
SOLUTION:
ssh into your RaspPi:
sudo ssh pi@YOUR.RASP.Pi.IP
sudo cd /etc/
sudo nano dhcpcd.conf
edit the /etc/dhcpcd.conf file and add the the following:
static ip_address=192.168.1.XX
where 192.168.1.XX is your RaspPi 's static IP for the wlan0 (wifi adapter). I would recommend also adding an IP reservation to your router OR place the RaspPi’s wifi IP outside the dhcp range on your router.
The GUI assignment of defining an IP does NOT make it static…and in turn will not allow your router to port forward to the wlan adapter
Is it possible to use the Sainsmart 2 channel relay for both heating and cooling? I had it hooked up (incorrectly apparently) and anytime 1 relay would go meet the critera to turn on it would turn both on… I think becase the VCC is shared? Attached is a picture… perhaps you can tell me where to place the remaining 2 wires (port 1 +/-)…thanks in advance.
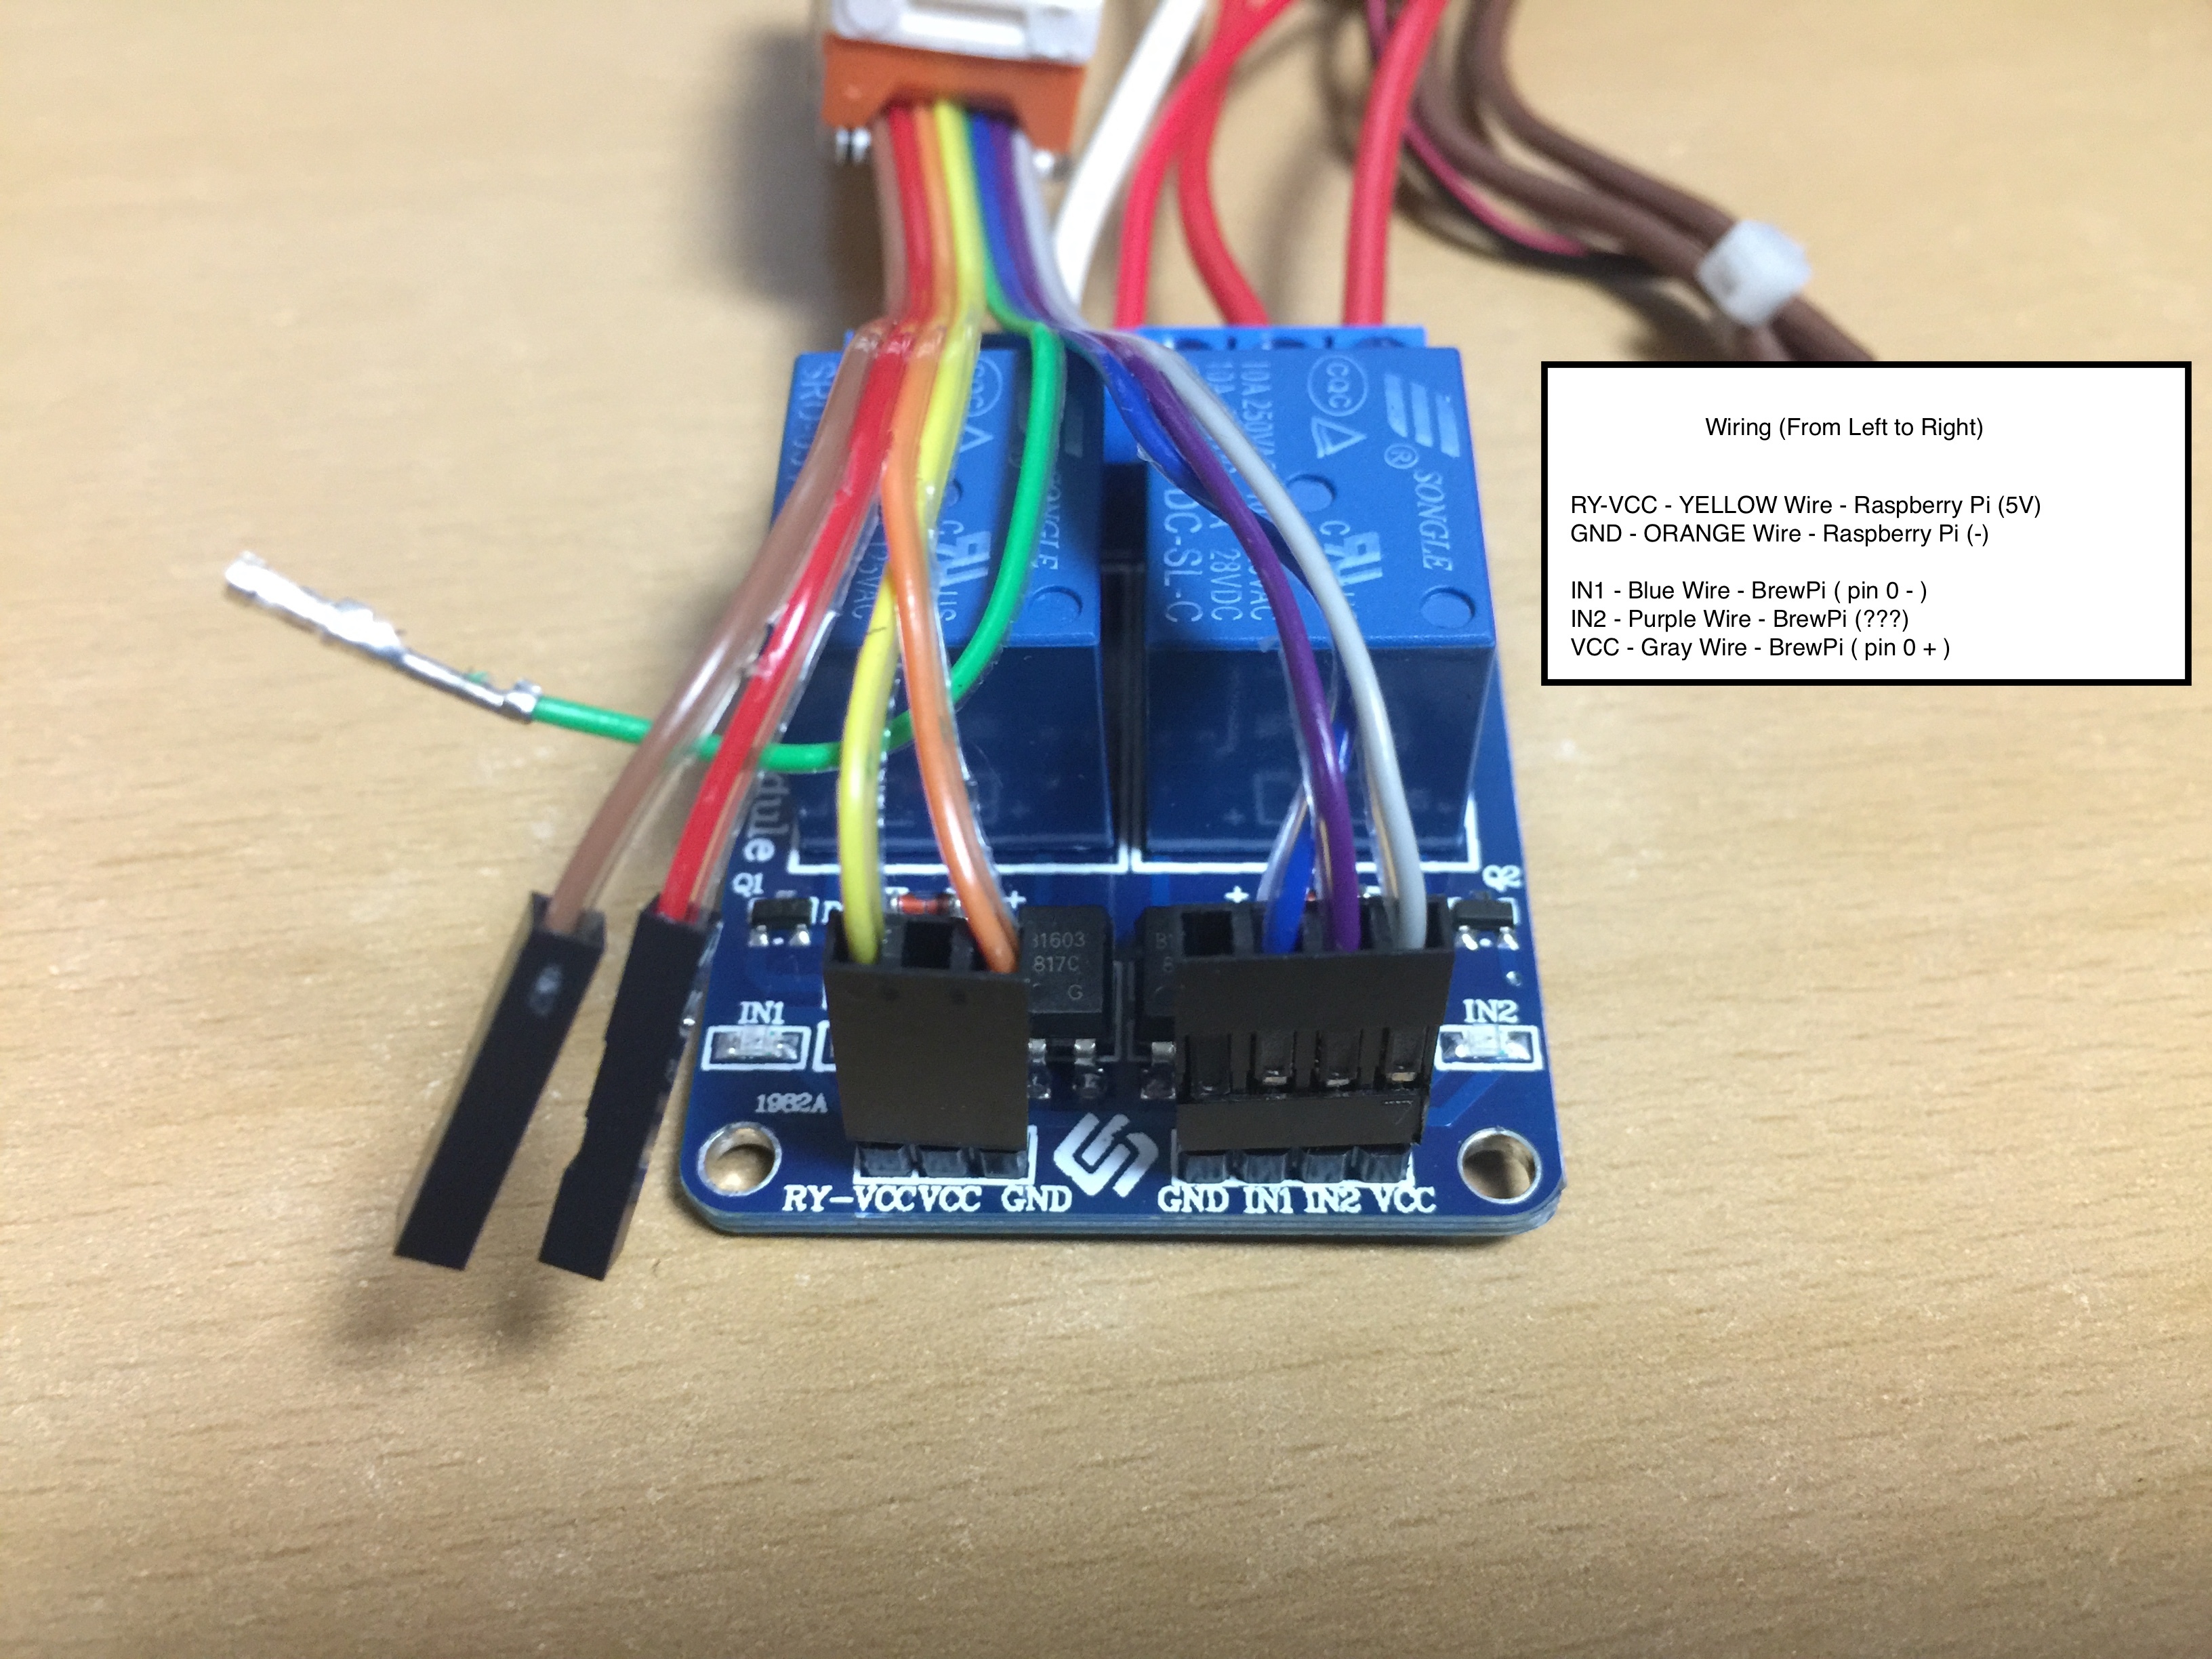
I recommend using SSRs, because they switch on a zero crossing of the AC signal and will cause less noise and interference because of it.
It will also be easier to connect, because this board needs a separate supply for GND and VCC.
This is how another user solved it:
Please note that the BrewPi Spark switches the negative pin, not the positive pin.
Everything I am running is DC (12V DC pump and heat pad).
In that case, SSRs would not work. The rest still applies.
after adding to /etc/network/interfaces file my internet doesn’t work anymore. The browser says “This site can’t be reached”
This is my fourth attempt at installing and my fourth time installing Noobs to get the Brewpi running. My patience is about up. Had I known the installation would occupy so much of my time I wouldn’t have purchased one. I feel a little cheated as at no point were there warnings that this is a device that requires moderate understanding in computers. What is the point of buying the pre-fab item if it requires the same degree of setup as making your own?
Sorry if I am coming off as ornery but I have put in close to 15 hours on this and I keep finding myself at the beginning again! What am I doing wrong if I am following your directions down to the word?
Can you connect a keyboard and monitor/tv connected to the Pi?
That would make it a lot easier to fix the Internet connection instead of starting again.
I suggest you skip the static IP settings and install avahi-daemon:
sudo apt-get install avahi-daemon
This is the same as the bonjour service by apple. If you already have iTunes installed on your PC, you can now access the raspberry pi by visiting: http://raspberrypi.local
I’ll also reply to your e-mail with my Skype details so you can ask for support directly, because you put in so much time already.
Thank you Elco, I appreciate the help!
Hi. I’m still having a ton of trouble just getting the Brewpi set up. I’ve followed the install and tried to run the updater, but am getting the following error at the end of the process “Could not find compatible device in available serial ports”. The Brewpi Spark V2 is attached to the Raspi and the display is on. I am able to go through the touch screen callibration. I have some probes plugged in and the screen shows a room temperature reading. I just cannot seem to get the Brewpi to communicate with the Raspi. You’ll have to forgive my limited understanding of code, but I’m unsure of how to look into the serial port mapping to try and direct this the proper way.
Any help is greatly appreciated. Thanks in advance.