BrewPi 0.4.2 - How to update

BrewPi 0.4.0 is out! This release is a complete rework of the control algorithms, you can read more about those here:

This posts describes what you need to know to update and to configure your BrewPi.

For the change log, check GitHub:


Arduino users
This new release did not fit into an Arduino and it is unlikely we can make it fit in the future. To keep using your Arduino version of BrewPi, and to prevent our update scripts from updating the UI to something that only works with 0.4.0 and later, change your branch to the ‘legacy’ branch. Run the updater with --ask. It will ask you which branch to check out. Choose ‘legacy’.

cd ~/brewpi-tools
sudo python updater.py --ask

Updating your BrewPi (BrewPi Spark Only)
To update to the latest release, you can simply run our update script from the brewpi-tools repo.
If you followed or guide, this will be in ~/brewpi-tools/

So log into your brewpi via SSH (for example using putty

And then run the following commands:

cd ~/brewpi-tools
sudo python updater.py

Quick tip: use TAB to auto-complete file names. You’ll make less errors.

The updater will update the script, web interface and dependencies. It will then ask to check for updates for your controller

That’s it. If you are up-to-date.

If you installed the web interface and script manually, you will have to update them manually. You can probably do this with a git pull. To update the controller run:

cd /home/brewpi/utils
sudo python updateFirmware.py

Configuring your devices
Setting up your devices has not changed. If you are lucky, they have even been restored for you.

There is one new device function: manual actuator.
If a device is configured as a manual actuator, you will get a toggle button in the device manager. This is available for digital pins and valves.

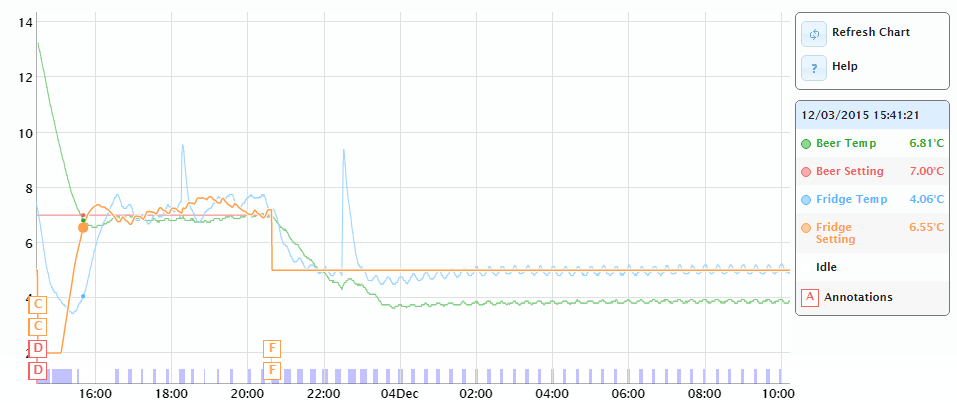
The new control algorithm and PWM
To control fermentation, BrewPi has now 3 PIDs, as described in this topic:

There is a PID for your heater, a PID for your cooler and a PID to convert the beer temperature error into a fridge setpoint. For each of these PIDs, you can configure:

  • Kp: the proportional gain. The output will be Kp * error.
  • Ti: the integral time constant. The proportional part is added to the integral each second. The output is integral/Ti. In other words, the integral grows the proportional part every Ti seconds.
  • Td: The derivative time constant. The derivative (degrees per second) of the input is multiplied by -Td. This will lower the output when the controller is approaching the setpoint fast. Td* derivative should equal the amount of overshoot you expect.

The output of the heater PID and the cooler PID control a is a percentage (0-100). At 100, the actuator is fully ON.

The output of the beer-to-fridge PID is a temperature difference between the fridge setpoint and the beer setpoint.

The default settings should probably be okay for fermentation. For mashing, I will create a new topic.

Filtering:
The temperature filtering has moved inside each PID as an input filter and a derivative filter. My suggestion for fermentation is:
Beer-to-fridge filters: 18s and 78s.
Cooler: input 18s, derivative 78s.
Heater: input 18s, derivative 78s.

Other settings
For the heater, the PWM period is 4 seconds: it will give a variable width pulse every 4 seconds.
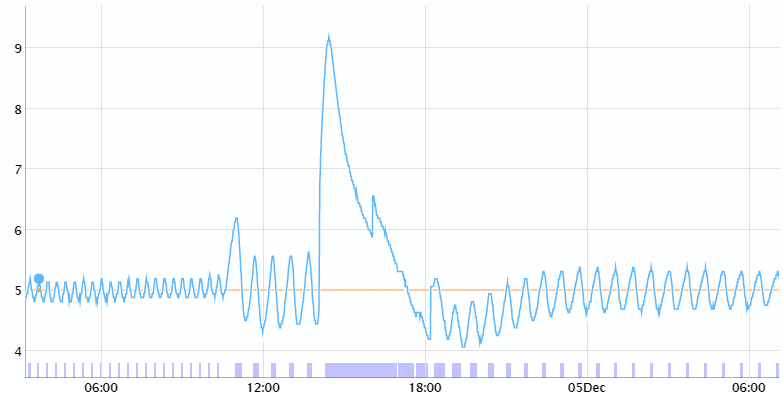
For the cooler, this period is 20 minutes.
For the cooler, there is a minimum ON time and minimum OFF time. This is to protect your compressor. These minimum times will be honored regardless of the PWM value. The controller is smart enough to achieve the correct average while working around them.

For the beer to fridge PID, you can set the maximum difference between fridge and beer setpoint, to prevent the fridge setpoint from running to far away from your beer setpoint.

Want to know the details?
On the control algorithm tab, you will find the state of all control objects on the controller. It is very complicated and not user friendly, but it will allow you to see all the details of what the algorithm has calculated internally.

Update 0.4.1

I discovered some things not working well in the algorithm when a heater and cooler were used to control a small volume that reacts quickly. This update prevents integrator windup and overshoot by reading back what the actuator has achieved within its constraints (minimum on/off time, mutex group dead time, etc).
It also has some changes that make the derivative work much better, which also helps to correct overshoot.

The default settings have been changed with this release. It is recommended to not restore your settings when updating from 0.4.0. You can restore your devices.

4 Likes

Just to clarify, the fridge compressor isn’t actually PWM driven as that doesn’t make any sense to me with a single phase A/C motor. We are still doing just ON or OFF correct? With a little work it would be good with a modern inverter compressor though.

Also, the heater isn’t PWM driven either right? As in no frequency reduction or waveshaping? While it makes more sense with certain types of resistance heating that might not work well with all types of heaters.

The default PWM period is 4 seconds for the heater, 20 minutes for the cooler.
Don’t think of this as the PWM you are used to, like 100Hz. This is slow PWM, 1/4 Hz and 1/1200 Hz.

The compressor will just turn on every 20 minutes, for a period of value/100 * 20 minutes. If you think that is still too often, you can increase the period.
On top of that, the PWM actuator drives a time limited actuator which:

  • When the compressor is running, won’t turn it OFF until the minimum ON time has passed
  • When the compressor is not running, won’t turn in ON until the minim OFF time has passed.

When you are running a fridge at 20 degrees, it will only need short bursts of cooling. Using a regular pulse, like 3 minutes every 20 minutes will give a smoother result then our old algorithm. This is because there is a lot of slowness in the fridge: before you are measuring the result of running the compressor, you have likely have been running it for too long.

Here is an example of my fridge:

The beer temperature was just a glass of water for testing. Running in beer constant 7 degrees until F, then back to fridge constant 5 degrees.
As you can see, it fluctuates very little with the PWM period at 20 degrees in fridge constant mode. I’ll probably increase the period on mine.

Hi,

i just updated to the new version but i think something isn’t working as it should.
The update process finished without any issues and the script is starting. But none of the new variables shows up in the “Advanced Settings” tab. (As Beer-to-fridge filters,…) It seems that there are still all the old variables but all the fields are empty and cannot be filled by “reload defaults” or the other options. The Brewpi itself is working, but after half an hour or so it beeps and looses the connection to the raspberry. Also it cools only in 2.5 minute cycles.
So I decided to make a complete clean install but it did not change anything.
The only thing I can read out of the stderr is that the wifi checker has some errors.

stderr.txt (9.2 KB)

I hope you can find the error/bug.
Thanks!

I think I solved the Problem by choosing the “feature/0.4” branch instead of the “master” branch. Should it be this way?

Whoops, I pushed to the wrong remote, the official GitHub repo was not updated.
Try again please, master should work now.

Nice work, Elco! I know you put a lot of time an effort into this.

I tried the master branch yesterday and the frigde was running over night :blush:

I think I found a small bug. I don’t know what triggers it but the BrewPi is beeping and loosing the connection to the web interface. But after a short time it reconnects and runs as before. I mentioned this now three or four times.

I think it is related to the following lines in the stderr but i’m not shure because of the missing time stamps.

Dec 04 2015 01:47:52 controller debug message: INFO MESSAGE 12: Received new setting: beerSet = 20.0
Traceback (most recent call last):
File "/home/brewpi/brewpi.py", line 725, in
ser.write('l')
File "/usr/local/lib/python2.7/dist-packages/serial/serialposix.py", line 518, in write
raise SerialException('write failed: %s' % (v,))
serial.serialutil.SerialException: write failed: [Errno 5] Input/output error
Dec 04 2015 09:26:06 Opening serial port
Dec 04 2015 09:26:06 Notification: Script started for beer 'My First BrewPi Run'
Dec 04 2015 09:26:16 Checking software version on controller...
Dec 04 2015 09:26:16 Found BrewPi v0.4.0 build 0.4.0-0-g051a22b, running on a Particle Core with a V1 shield on port /dev/ttyACM1

Edit: The bug only shows up when being in the maintenance panel of the web interface

Just install branch Master. Upgrade script worked flawlessly but after upgrading firmware on my brewpi i am stuck in touch calibration screen. The cross moves between top left, bottom right on and on again. Cannot get past it. What could be wrong?

What are the values that are printed on the screen?

They should be about 1600, 1600 for the first cross and 250,250 for the second cross.
If the controller receives coordinates that are likely incorrect, it displays the crosses again. It sounds like that is happening here. Maybe the enclosure is pressing on your screen?

I have no cabinett installed so it is not pressing but i do not get the values you mentioned.

More like:
X1: 18 Y:1 1487
X2: 218 Y:2 1536

But is very different each time. I will try some more times to see if i am able to get it.

Now the touch do not respond at all. Think it is broken. Have a new display on its way already. Ordered a new one as mi display sometimes looses some lines in the display.

Is there any possibility to get past the touch calibration so that i get it up and running? Without the touch that is.

On the Photon it times out after 60s, on the core we couldn’t fit freertos, which handles the timeout. I shipped your order today.

1 Like

When I put in

I get

Python: can’t open file ‘updater.py’ : [Errno 2] No such file or directory

You are not in the right directory. I updated the instructions.

With the new code, it is entirely up to you how often your compressor runs:

Here you can see the difference between a PWM period of 20 minutes and 40 minutes. The peak is due to opening the fridge and putting some new stuff inside.

In older firmware i used one of the outputs to run my fridge fan. In this release it seems that i do not get the fan running. If i remember correctly the fan ran when the fridge was cooling or heating. Not a big problem in itself. I will just put the fan as always on instead. Just wondering…

Hi, that functionality has indeed not been migrated yet.
My opinion is that it is better to leave the fan running continuously anyways.

When you are cooling, you are chilling the back of the fridge. When the compressor stops, the back wall of the fridge is still much colder then the rest, so keeping the fan on to get the cold back wall to cool the air is better.