The long awaited moment is finally there: BrewPi will be updated to 0.4.0.
This is our biggest release yet and it is a complete overhaul of the control algorithms. The update is almost entirely in the firmware (controller software) and not in the script or web interface. Most changes are therefore ‘under the hood’ and you might not notice them immediately. In this post, I will give a quick introduction into the new modular control algorithm.
New control algorithm(s)
I completely reworked how PID works on the controller and how actuators are driven. I will try to explain it here.
In version 0.2.11 BrewPi worked as follows:
- To control fridge temperature, BrewPi just turned the heater and cooler ON and OFF, taking overshoot into account to stop cooling early.
- To control beer temperature, BrewPi used the Proportional error, Integral of the error and the Derivative (together PID), which were added to the beer set point to give a fridge set point.
So to summarize: the fridge temperature was not controlled with PID, but the fridge set point was adjusted dynamically with PID.
In version 0.4.0, we are moving towards running multiple PIDs: for each actuator and for dynamic set points. These PIDs are independent.
Instead of doing the PID calculation directly in the control loop and turning outputs ON and OFF in a in if statements, things are much more modular now. There are classes for PIDs, setpoints, actuators, etc. Let me show the simplest example:
A simple example
The simplest case is running BrewPi with one sensor and one heater.
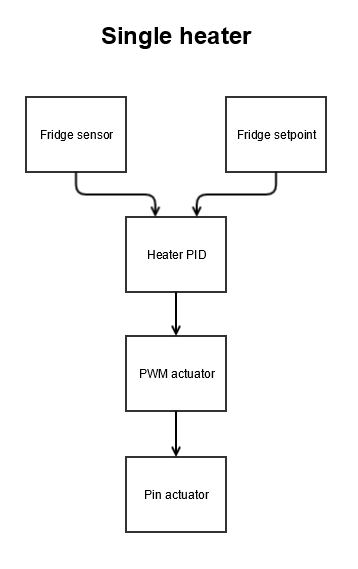
Each object above has an update() function. In an update, it reads from its input and drives its outputs. The PID reads the setpoint and the sensor and recalculates the value to send to the PWM actuator, for example 20% ON.
The PWM actuator on its turn keeps of when the digital pin actuator has been ON and OFF and makes sure the average pulse width matches the value received from the PID.
Controlling a compressor with PWM
When the output is a fridge compressor, instead of a heater, some precautions have to be taken. A compressor has a minimum ON time and minimum OFF time to prevent overheating. Simply setting the PWM period to 15 minutes is not enough.
Like you saw above, actuators can be built up from multiple classes, taking each other as target. For a fridge, we add a time limited actuator in between, which guards the minimum ON and OFF time.
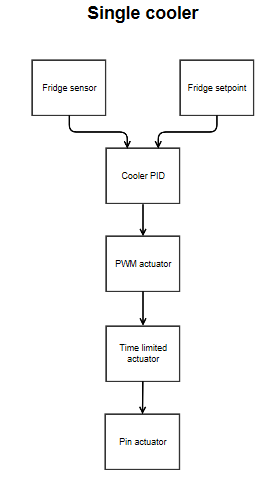
The time limited actuator between the PWM class will refuse to toggle the pin if the minimum times have not passed. The PWM actuator continuously reads back the state and is aware when the pin does not toggle. It takes this into account and is smart enough to still be able to run a fridge compressor at 2%. Even when the period is 15 minutes and the minimum off time is 3 minutes. It will just skip going high for a few cycles to adjust.
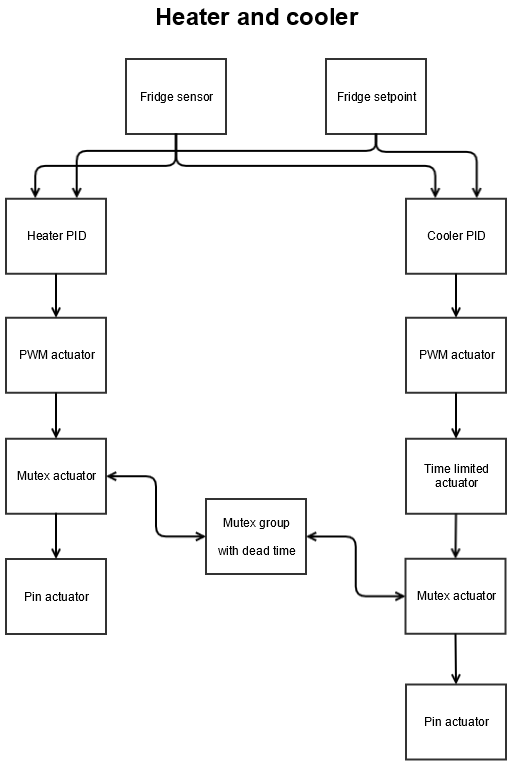
Heating and cooling
With independent PIDs, there is a danger of heating and cooling at the same time. Still, I think independent PIDs are the correct approach: cooling in a fridge behaves very differently to heating. They are different in their slowness and overshoot.
To prevent heating and cooling at the same time, actuators can be added to a mutex group. Actuators in the same group are mutually exclusive: they cannot be on at the same time. A dead time to switch from heating to cooling can be defined, to prevent quickly alternating. The group is the arbiter on who can go active.
Cascaded control
One of the great features of BrewPi was cascaded control: automatically adjusting the fridge setpoint based on what the beer needed.
In the new release, this has been implemented as another actuator class: the setpoint actuator. It creates an offset between 2 setpoints and can be driven by a PID.

Conclusion
So there you have the new BrewPi control objects and how they drive each other.
We will try to hide this complexity from the end user as much as possible.
Using these modular objects, we can more easily from new types of actuators and multiple control loops.
For example, the bottom actuator, the digital pin actuator, can also be an output of the OneWire SSR board, you can PWM over the OneWire bus.
Instead of turning on a compressor, you might want to open a valve.
Instead of a simple sensor, perhaps the input to a PID could be the average of 3 sensors.
There are many possibilities and we will gradually expand them.
When can we expect the release?
I have found a bug in the integrator anti-windup code when a PID is driving a setpoint actuator and has a very low Kp. I am currently trying to resolve it. I am doing everything I can to release this this week.
Hopefully this explains a bit why this release took so long.