SS Brewtech 14g BME FTS converted to use BrewPi Spark v2

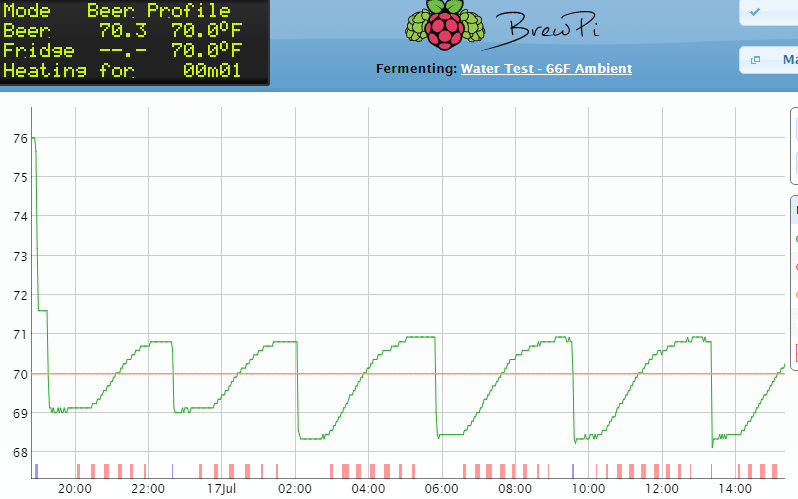
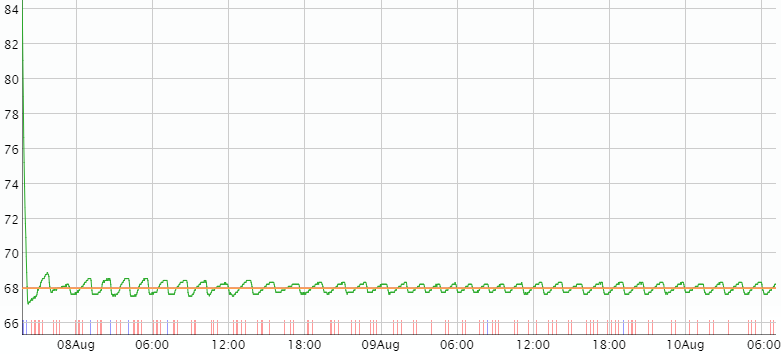
My setup is 14g SSBrewtech BME chronicle with FTS converted to use BrewPi Spark v2 (0.4.3). I have the config close but not quite where I think it should be. I’d like to get it w/in 1+/-F and ideally .5+/-F. Here is the graph and as you can see, it’s still heating when its above the set point. The cooling coasts 1 degree after the glycol pump stops thus going about 1.5F lower than the set point. Any suggestions?

Control config

  "kind": "Control",
  "pids": [
    {
      "kind": "Pid",
      "name": "heater1",
      "enabled": true,
      "setPoint": {
        "kind": "SetPointSimple",
        "name": "fridgeset",
        "value": -5
      },
      "inputSensor": {
        "kind": "TempSensorFallback",
        "onBackupSensor": true,
        "sensor": {
          "kind": "TempSensor",
          "name": "beer1",
          "sensor": {
            "kind": "OneWireTempSensor",
            "value": 24.5,
            "connected": true,
            "address": "28E5EAC107000077",
            "calibrationOffset": 0
          }
        }
      },
      "inputError": 29.5039,
      "Kp": 10,
      "Ti": 600,
      "Td": 60,
      "p": -295.0391,
      "i": 0,
      "d": 0.7031,
      "actuatorIsNegative": false,
      "outputActuator": {
        "kind": "ActuatorPwm",
        "value": 0,
        "period": 4,
        "minVal": 0,
        "maxVal": 100,
        "target": {
          "kind": "ActuatorMutexDriver",
          "mutexGroup": {
            "kind": "ActuatorMutexGroup",
            "deadTime": 1800000,
            "waitTime": 1733039
          },
          "target": {
            "kind": "ActuatorPin",
            "state": false,
            "pin": 16,
            "invert": false
          }
        }
      }
    },
    {
      "kind": "Pid",
      "name": "heater2",
      "enabled": true,
      "setPoint": {
        "kind": "SetPointSimple",
        "name": "beer2set",
        "value": null
      },
      "inputSensor": {
        "kind": "TempSensor",
        "name": "beer2",
        "sensor": {
          "kind": "TempSensorDisconnected",
          "value": null,
          "connected": false
        }
      },
      "inputError": null,
      "Kp": 10,
      "Ti": 600,
      "Td": 60,
      "p": 0,
      "i": 0,
      "d": 0,
      "actuatorIsNegative": false,
      "outputActuator": {
        "kind": "ActuatorPwm",
        "value": 0,
        "period": 4,
        "minVal": 0,
        "maxVal": 100,
        "target": {
          "kind": "ActuatorMutexDriver",
          "mutexGroup": {
            "kind": "ActuatorMutexGroup",
            "deadTime": 1800000,
            "waitTime": 1732973
          },
          "target": {
            "kind": "ActuatorNop",
            "state": false
          }
        }
      }
    },
    {
      "kind": "Pid",
      "name": "cooler",
      "enabled": true,
      "setPoint": {
        "kind": "SetPointSimple",
        "name": "fridgeset",
        "value": -5
      },
      "inputSensor": {
        "kind": "TempSensorFallback",
        "onBackupSensor": true,
        "sensor": {
          "kind": "TempSensor",
          "name": "beer1",
          "sensor": {
            "kind": "OneWireTempSensor",
            "value": 24.5,
            "connected": true,
            "address": "28E5EAC107000077",
            "calibrationOffset": 0
          }
        }
      },
      "inputError": 29.5039,
      "Kp": 10,
      "Ti": 1800,
      "Td": 200,
      "p": -295.0391,
      "i": 0,
      "d": 2.2656,
      "actuatorIsNegative": true,
      "outputActuator": {
        "kind": "ActuatorPwm",
        "value": 100,
        "period": 1200,
        "minVal": 0,
        "maxVal": 100,
        "target": {
          "kind": "ActuatorMutexDriver",
          "mutexGroup": {
            "kind": "ActuatorMutexGroup",
            "deadTime": 1800000,
            "waitTime": 1732897
          },
          "target": {
            "kind": "ActuatorTimeLimited",
            "minOnTime": 10,
            "minOffTime": 1,
            "maxOnTime": 65535,
            "state": false,
            "target": {
              "kind": "ActuatorPin",
              "state": false,
              "pin": 17,
              "invert": false
            }
          }
        }
      }
    },
    {
      "kind": "Pid",
      "name": "beer2fridge",
      "enabled": true,
      "setPoint": {
        "kind": "SetPointSimple",
        "name": "beer1set",
        "value": -5
      },
      "inputSensor": {
        "kind": "TempSensor",
        "name": "beer1",
        "sensor": {
          "kind": "OneWireTempSensor",
          "value": 24.5,
          "connected": true,
          "address": "28E5EAC107000077",
          "calibrationOffset": 0
        }
      },
      "inputError": 29.5039,
      "Kp": 0,
      "Ti": 0,
      "Td": 0,
      "p": 0,
      "i": 0,
      "d": 0,
      "actuatorIsNegative": false,
      "outputActuator": {
        "kind": "ActuatorSetPoint",
        "targetSetPoint": {
          "kind": "SetPointSimple",
          "name": "fridgeset",
          "value": -5
        },
        "targetSensor": {
          "kind": "TempSensor",
          "name": "fridge",
          "sensor": {
            "kind": "TempSensorDisconnected",
            "value": null,
            "connected": false
          }
        },
        "referenceSetPoint": {
          "kind": "SetPointSimple",
          "name": "beer1set",
          "value": -5
        },
        "output": 0,
        "achieved": null,
        "minimum": -10,
        "maximum": 10

1: Set the beer-to-fridge Kp, Kd, Ki to zero, because you are not using a fridge temperature.
2. Your cooling should be a lot shorter. Set the period to 60 or 120s, instead of 20 minutes.
3. Your beer responds very slowly to heating. Make the heater act a bit more aggressive. Set Kp to 50 for the heater. This will help reducing windup, because the integrator will not increase when the actuator is already at 100%.

Started off with wort just above 83F and had the system cool it down. After initial cooling, system was off by 1F +/- and once stabalized it’s now within .5F +/-. Think I got the settings nailed!

The system is responding well to keep things in a tight temp pattern. Now I just need to cleanup this test config (hardware) and put it into an enclosure and I’ll be set.

Current Settings
Beer-to-Fridge proportional gain (Kp) = 0
Beer-to-Fridge integral time constant (Ti) = 0
Beer-to-Fridge derivative time constant (Td) = 0
Maximum difference between fridge and beer set point (= output of PID) = 16.2
Beer-to-Fridge Input filter delay time = 18 Seconds
Beer-to-Fridge Derivative filter delay time = 159 Seconds
Cooler proportional gain (Kp) = 10
Cooler integral time constant (Ti) = 3600
Cooler derivative time constant (Td) = 50
Cooler PWM period (seconds) 10
Cooler minimum OFF time = 1
Cooler minimum ON time = 0
Cooler Input filter delay time = 18 Seconds
Cooler Derivative filter delay time = 159 Seconds
Heater 1 proportional gain (Kp) = 50
Heater 1 integral time constant (Ti) = 600
Heater 1 derivative time constant (Td) = 60
Heater 1 PWM period (seconds) = 10
Heater 1 Input filter delay time = 18 Seconds
Heater 1 Derivative filter delay time = 159 Seconds

I’ve actually build a drop-in replacement now for the FTSS system :slight_smile: 
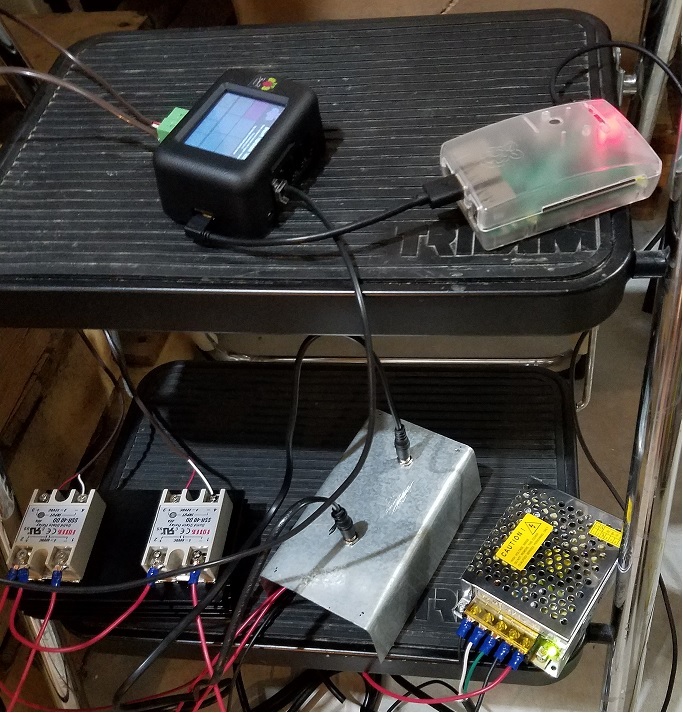
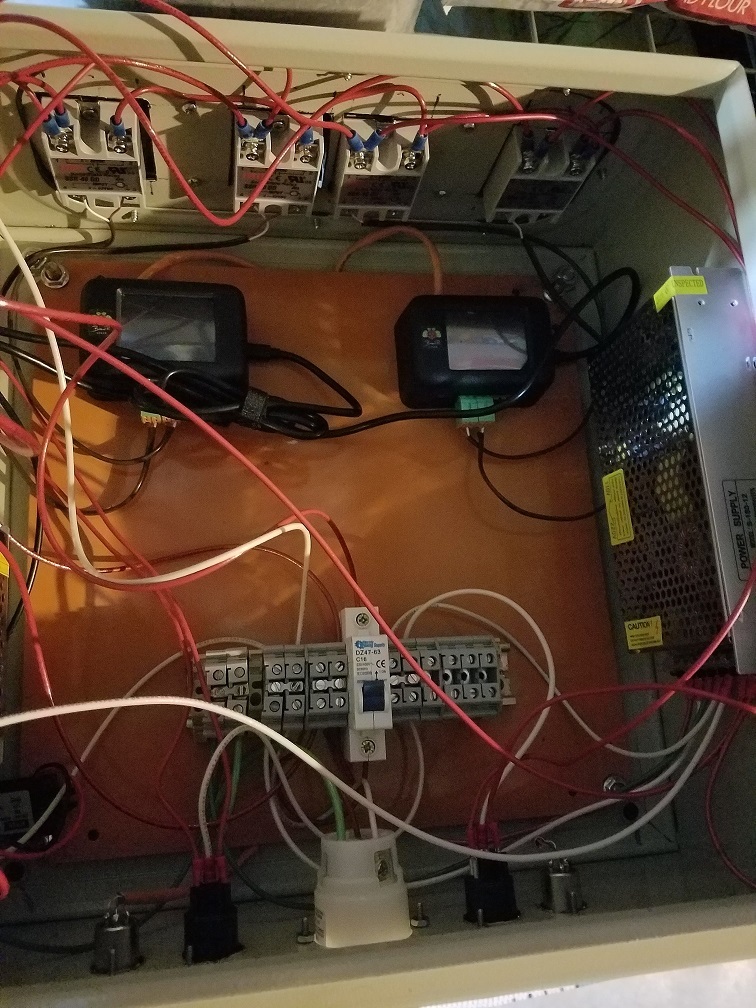
reusing the existing power supply brick, pumps and heating element… :slight_smile:

On my hot side of things, I’m using an electric control panel using the BCS 460

I plan to have the cold side in a similar enclosure. I’ll post some pics once it’s done and a parts list of anyone wants to replicate.

Was looking at doing this same thing for my Brewtech Fermenters and FTSS, any plans or layouts you can share as to what parts you used other than the BrewPI, settings, wiring and temp probes you used?

What a journey this has been. Prototyping can be fun, aggravating and exhausting at times. Stuck to it and worked through hurdles and now it’s fully functioning! Since I have a hot side control panel, I wanted something similar for the cold side while having a setup for 2 SsBrewTech Conical fermenters (once dual fermenter support comes I can expand to 4). Please be kind with the wiring pics, its inside a box and can’t been seen in normal operations and I was getting excited to get this into use. I’ve attached a parts list and source for them. Of course use your own google kung-fu to find cheaper pricing if you wish (I used eBay,Amazon, Local Stores and extras I had laying around).

Parts/Tools listParts_Tools.txt (5.7 KB)

External View

Inside View

Extensions