Hello I’m looking for some help.
I have a HLT, MT, BK & a small cylindrical vessel with a herms coil inside, it has its own heating element & thermowell.
Can I simply adapt the Herms wizard & add another vessel?
Hello I’m looking for some help.
I have a HLT, MT, BK & a small cylindrical vessel with a herms coil inside, it has its own heating element & thermowell.
Can I simply adapt the Herms wizard & add another vessel?
Yes. You’ll want to run the HERMS wizard, and then add a control chain for your additional heater.
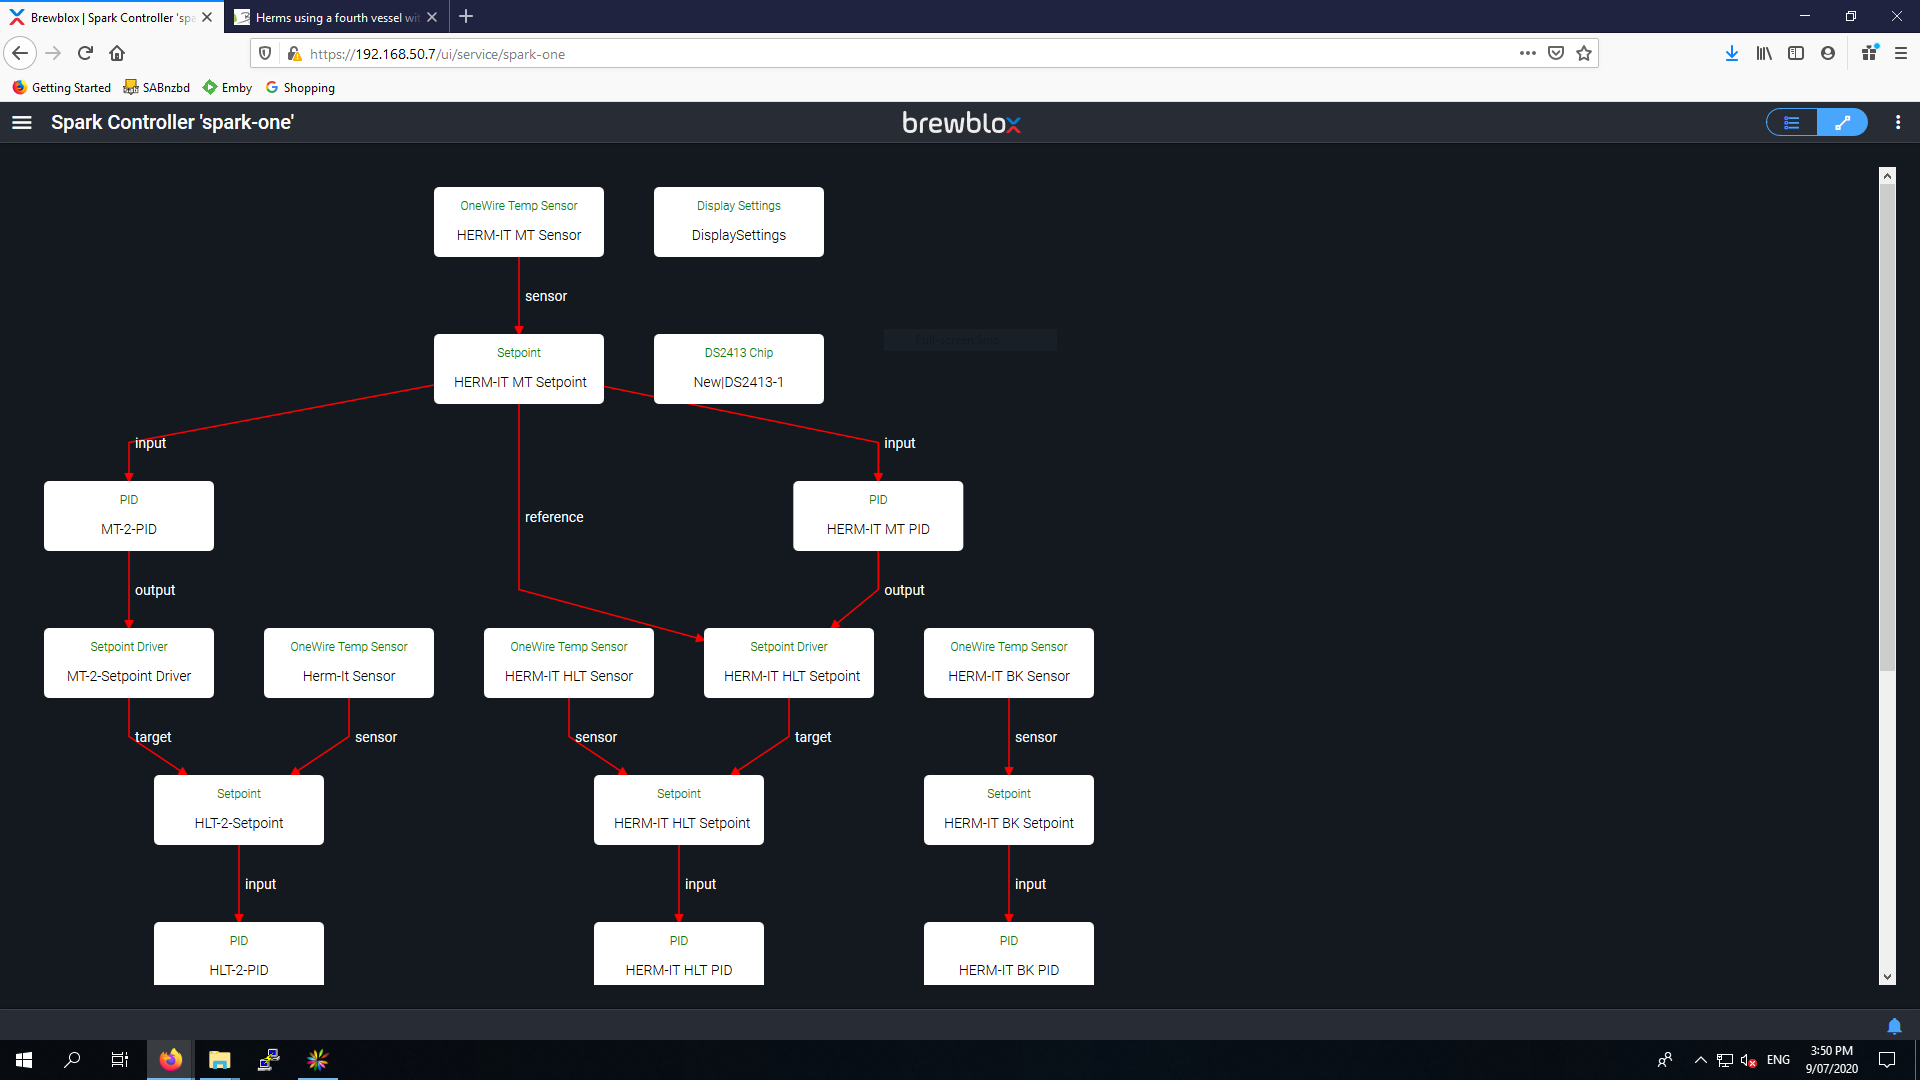
For reference, you’d be looking at duplicating the left control chain in https://brewblox.netlify.app/user/control_chains.html#mashing-with-brewblox
This is assuming that your vessel sits in line with the HLT, and functions like a HLT: it contains water to evenly heat the HERMS coil.
You can re-use the MT setpoint for both the control chain driving your HLT, and the one driving your mini-HLT.
The additional blocks are marked in cyan:
Hi Bob thanks for the reply, I’m a total newbie with this & cannot figure out how to add the extra control chains, I’ve googled as much as I can & all I get is the brewblox start up page, I’ve maybe bitten off more than I can chew, I’ve drawn up my brewery diagram using the brewery builder but don’t know how to add the logic to it?
Ok I figured out that i had to add the new blocks during the wizard set up, I added what I could from the list available, but its still not functioning properly, I think I’ve got myself confused somewhere, can anyone who has a similar set up please send through their blocks & a bit of a step by step guide on how to get this working correctly?
It seems like the control chains page could do with a section describing how to use the UI to make the theory reality. I’ll make a todo item for that.
I’ll be referring to various block types. You can find their descriptions here: https://brewblox.netlify.app/user/blocks_in_depth.html.
If you go to the Spark service page, you can see and modify all blocks on your controller.
In the top right corner is a switch between list and relations view.
The relations view is an automatically generated control chain diagram. You can click on each node in the diagram to edit that block.
To “save” state between edits, you can export your blocks from the service page action menu.
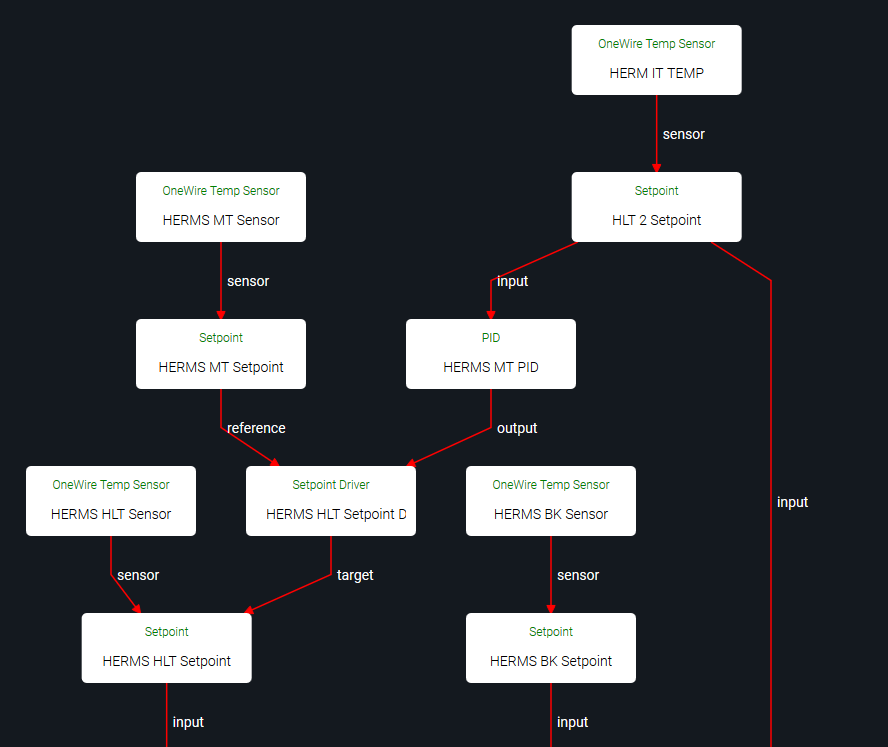
If there’s a line between blocks, it’s because one of the blocks has a setting that refers to the other.
For example, the Setpoint block uses a Sensor as input. When you go into your manually created setpoint, and link it to a sensor, you’ll see a new link line appear in the diagram.
The setpoint has a link to a sensor.
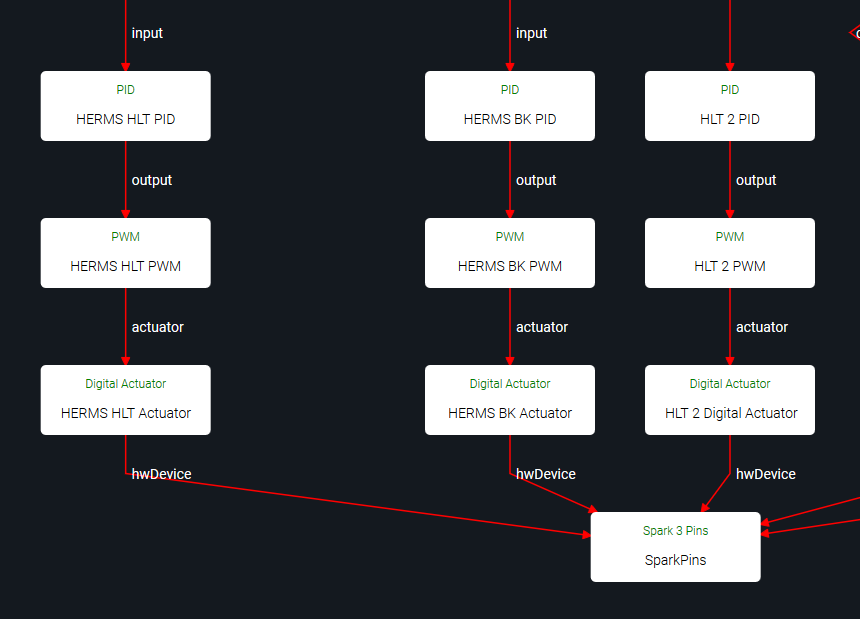
The PID has links to a setpoint, and to a PWM or Setpoint Driver.
The Setpoint Driver has links to a reference Setpoint and an output Setpoint.
The PWM has a link to a Digital Actuator.
The Digital Actuator has a link to a SparkPins or DS2413 block.
The new blocks mirror existing HERMS blocks You can copy settings from each mirrored block. You can also copy the entire block, and then adjust the links.
I’d recommend tinkering with the system a bit: either fill kettles, or unplug actuators, and see what happens if you change a setpoint setting.
Hi Bob,
I managed to get it all set up, it took me a few attempts, learning from my mistakes each time but its done, I also got the brewery diagram working properly to suit my set up.
When i click on the herm it coil/4th vessel, ive assigned it a temp probe & an element, how do I control the temperature of this, will it be the same as the mash tun or HLT or can it be independent?
The Setpoint Driver blocks are used to regulate HLT temperature based on desired MT temperature -> you set the MT setpoint, and the system automatically adjusts the HLT setpoint.
For example, if you set your MT setting to 70 degC, HLT temp may first rise to 80 degC to warm up your wort. When your wort reaches 70 degC, your HLT temp remains at ~71 degC to compensate for heat lost in the tubing.
I’m still not entirely sure on whether you want to be using your HLT and HLT-2 in line (wort travels through both), or separate (wort travels through one of them).
The setup you have right now is designed for an in-line setup: you set MT temperature once, and both HLT and HLT-2 are based on that.
If you want your HLT and your HLT-2 to be independent, you can use two MT setpoints that share the MT Sensor. That gives you a setpoint for “desired MT temp when using HLT”, and one for “desired MT temp when using HLT-2”.
If you want either HLT to be fully independent (not linked to MT), you can remove a PID/Setpoint Driver combo. (MT-2-PID + MT-2 Setpoint Driver or HERM-IT MT PID + HERM-IT HLT Setpoint Driver in your diagram)
Hi Bob,
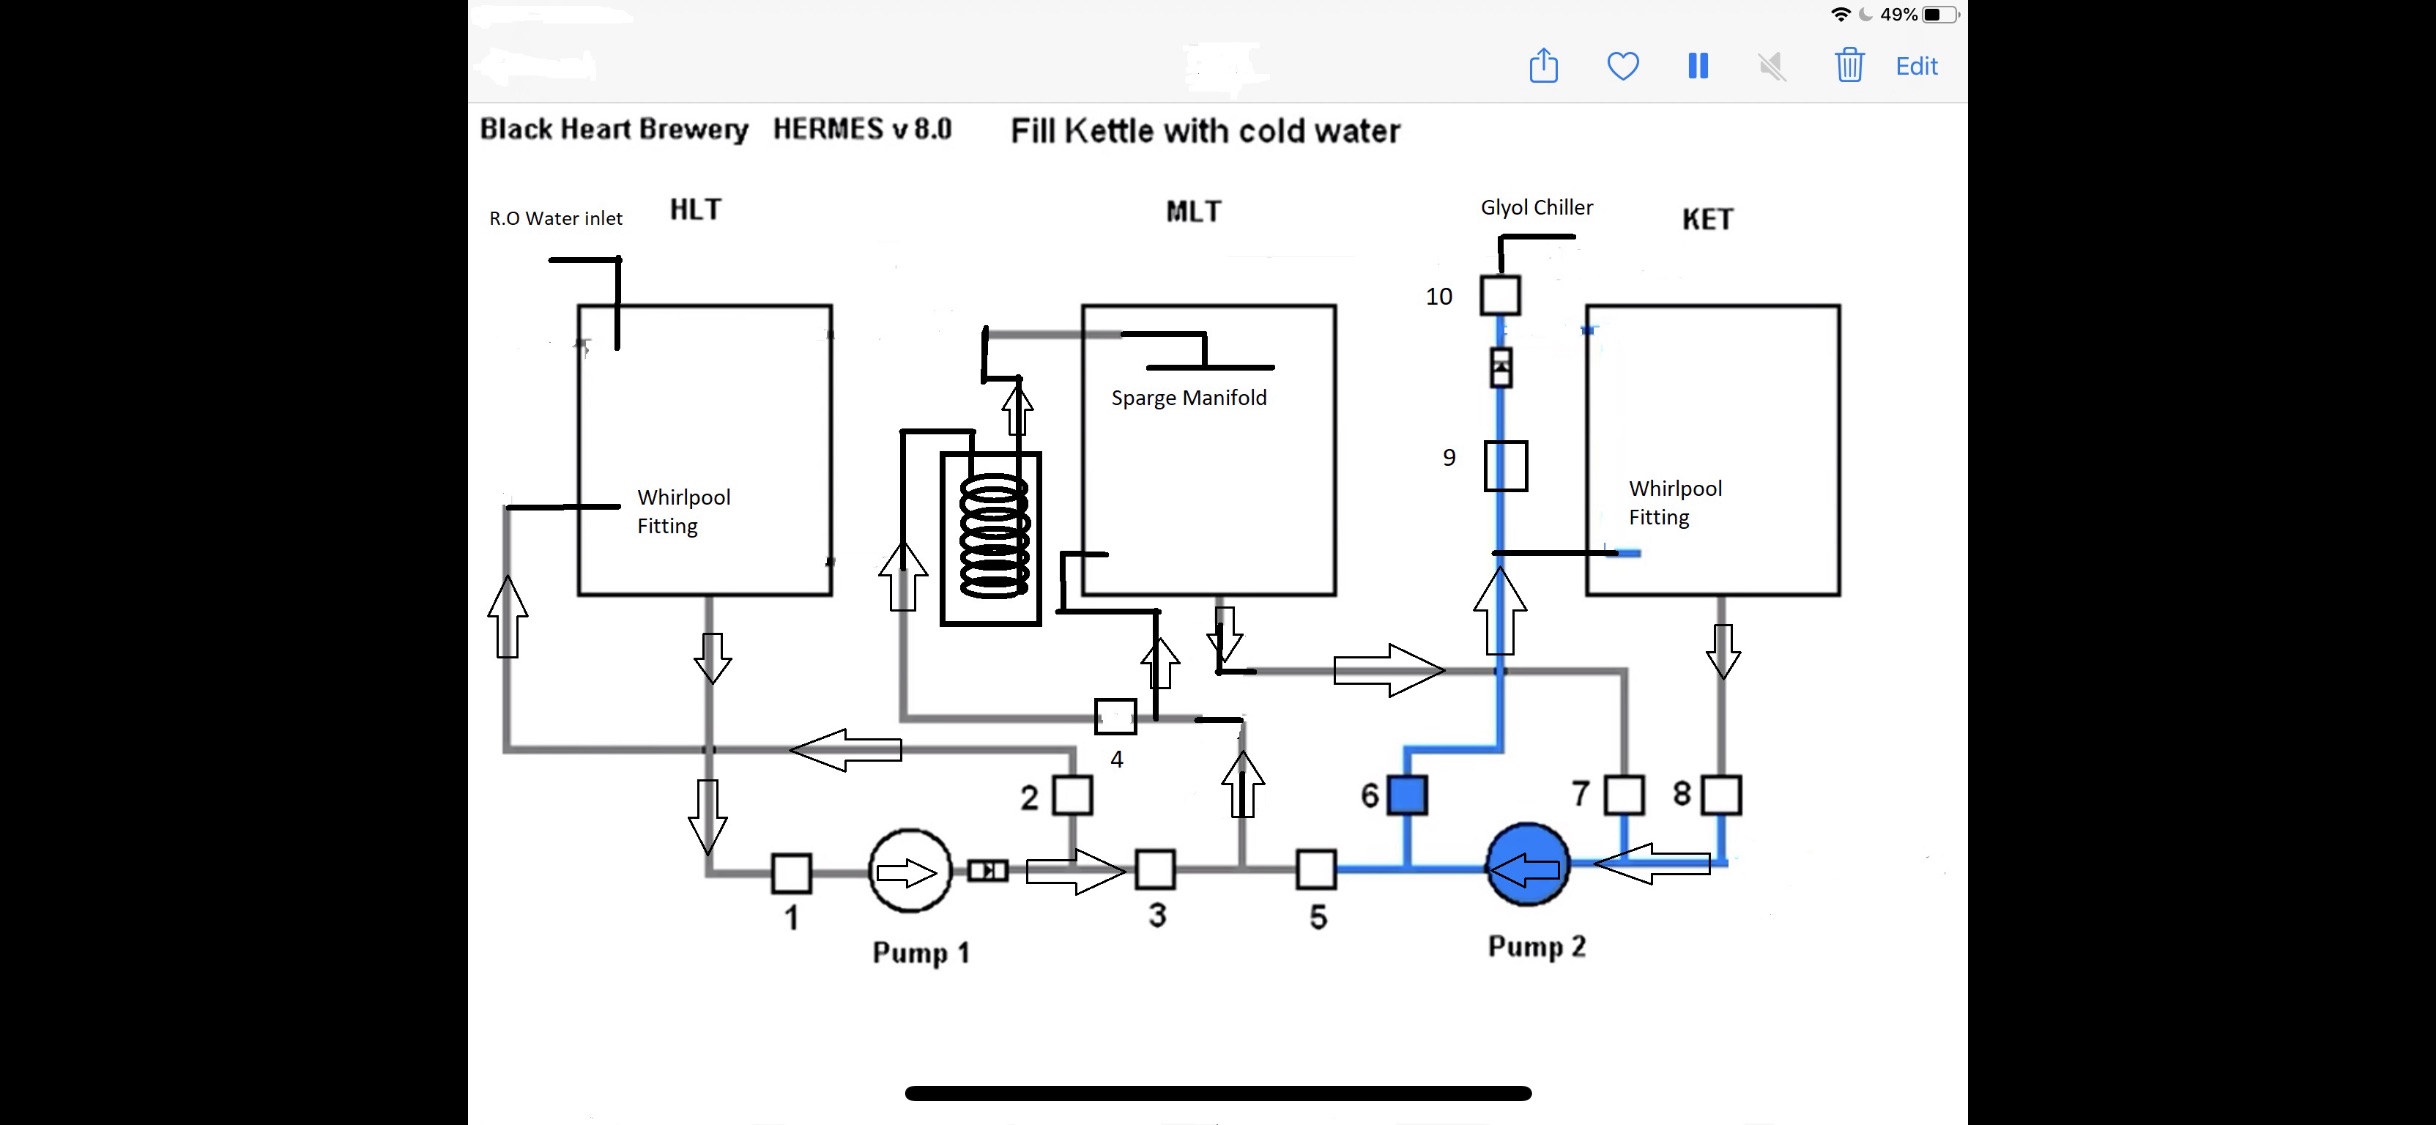
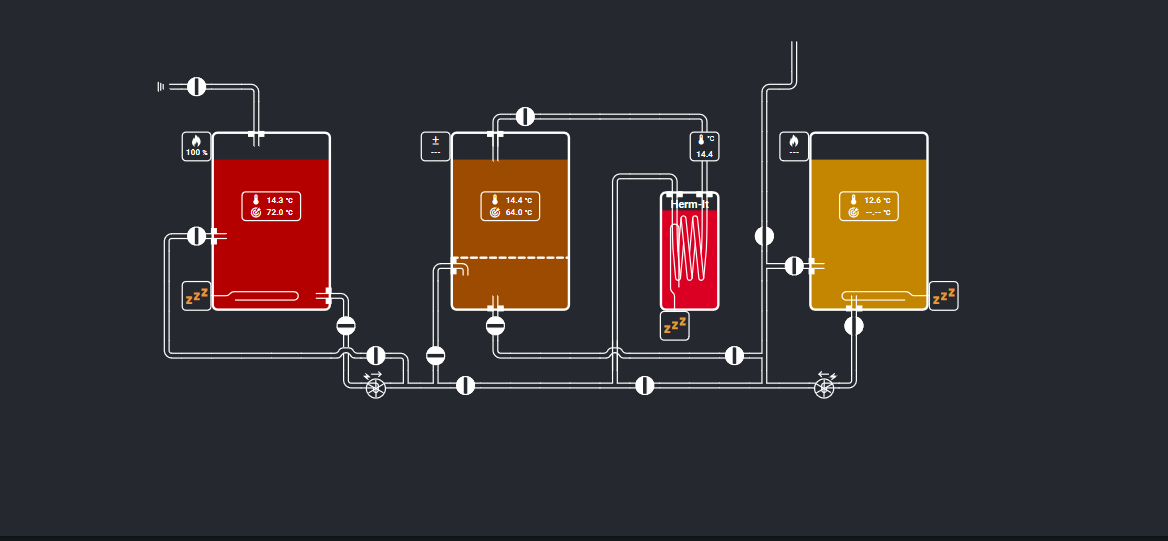
The HLT & BK will heat up my strike & sparge water, I’ll then fill the MT from the BK & top up from the HLT, the HLT will keep my sparge water & cleaning water warm ready for me to use at the end of the brew session, once the wort is in the MT it will travel as per this picture, the Herm-It coil will maintain the mash temp & wort will keep cycling through the grain bed, I’ll then sparge from the HLT & then transfer to the BK ready for the boil.
In this case, it sounds like your HERM-it coil is the “HLT” in the HERMS setup as generated by the wizard, and your HLT is a separate control loop, not related to the MT.
Your HLT then doesn’t need a Setpoint Driver, as its setting is not dependent on wort temperature.
The easiest way to set this up is to run the HERMS wizard, and assign the various HLT elements to your HERM-it coil. During the naming step, you can override individual block names to change “HLT” to “HERM-it”.
To add your HLT control chain, you can copy the BK blocks.
Builder layouts are not removed when you re-run the wizard, so you continue using your custom layout. You may need to check whether all display parts are still linked to the correct blocks.
Your HLT and BK setpoints are then set independently, and your HERM-it setpoint depends on the desired temperature in the MT. That sounds about right?
Sounds complicated I might just leave it as is & just unplug the HLT element, a control block diagram would help, if you have the time, no rush I’m flying out to work tomorrow for 8 days, I would like it set up properly
HERM-it elements prefixed with “Coil” due to technical issues with the diagram tool.
Yellow elements are the output from the HERMS wizard. You can rename HLT -> HERM-it in the wizard.
You can create the cyan/HLT elements by copying the BK blocks, as their configuration will be exactly the same.
Hi Bob many thanks for this, I’ll get it set up when I fly home next week, exciting times ahead 
For what it’s worth, we use the same setup and named the kettle with a coil “Heater” and the water tank “HLT”. This is a common design when going over 100-200L for this design, otherwise you loose a lot of reactivity from the Heater (too much water, not dynamic at all).  for adding support, as always Bob
Learn something new every day =)
The wizards on the backlog are due some attention after this release. I’m pretty sure that includes a single kettle wizard.
Hi Bob,
This didn’t work too well, is there a way that the MT temp can control my 4th vessel, the small vessel with the coil inside?
I can’t figure out how to do it, i brewed yesterday but had to keep manually changing the power levels to try & keep the mash temp stable.
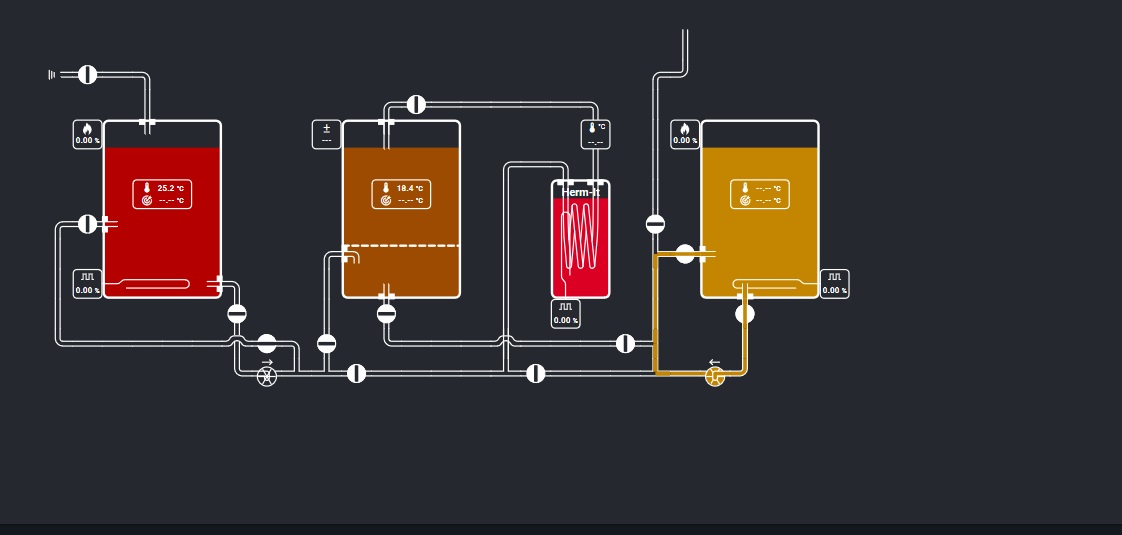
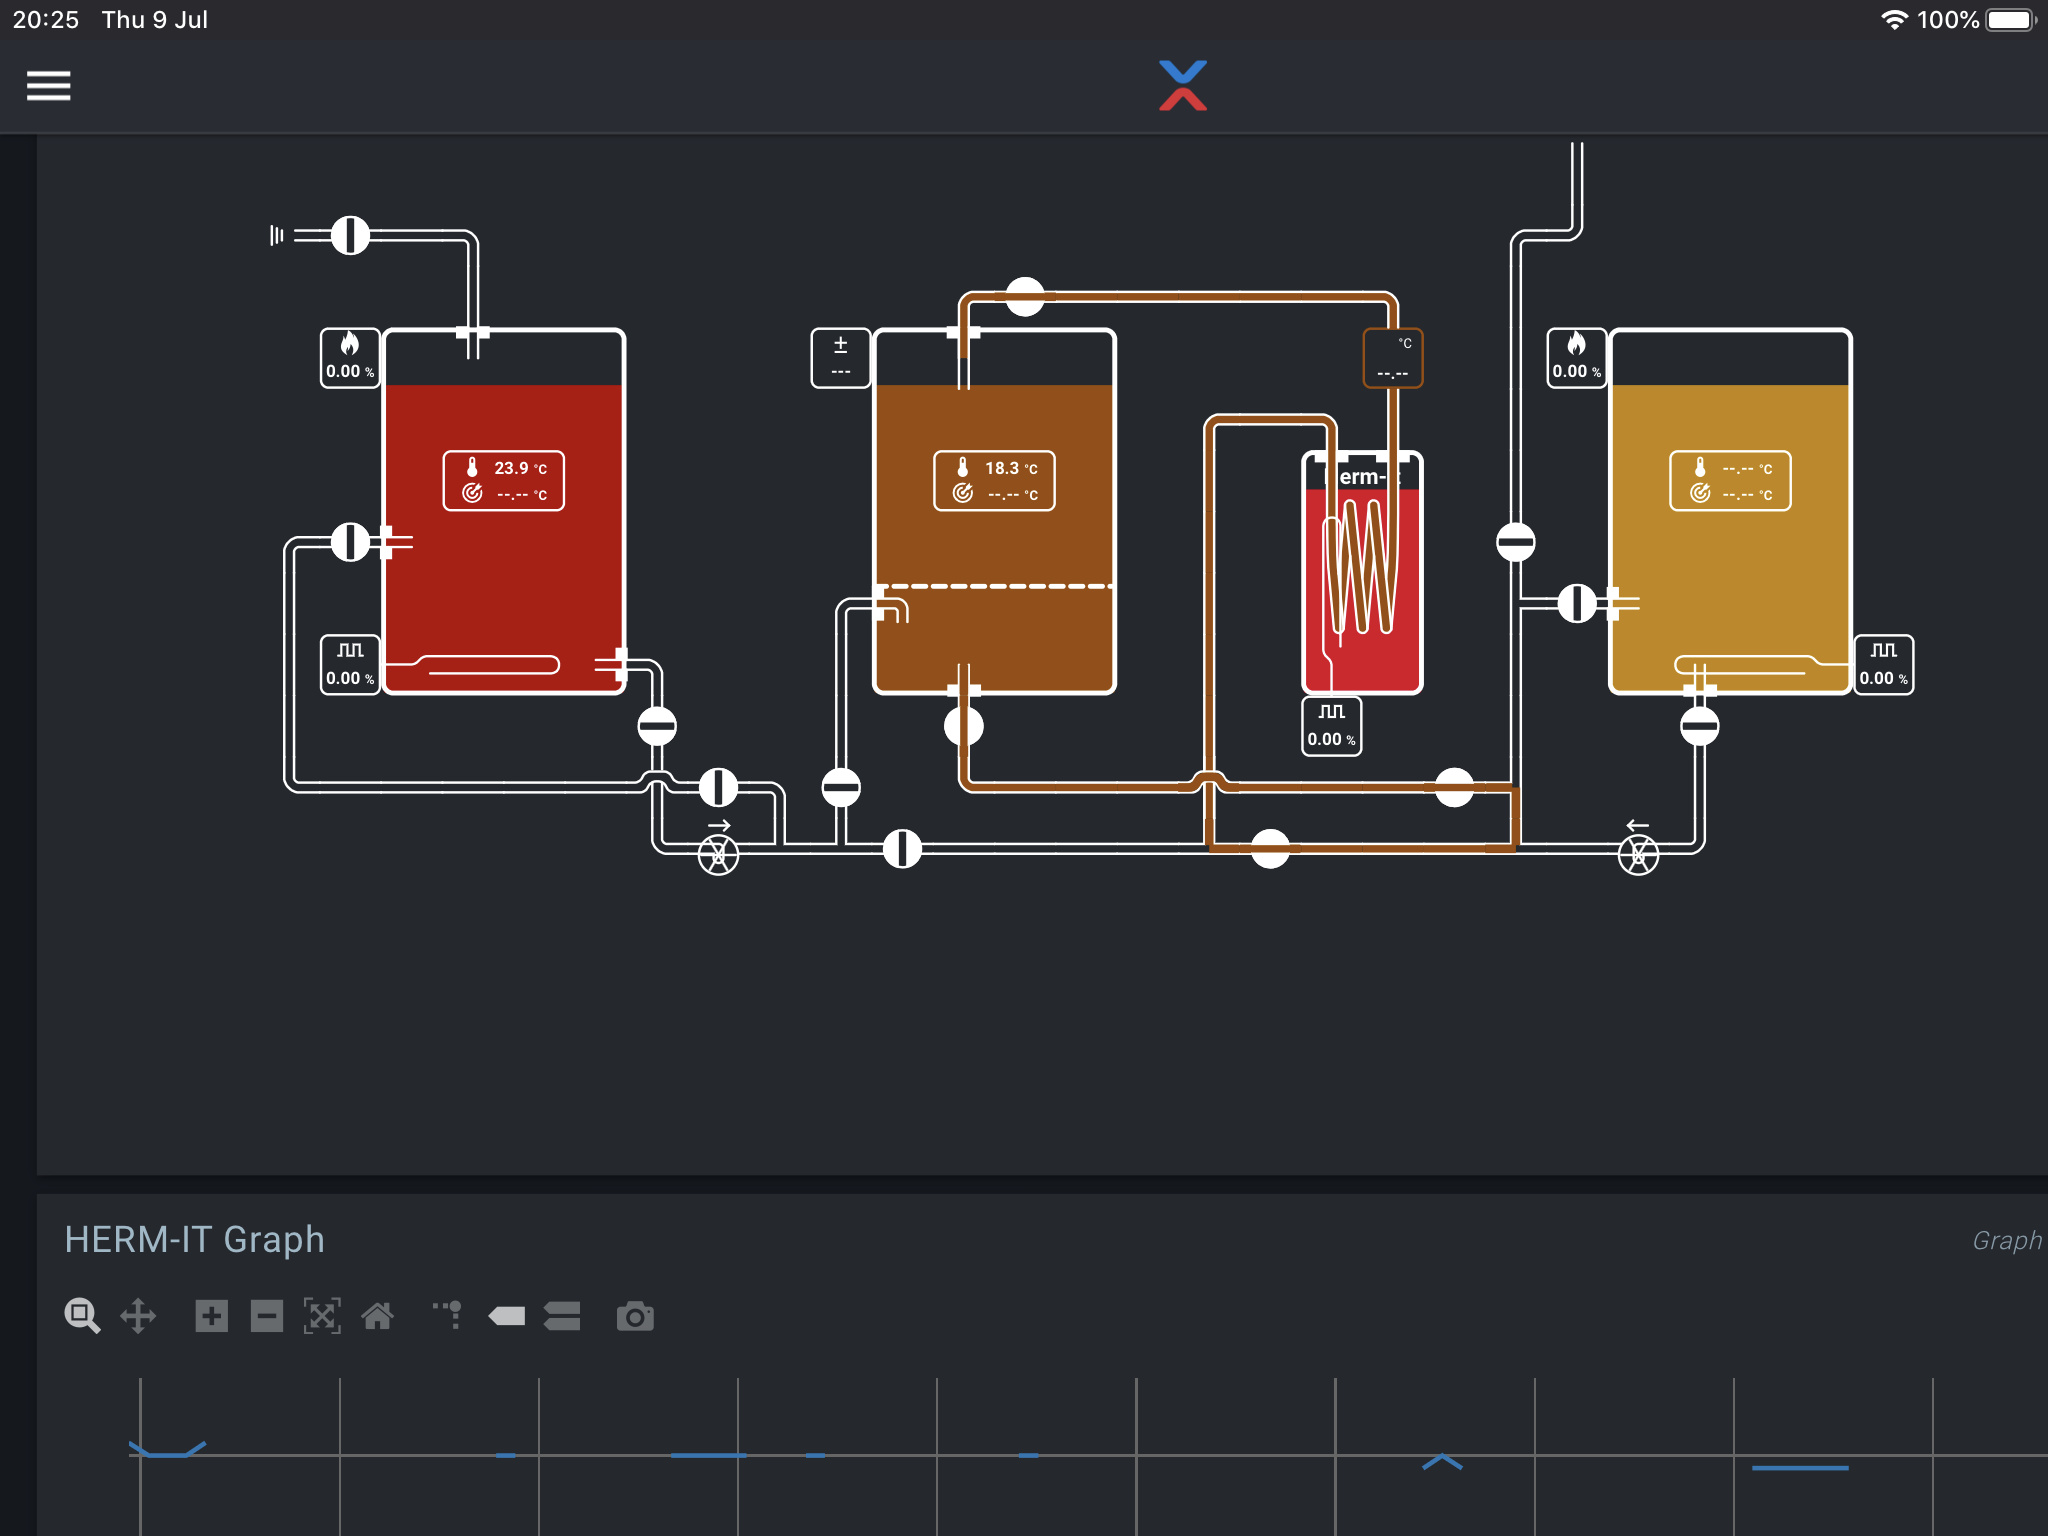
Ideally I’d like to be able to highlight the MT dialog box (Brown Liquid in vessel) & be able to set the temp of the MT, the herm-it coil will heat the wort, I have a temp sensor in the MT & on the outlet of the Herm-it vessels coil, the pump will keep recirculating the wort through the grain bed.
You can click on the setpoint / sensor display in the MT kettle to adjust the setpoint.
That’s the job of the HERMS HLT Setpoint Driver block in your config.
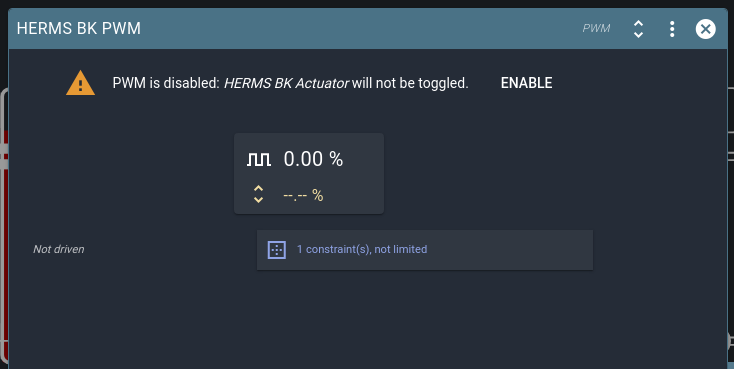
Are all blocks in the chain enabled? You can only manually set power level if the block is not driven (controlled by a block above it in the chain).
Hi Bob,
Thanks for the quick reply, I’m definitely learning the system slowly, but its a bit daunting still.
“You can click on the setpoint / sensor display in the MT kettle to adjust the setpoint” doesn’t do anything you can change the numbers but it has no effect on the element inside the herm-it vessel?
“That’s the job of the HERMS HLT Setpoint Driver block in your config.
Are all blocks in the chain enabled? You can only manually set power level if the block is not driven (controlled by a block above it in the chain)”
Not sure how I’d check if all blocks are enabled?
The block above is HERMS MT PID so definitely driven, I had more control using the original set of blocks you posted but I had both elements firing up, I only require the herm it element to control the MT temperatures, is there a way of all the elements to be controlled independently?
Where I can click on each vessels dialog box & manually set my desired temperatures?
Updating the MT setpoint, and it not changing the Herm-it, indicates that somewhere in the chain a block is disabled.
You can check individual blocks either on the Spark service page, or by clicking on them in the relations diagram. If they’re disabled, they typically show it as a big warning at the top.
In the builder screenshot you posted, it appears that:
Normally the best approach is to enable all blocks. When you want the system to deactivate, you only need to disable the Setpoints. A PID with a disabled Setpoint will be inactive.
I just checked to be sure, and if you disable your MT Setpoint, it will do a one-time toggle of the HERM-it Setpoint. Afterwards you can manually re-enable the Herm-it Setpoint to switch to manual control.
You can manually control blocks that are not actively driven by another block.
In your case that means you can manually control the Herm-it Setpoint only when the Setpoint Driver / MT Setpoint are not active.
In your brewery layout, you can click on the Setpoints in each kettle to access / edit them.
I suggest adding the Herm-it setpoint to your builder diagram to easily see what’s going on.
We’re aware that the reasons behind enabled/active state of driven blocks get complicated rather fast. I’ll have a look at implementing some convenient overview of what blocks are disabled / inactive, and why.
We don’t currently have a builder part for the Setpoint Driver. I’ll make an issue for it, if only for completeness’ sake.
Thanks Bob I disabled the elements so that picture isn’t the best to explain what was happening, I’m back on site now so don’t have access to my home PC, so can’t access any other pictures of the brewday graphical interface, I will try what you said in your reply & report back, thank you again for taking the time to provide an explanation