Any idea on which side wire on the heater that needs to run to the SSR? One side has groves on the side and the other side is smooth. I need help please.
If the pad is AC, it shouldn’t matter. It is alternating current 
Unless the pad has a power switch. In that case it’s import the switch is on Live. I’d be surprised if it does though.
Thanks @Elco and @Dan for your replies. Yes it is an AC pad 120v 60 hz 25w heating pad that is made for brewing. It has no switch just plug to wall straight to the pad. I will hook that up today. Also here is a few more picture of the build. I am almost done with the wiring.
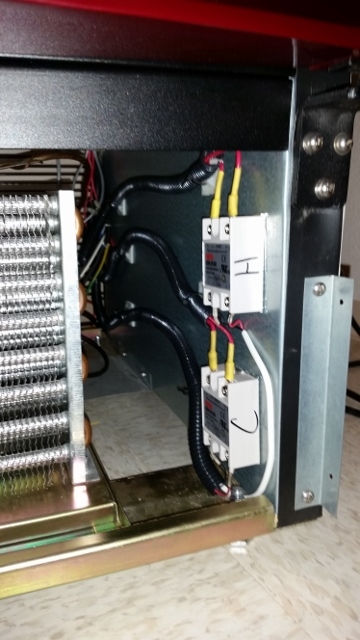


See all the room I have? I think I could sneak another Conical in there. Excuse the wires, I’m going to clean it up with the goodies I got from @Elco.
Let me know how you like your heater pad.
O heck yeah @Jesse. It looks like you have plenty of room. If you don’t mind me asking why do you have the baking soda in there?
lol Okay that’s what I was thinking but just not sure.
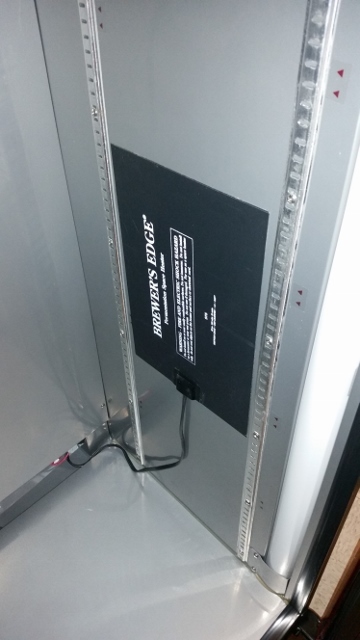
Here is the Brewers space heater installed to the side wall of the cooler. It has an adhesive back to it.
So I just ordered the BrewPi. Once it arrives, I will start my testing. I have my Raspberry 2 up and ready. Just finished it last night. I thinking I am going to do some testing on the web interface to change the background color to black. I feel that the line colors for Beer, Fridge, Room temp will show up more.
Thanks @Elco I am showing the BrewPi is shipped and will arrive on the 29th! I cant wait to get it and start my testing. I will upload some pics once in hand…
Update: The brewPi will be here today!!! Man that was fast… Also Since I don’t have a dedicated monitor/keyboard/mouse for my Pi, I looked into remote options for the Pi. I know that we can SSH into it but I wanted to see the GUI and work from there. So what I have used is VNC for Raspberry Pi: https://www.raspberrypi.org/documentation/remote-access/vnc/
I have it setup so that when the pi boots, it will start VNC and I can work on it while I am sitting in the living room or etc. If any of you would like to do this, its not hard to do and I kinda like it better.
So I got the brew Pi in. Man does this thing look sweet. So I already had a photon. I plugged it in and connected to my RP. It popped up with a white screen. I am just wondering if this is normal having my own photon to put in it? Now I am trying to figure out how to program the photon from scratch. Any help would be great. Thank you
Edit: I got fixed!!! I think I need to fix my wiring on my sensors. When I plugged the cable in it would turn my screen white. I might have a wrong connection. Once I get it complete I will post some more pictures of the build!
I did this just a couple weeks ago because I ordered a photon to replace my core. You have to put your photon in DFU mode first which is explained here:
https://docs.particle.io/guide/getting-started/modes/core/
Attach by USB to your Raspberry Pi. With BrewPi firmware being up to date on your Pi run:
sudo python /home/brewpi/utils/flashDfu.py
It’s in this forum but just not too easily found.
I feel like I’m missing something but hope this helps.
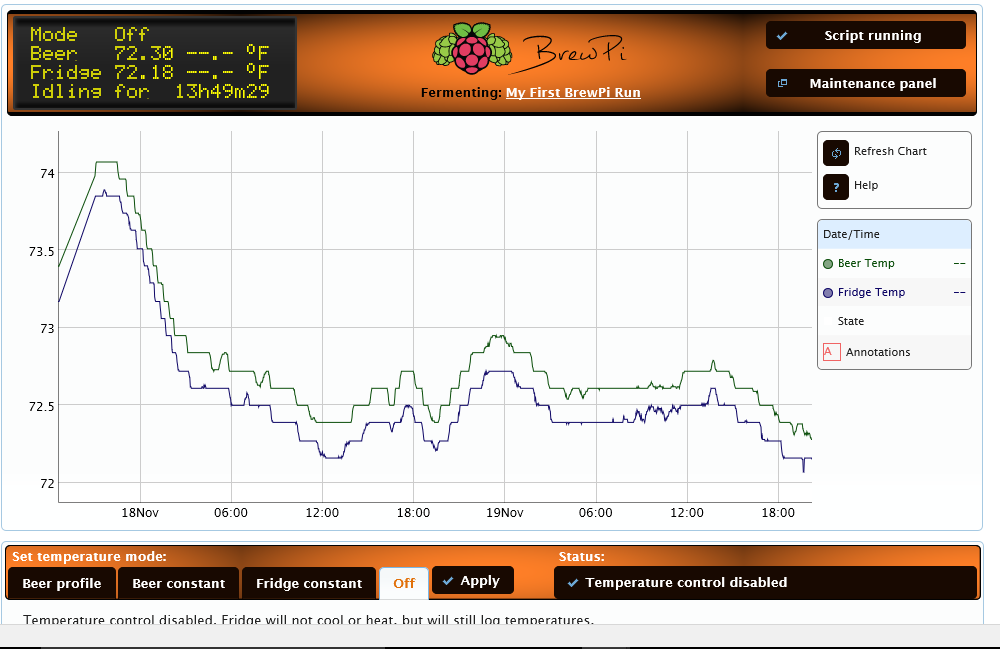
Thanks @Jesse, I found that post and got it to work. Last night I was having issue on my temp sensors not picking up and then would turn the screen white. Long story short I have a spliter that runs one wire from the controller down to the bottom of the fridge then split right there. I found out the my splitter was the issue. The wires inside the housing were crossed and had to fix it. Now I am able to read temp for both beer and fridge.
Sorry for not posting in a while on my build! I have been working and trying to get the rest of my brew equipment ready for my next brew day. I have been doing some maintenance on everything to ensure its all good to go. But I also want to post a picture of some work I have done to my BrewPi web interface. I changed a few colors to more of my liking and getting it ready to upload my Own Brew Logo into the header with BrewPi next to it.
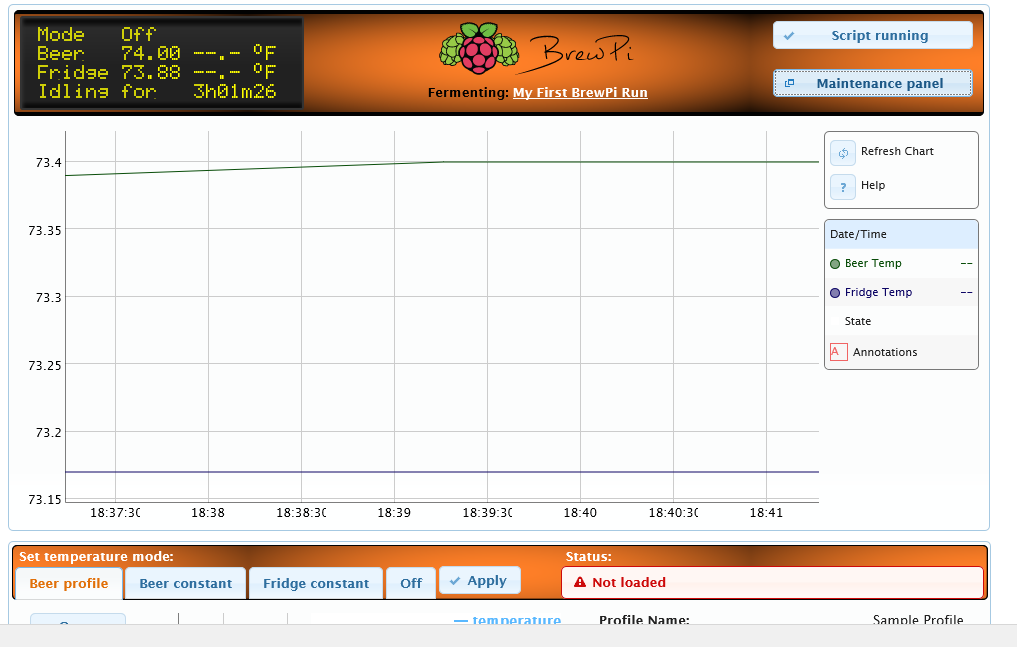
It took me a little to figure out the code. But I got it. Man, @Elco props up to you on all the work you and some other have put into coding. I could only imagine all the other coding you are writing right now. I went with the colors you see due to how my logo is going to look. Once I get my logo done and loaded I will place another pic to show the results. Also I changed the line colors so that it will show up more on the graph. I made them darker so I can see them better. I have a hard time seeing haha. I would also like to change the colors of the buttons at the top to black with white lettering and but I have to figure that out I am not sure were they are in the code.
Looks awesome. You should let us in on your secret.
@Jesse I will provide feedback in a bit on what I did. Keep in mind that the only thing that is changed is the colors used and adding the .png file for the banner. I am still learning the code but I just wanted to add a little visual look I found the button colors too. Off the top of my head, there are two code files used to change the colors. I wouldn’t mind changing the width of the outer lines to make it look more bold. I am trying to find that out. Everything that I am doing is just cosmetic. I know that @Elco is working very hard on the new code and new web GUI and I am looking forward to seeing it.
Edit:
Okay, @Jesse so the files that I used are in the
www/css folder
www/css/Redmond folder
www/css/Redmond/images folder
" You have to add your new created .png file in images. make sure to make the picture size 500x100 px"
www/js folder
Within each folder are the code files such as beer-chart.js that has a couple of colors to change. Make sure you change one thing at a time and then pull the interface to ensure the change is correct.

Here is the .png file that I created.

This is in the css / redmond / jquery-ui-1.10.3.custom.css. the ui-bg_gloss-wave_55_5c9ccc_500x100.png is the file that you will replace with the new png file you create. just make sure you place it in the image folder
It’s looking great, I like it.