Setting up BrewBlox for password protected external access

I’ve tried a few things without success. Are there any basic guidelines on how to do this?

Background: I’ve setup BrewBlox on a Synology NAS with DSM 6.2. I’m using the nginx reverse proxy on the NAS to provide TLS access. I have no problems getting this to work. But then it’s exposed with no authentication.

I’ve tried the following:

When I add basic auth with a .htpasswd file for the nginx reverse proxy, I get the access challenge, but then the spark service I setup is not accessible. In the API logs, I get messages like this:

{
      "message": "Create object",
      "moduleId": "services",
      "time": "Thu Jan 16 2020 21:46:40 GMT-0600 (Central Standard Time)",
      "content": "{\"id\":\"myspark\",\"title\":\"Basement Fermentation Controller\",\"order\":1,\"config\":{\"groupNames\":[],\"expandedBlocks\":{},\"sorting\":\"unsorted\",\"pageMode\":\"List\"},\"type\":\"Spark\"}",
      "error": "Name or password is incorrect."
    }

I assume this may be because there are some local requests that get challeneged and don’t supply the password? If that’s the case, I supposed I could look into configuring nginx to let local requests go unchallenged?

As a next step I removed basic auth from nginx and moved on to trying to secure traefik.

I tried both of these configurations in the docker-compose.shared.yml file and in neither case do I get challenged when accessing the brewblox UI

ui:
    image: brewblox/brewblox-ui:${BREWBLOX_RELEASE}
    restart: unless-stopped
    labels:
      - "traefik.port=80"
      - "traefik.frontend.rule=Path:/, /ui, /ui/{sub:(.*)?}"
      - "traefik.frontend.auth.basic.users=User:HashedPasswordWithEscaped$"

ui:
    image: brewblox/brewblox-ui:${BREWBLOX_RELEASE}
    restart: unless-stopped
    labels:
      - "traefik.port=80"
      - "traefik.frontend.rule=Path:/, /ui, /ui/{sub:(.*)?}"
      - "traefik.http.middlewares.test-auth.basicauth.users=User:HashedPasswordWithEscaped$"

Has anything like this been done before?
An alternative is to SSH into the NAS and tunnel the port over SSH.

This is a bit of a hassle when accessing from your phone though, but very secure.

OK, I guess I’ll keep it internal for now and await a password feature. SSH solution is clever, but I agree … too much hassle.

I’ve set up something very similar: I’m running nginx on a Digitalocean Droplet as a reverse proxy for Brewblox with htpasswd basic auth. My Brewblox install is available on https://brewpi.xxxxxx.yyy using any desktop or mobile device with password authentication (mobile has improved greatly with recent Brewblox releases). It works just as well as on the local network.

The setup is a bit hacky, but it works. TL;DR:

  1. Forward port 443 on the Pi to port 8001 on the public server using a reverse SSH tunnel (port 8001 is closed to the outside world on the server)
  2. Set up Nginx on the server to forward https://brewpi.xxxxxx.yyy to https://localhost:8001 (after htpasswd basic auth and letsencrypt), which will be tunneled to the Pi over the SSH tunnel.

Step 1: set-up ssh
Start by generating a pair of SSH keys on the Pi, create a user on the server (in my case brewpi) and copy the public key to the server to authorize login. Check that you can log into the account on the server from the Pi.

Step 2: create reverse ssh tunnel
I’m running this script from crontab (I know this can be written this a lot more elegantly, but it works). For testing you can simply use the SSH command on line 4

#!/bin/bash
createTunnel() {
   sleep 10
  /usr/bin/ssh -N -R 8001:127.0.0.1:443 -o ServerAliveInterval=5 -o ServerAliveCountMax=1 brewpi@server.xxxxxx.yyy
}
ps ax | grep "ssh -N -R 8001" | grep -v grep > /dev/null
if [ $? -ne 0 ]; then
  createTunnel
fi

Make sure port 8001 on the server is not open to the public!

Step 3: set up nginx reverse proxy on the server side
This is the tricky bit. Here’s my working nginx config file for the subdomain:

server {
  listen 443 ssl;
  server_name brewpi.xxxxxx.yyy;
  ssl_certificate /etc/letsencrypt/live/xxxxxx.yyy/fullchain.pem;
  ssl_certificate_key /etc/letsencrypt/live/xxxxxx.yyy/privkey.pem;
  ssl_dhparam /etc/nginx/ssl/dhparams.pem;
  ssl_protocols TLSv1 TLSv1.1 TLSv1.2;
  ssl_prefer_server_ciphers on;
  ssl_ciphers 'ECDHE-RSA-AES128-GCM-SHA256:ECDHE-ECDSA-AES128-GCM-SHA256:ECDHE-RSA-AES256-GCM-SHA384:ECDHE-ECDSA-AES256-GCM-SHA384:DHE-RSA-AES128-GCM-SHA256:DHE-DSS-AES128-GCM-SHA256:kEDH+AESGCM:ECDHE-RSA-AES128-SHA256:ECDHE-ECDSA-AES128-SHA256:ECDHE-RSA-AES128-SHA:ECDHE-ECDSA-AES128-SHA:ECDHE-RSA-AES256-SHA384:ECDHE-ECDSA-AES256-SHA384:ECDHE-RSA-AES256-SHA:ECDHE-ECDSA-AES256-SHA:DHE-RSA-AES128-SHA256:DHE-RSA-AES128-SHA:DHE-DSS-AES128-SHA256:DHE-RSA-AES256-SHA256:DHE-DSS-AES256-SHA:DHE-RSA-AES256-SHA:AES128-GCM-SHA256:AES256-GCM-SHA384:AES128-SHA256:AES256-SHA256:AES128-SHA:AES256-SHA:AES:CAMELLIA:DES-CBC3-SHA:!aNULL:!eNULL:!EXPORT:!DES:!RC4:!MD5:!PSK:!aECDH:!EDH-DSS-DES-CBC3-SHA:!EDH-RSA-DES-CBC3-SHA:!KRB5-DES-CBC3-SHA';
  add_header Strict-Transport-Security "max-age=31536000; includeSubdomains;";
  ssl_session_cache shared:SSL:50m;
  ssl_session_timeout 5m;

  location / {
    auth_basic "Login";
    auth_basic_user_file /etc/nginx/.htpasswd;
    proxy_set_header Authorization "";
    proxy_pass https://127.0.0.1:8001;
    proxy_ssl_trusted_certificate /usr/local/share/ca-certificates/Nikkel_RootCA.crt;
    proxy_ssl_verify on;
    proxy_ssl_verify_depth 2;
    proxy_ssl_session_reuse on;
    proxy_ssl_name brewpi;
    proxy_buffering off;
    proxy_http_version 1.1;
    proxy_set_header Host $http_host;
    proxy_set_header Upgrade $http_upgrade;
    proxy_set_header X-Real-IP $remote_addr;
    proxy_set_header X-Forwarded-For $proxy_add_x_forwarded_for;
    proxy_set_header X-Forwarded-Host 127.0.0.1:8001;
  }

  location /.well-known/ {
      rewrite ^/.well-known(.*)$ $1 break;
      root /var/www/html/.well-known;
  }
}

server {
  listen 80;
  server_name brewpi.xxxxxx.yyy;

  location / {
    rewrite ^/(.*)$ https://$host/$1;
  }
  
  location /.well-known/ {
    rewrite ^/.well-known(.*)$ $1 break;
    root /var/www/html/.well-known;
  }
}

You could simplify this a bit. I have used a custom root ca that I use to generate certs for various projects around the house instead of self-signed certificates and that is installed on the server. You should be able to remove the lines with proxy_ssl_trusted_certificate and proxy_ssl_verify_depth 2 and set proxy_ssl_verify off to force nginx to accept the built-in self-signed cert of Brewblox.

Warning: It’s easy to accidentally open your home network to the world. Only use this method if you have a good understanding of what you are doing.

2 Likes

@robvdw - Had to draw myself a diagram to visualize what’s going on with this. Though, I’m still a confused on why simpler solutions like what I started with don’t work. Any clue what causes messages like “error”: “Name or password is incorrect.” in my API log?

The problem with your approach is that the UI itself also sends HTTP requests to the services in the backend.
Those are sent by JS code, not you, so you are not challenged - they just fail.

Tunneling works because then individual requests are not challenged.

1 Like

Just to check, is there any reason for not using a VPN? Many (most?) modern home routers provide VPN functionality

1 Like

Wouldn’t those requests to the backend services be on the brewblox_default docker network. If that’s true then why would the requests go back out to my reverse proxy and be challenged.
Sorry for asking such basic questions. Feel free to point me to any specific developer docs if it would help.

Service to service requests will indeed stay inside the brewblox_default network, but those are not the ones causing the problem here.

JS code (the UI) runs in your browser - outside the docker network. This means that the requests made by JS code originate from outside the docker network, and will have to cross the boundary.

Loading / running the UI is done in two stages.

  • First the HTML/CSS/Javascript code is fetched from brewblox_ui. This is nothing more than static files.
  • The fetched Javascript is executed by the browser. This code will fetch data from backend services in order to render it.

Both stages will go through the reverse proxy, but your browser will only show you password popups if the first stage (fetching static UI files) returns a challenge.
It’s up to us to handle authentication for requests made by the JS code. This is perfectly doable, but it takes time.

1 Like

@j616s VPN is a great secure solution, but personally I find it cumbersome to establish a VPN connection just to quickly check on my fermentation from my phone (on the train, at work, …).

@hexamer I still think the nginx reverse proxy + basic auth route should be possible in your case with some tweaking of the nginx config. I don’t know much about the Synology, but just did a quick experiment (similar to your setup) on my raspberry pi:

  • Installed nginx on the Pi that’s running Brewblox
  • Replaced the default nginx config with:
server {
  listen 9443 ssl;
  ssl_certificate /home/pi/brewblox/traefik/brewblox.crt;
  ssl_certificate_key /home/pi/brewblox/traefik/brewblox.key;

  location / {
    auth_basic "Login";
    auth_basic_user_file /home/pi/.htpasswd;
    proxy_set_header Authorization "";
    proxy_pass https://127.0.0.1:443;
    proxy_ssl_verify off;
    proxy_ssl_session_reuse on;
    proxy_buffering off;
    proxy_http_version 1.1;
    proxy_set_header Host $http_host;
    proxy_set_header Upgrade $http_upgrade;
    proxy_set_header X-Real-IP $remote_addr;
    proxy_set_header X-Forwarded-For $proxy_add_x_forwarded_for;
    proxy_set_header X-Forwarded-Host 127.0.0.1:443;
  }
}
  • Generated a .htpasswd with: htpasswd -c /home/pi/.htpasswd test
  • forwarded port 9443 on my router to port 9443 on the Pi
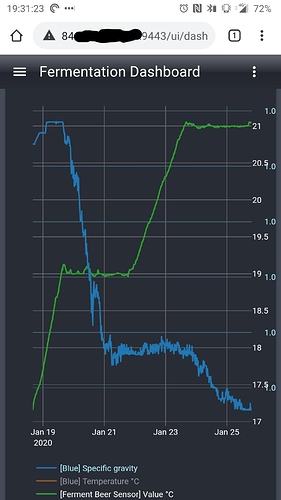
  • switched my phone to 4G (wifi off, so nothing going over the local network) and went to https://my.ip.address:9443. After chosing to ignore the certificate warnings, I was presented with the basic auth login prompt and after logging in, I get a working Brewblox:
1 Like

Thanks for the helpful post, @robvdw . That does seem to mostly* work, but curious why. Perhaps it’s doing some kind of HTTP Basic-Auth session caching?

*I say mostly because I can “kind of” bypass it by choosing to give blank credentials in FF. What I get in that case is a pretty non-functional BrewBlox page - similar to my earlier experience where apparently all the browser JS to backend communication was failing. Not sure that’s completely secure.

Here’s my earlier conf file before I made it look more like yours:

server {
        listen 443;
        server_name brewblox.my.domain;
        location / {
                auth_basic "Login to BrewBlox";
                auth_basic_user_file /etc/nginx/.htpasswd;
                proxy_pass https://localhost:8443;
                proxy_set_header Host $http_host;
                proxy_set_header X-Real-IP $remote_addr;
                proxy_set_header X-Forwarded-For $proxy_add_x_forwarded_for;
                proxy_set_header X-Forwarded-Proto $scheme;
        }
}

I don’t need the other server ssl cert variables because they come from Synology’s global setup of nginx, so then I get an automatic periodically updated let’s encrypt cert.

That looks like a pretty doable workaround. Mind if I make an install script to deploy nginx docker container + htpasswd files + config?

1 Like

FYI: Nginx’ proxy buffering function is what breaks the API calls, so the key line in the config is proxy_buffering off (you can check the nginx docs for more info). Proxy_ssl_session_reuse and proxy_http_version 1.1 should theoretically speed things up.

@hexamer The “bypass” you are describing is simply the static data being loaded from your local Firefox cache. If you hit escape a couple of times at the login prompt (or enter blank creds), Firefox will show you whatever it has in the cache (Chrome/Chromium will not do this). If you clear your browser cache before you try the bypass, you should see the actual 401 from nginx.

@Bob_Steers Sure. Note that I spent a whole of 10 minutes testing this setup with nginx running on the Pi. I can’t vouch for the robustness, although it has worked well with my own setup through an SSH tunnel (as described in an earlier post, which I have been using for about 6 months).

1 Like

Confirmed.

I had looked at all the differences between you nginx file and mine and none stuck out to me. Turning proxy buffering off would seem to have nothing to do with the notion that the issue is client side scripts getting blocked, but the whole configuration seems to work.

Anyone having problems getting this to work in Chrome (desktop and mobile)? It works fine in Safari and Firefox. But with Chrome, the graphs won’t load. It has something to do with the SSE+SSL configuration in nginx as it works fine going direct.

What I see, is that after the SSE event streams are established in Chrome, any non-SSE connections get stuck in a “Pending” state. I’ve tried just about everything I can think of to no avail.

If this is using http 1, you may be running into the concurrent connection limit.

To verify, set the proxy http version to 2, or increase the number of simultaneous connections to host in your browser.

I thought of this as well. But since it works direct (no nginx), I concluded it wasn’t a connection limitation. I will bump the http version from 1.1 to 2 and see what happens tonight.

The default version is using https/http2 because we ran into the connection limit.

Ha! Ok, I bet that’s it then.

yep, that fixed it. Added http2 to the listen directive. Here’s what I ended up with.

server {
    listen 8080 default_server;
    server_name _;
    return 301 https://$host$request_uri;
}

server {
	listen 8443 ssl http2;

    ssl_certificate     ssl/certificate.pem;
    ssl_certificate_key ssl/key.pem;

	proxy_buffering off;
	chunked_transfer_encoding off;
	proxy_cache off;

	auth_basic "Login";
    	auth_basic_user_file /etc/apache2/.htpasswd; 

    location / {
        proxy_set_header Authorization "";
        proxy_pass https://127.0.0.1:443;
        proxy_ssl_verify off;
        proxy_ssl_session_reuse on;
        proxy_buffering off;
        proxy_http_version 1.1;
        proxy_set_header Host $http_host;
        proxy_set_header Upgrade $http_upgrade;
        proxy_set_header X-Real-IP $remote_addr;
        proxy_set_header X-Forwarded-For $proxy_add_x_forwarded_for;
        proxy_set_header X-Forwarded-Host 127.0.0.1:443;

        proxy_set_header Connection '';
        proxy_connect_timeout 3600;
        proxy_send_timeout 3600;
        proxy_read_timeout 3600;
        keepalive_timeout 3600;
    }
}
2 Likes