yes, I would recommend connecting at at a time during the update process.
I get what you mean @Elco … But even if you improve the transfer between air and your reservoir I think you will be a little underwhelmed for anything except ales, and you will NOT be able to crash. I’d put money on that.
The way I think of it… The heat dissipated into your heat sink… It’s not getting ‘destroyed’ right?? Thanks to some dude named Newton. Your freezer has to account for it. So the air around your reservoir heats up… And your reservoir is so good at conducting heat that it warms up!
What if it were possible somehow to have your heat sink outside your freezer? Thermal glue… Remove the insulation… Etc… Then heat is thrown into the room?
I am totally with you cke11y, but my brewery is 1.10x4.00m: 4.4 square meters in total. At times, that can be a bit annoying.
2 m2 is taken up by my mashing setup, 1m2 by the door, so I have 1 m2 left for kegging, fermenting and chilling bottles.
That space, to be exact, is 1.10m wide, of which my freezer will take 67cm, and my chronical 39cm.
I now have a fridge that chills my bottled beers, unless I am fermenting something at 20 degrees (which takes up the fridge). My main reason to go with glycol is to be able to keep the fridge at 5C for kegs and bottles, while still keeping a fermenting beer at the right temperature.
1 Like
About $2000 including shipping and taxes. However, with CIP cleaning, preassure resistance up to two bar, cooling jacket with cone cooling, all tri-clamp accessories included, all in stainless and so on this is a good price. But this also depends on how much tanks you order.
I am happy with the quality. They look really good, some more pictures may be found on my webpage: http://www.chicco.beer/news/die-neuen-gartanks-sind-da When really go into the detail you will discover some details on which you can honestly recognize the differences to an european or american made tank. But then again, you can’t even compare prices cause such tanks are so expensive, they are usually not even offered.
If you’d like to order you may to this at your own risk, I don’t want to be held responsible if any body gets something which does not make him happy! Send me mesage with your name and eMail and I will tell the supplier to contact you.
Hey, i just wanted to share my actual setup.
I allready use my Glycol cooled fermenter in Profilemode and for me it works OK.
Setup:
- Fermenter: Doublemantle Fermenter, insulated, with Glycol-mantlecooling.
- Cooling Circle1 : The Glycol temperature is set by an extra Sensor and the cooling is done by something simmilar like this one: http://www.ebay.de/itm/Danfoss-Verfluessigungssatz-Aggregat-Kuehlanlage-Kaelteaggregat-G4565-SC12GHXNO-/251813718329?nma=true&si=PSNC8sybGEfW40UZk6pHua420xU%3D&orig_cvip=true&rt=nc&_trksid=p2047675.l2557 with coils submerged in Glycol reservoir. The Temp is set to +5°C. The +5°C are because the glycol stays in the fermentermantle after the pump stops circulating and keeps on cooling. Further more its also a relic of my setup before i switched to Brewpi.
- Cooling circle 2 : The second cooling circle cools the fermenter. The pump is triggered by an SSR (BrewPI). The Glycol reservoir is about twice the fermenter mantle Volume.
-
Sensors:
Beersensor in Thermowell in Fermenter. Location about 1/3 above the bottom of the Fermenter.
Fridgesensor mounted on the outside of the Glycolinlethose at the fermenter underneath the insulation.
Room Temp sensor: hanging somewhere in the corner of the room. - Heating: no heater installed.
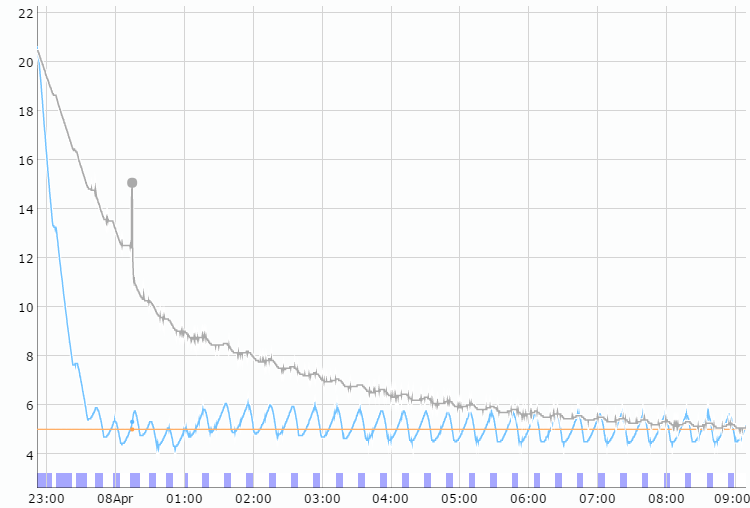
My last fermentationgraph:

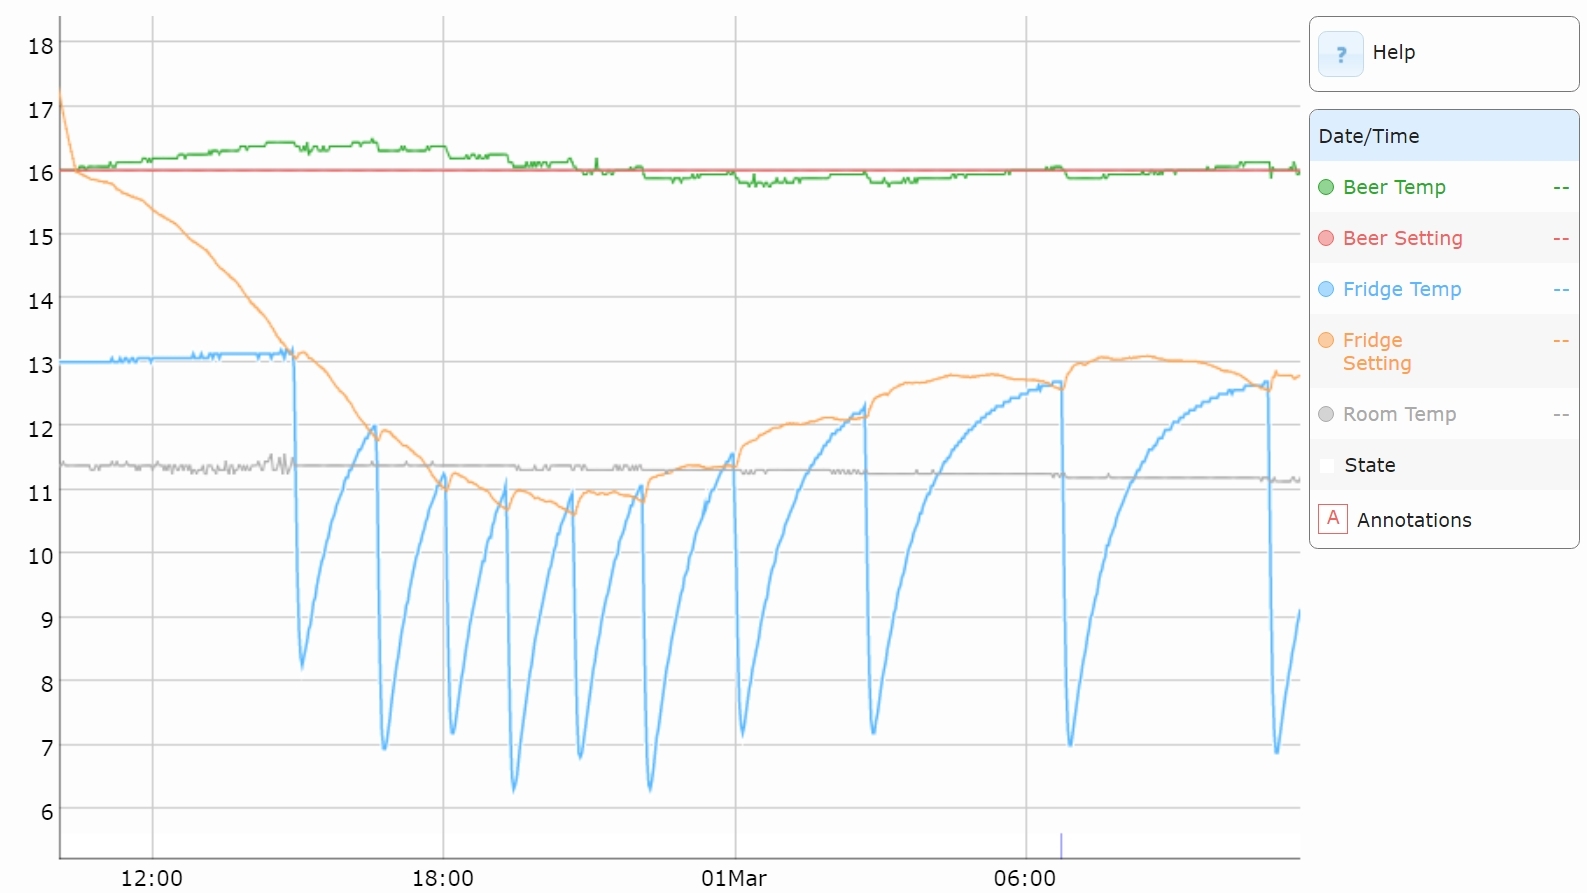
I was brewing in February and the Roomtemp was at about 11°C. This explains the Tempdrop at the End of the Fermentation. Brewpi Firmware version 0.4.2 Temperature varies 0,70°C
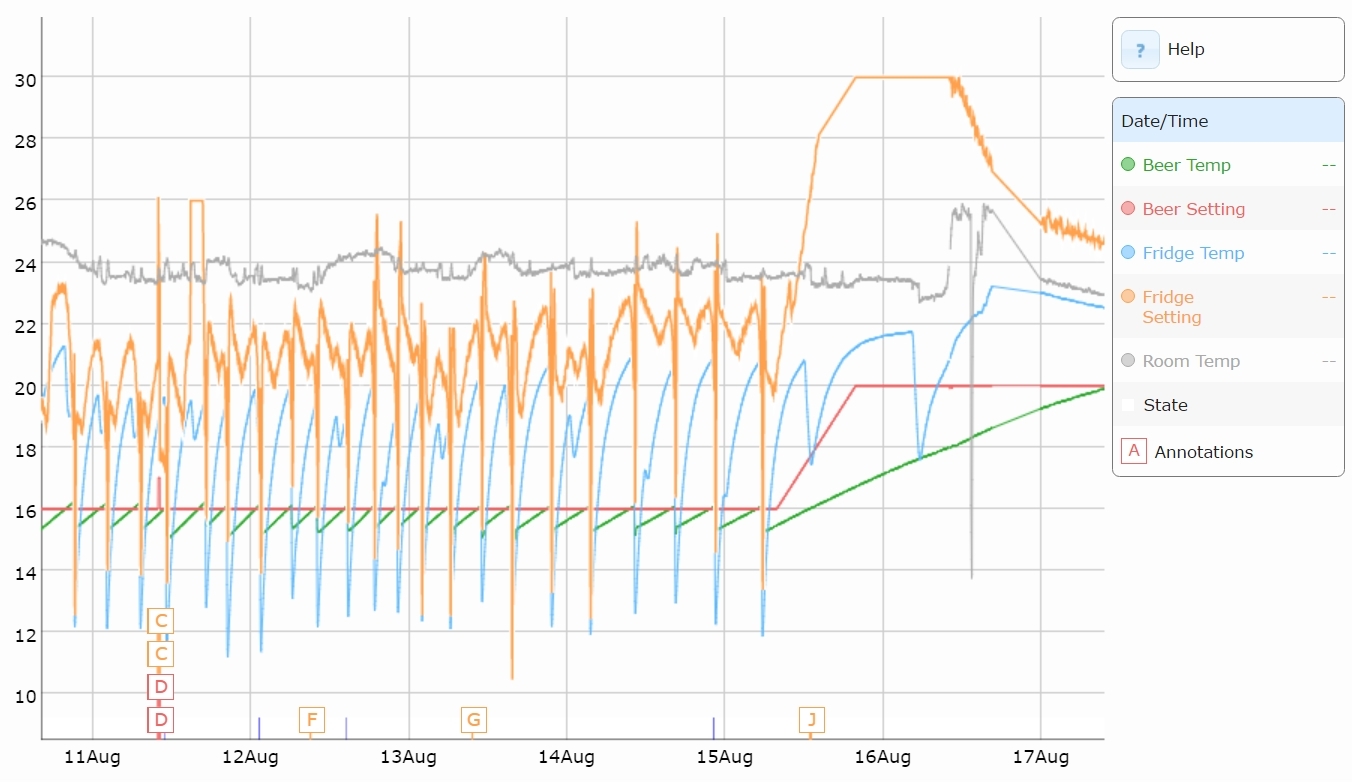
In Summer 2015 using the actual Brewpi Firmware at that time and the same Hardware setup the graph was like:
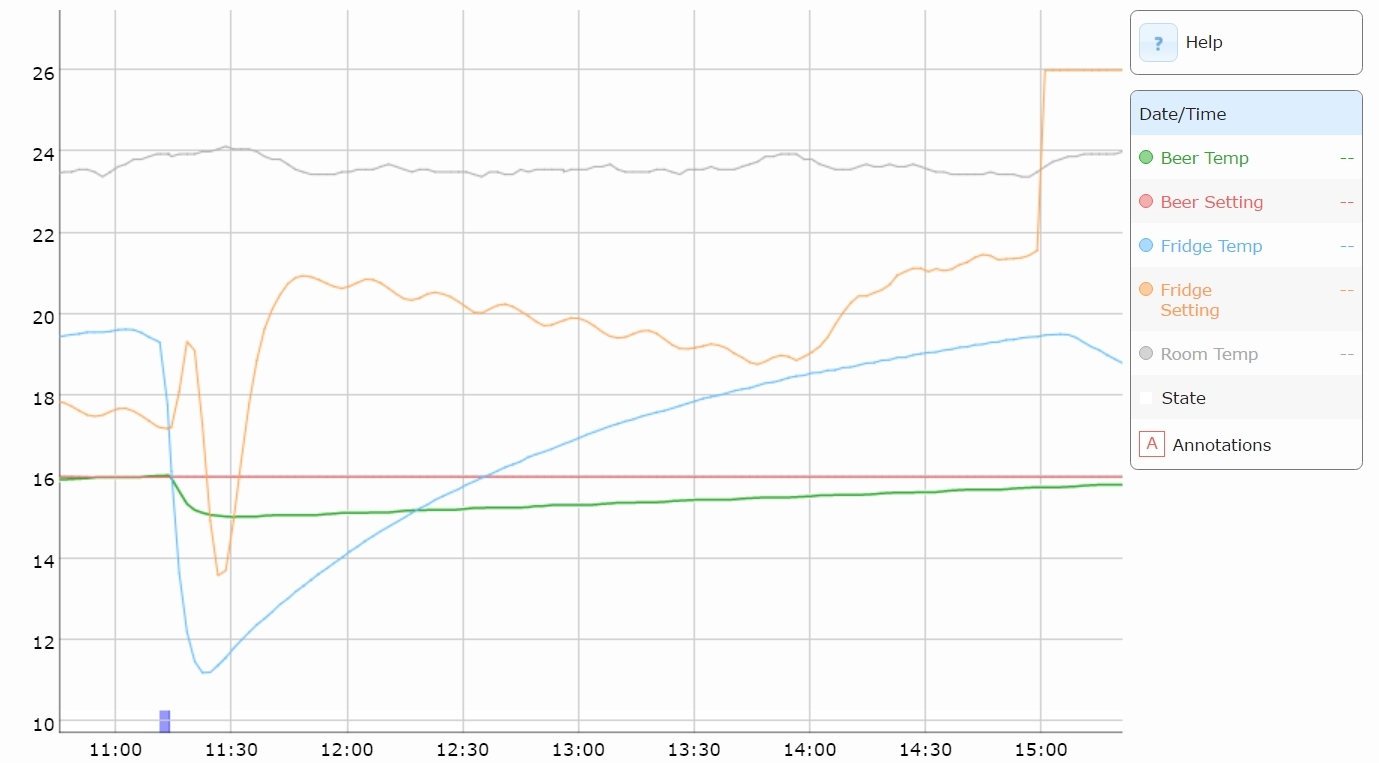
One Coolingcycle in Detail: Temperature Varies
Settings:
I Changed the BrewPi settings as follows: (this was my first “guess” for the settings and for starters it turns out to be ok.)
Beer to Fridge proportional Gain (KP) = 2
Beer to Fridge integral Settings (Ti) = 3600
Beer to Fridge derivative time constant (Td) = 0
Max difference between fridge and beer Setpoint = 10 °C
Beer to Fridge Input Filter delay time = 159 seconds
Beer to Fridge Derivative filter delay time = 159 seconds
Cooler proportional gain (Kp = 3
Cooler integral time constant (Ti) = 1800
Cooler derivative time constant (Td) = 0
Cooler pwm period = 600
Cooler minimum OFF time = 180
Cooler minimum ON time = 10
Cooler input filter delay time = 9
Cooler derivative filter delay time = 159
No Heater installed.
I’m open for ideas to optimise the Settings.
I just want to point out, if someone works with mantle cooling keep in mind that the Glycol stays in the mantle and keeps on cooling.
Ideas:
-
place the Glycol Reservoir lower than the Fermenter so that the Glycol can flow back into the reservoir and out of the cooling mantle so that no cooling happens and build the Glycol reservoir big enough to cope with the cooling and hold enough Glycol while cooling to keep the pump running.
-
Tweak the Settings of the Brewpi.
If you are running with glycol on the BrewPi Spark, you should really switch to the new beta and remove the fridge sensor.
Then the beer sensor will be used as input for the cooler PID, without the fridge sensor in between.
I suggest:
Beer to Fridge PID: KP = 0, Td = 0, Ti = 0. This ensures fridge setpoint = beer setpoint.
Cooler PID: min time: 10 sec, period 2 min ? This is a guess though. Still have to play with mine.
Maybe @lucasjans can comment, he is trying the new beta with glycol.
I have good hopes that this will help to chill the glycol tank to the fridge temp.
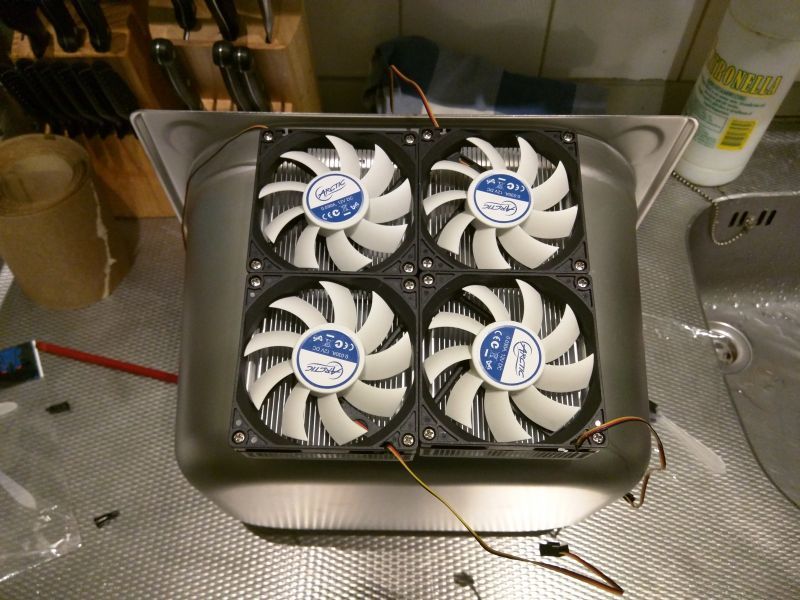
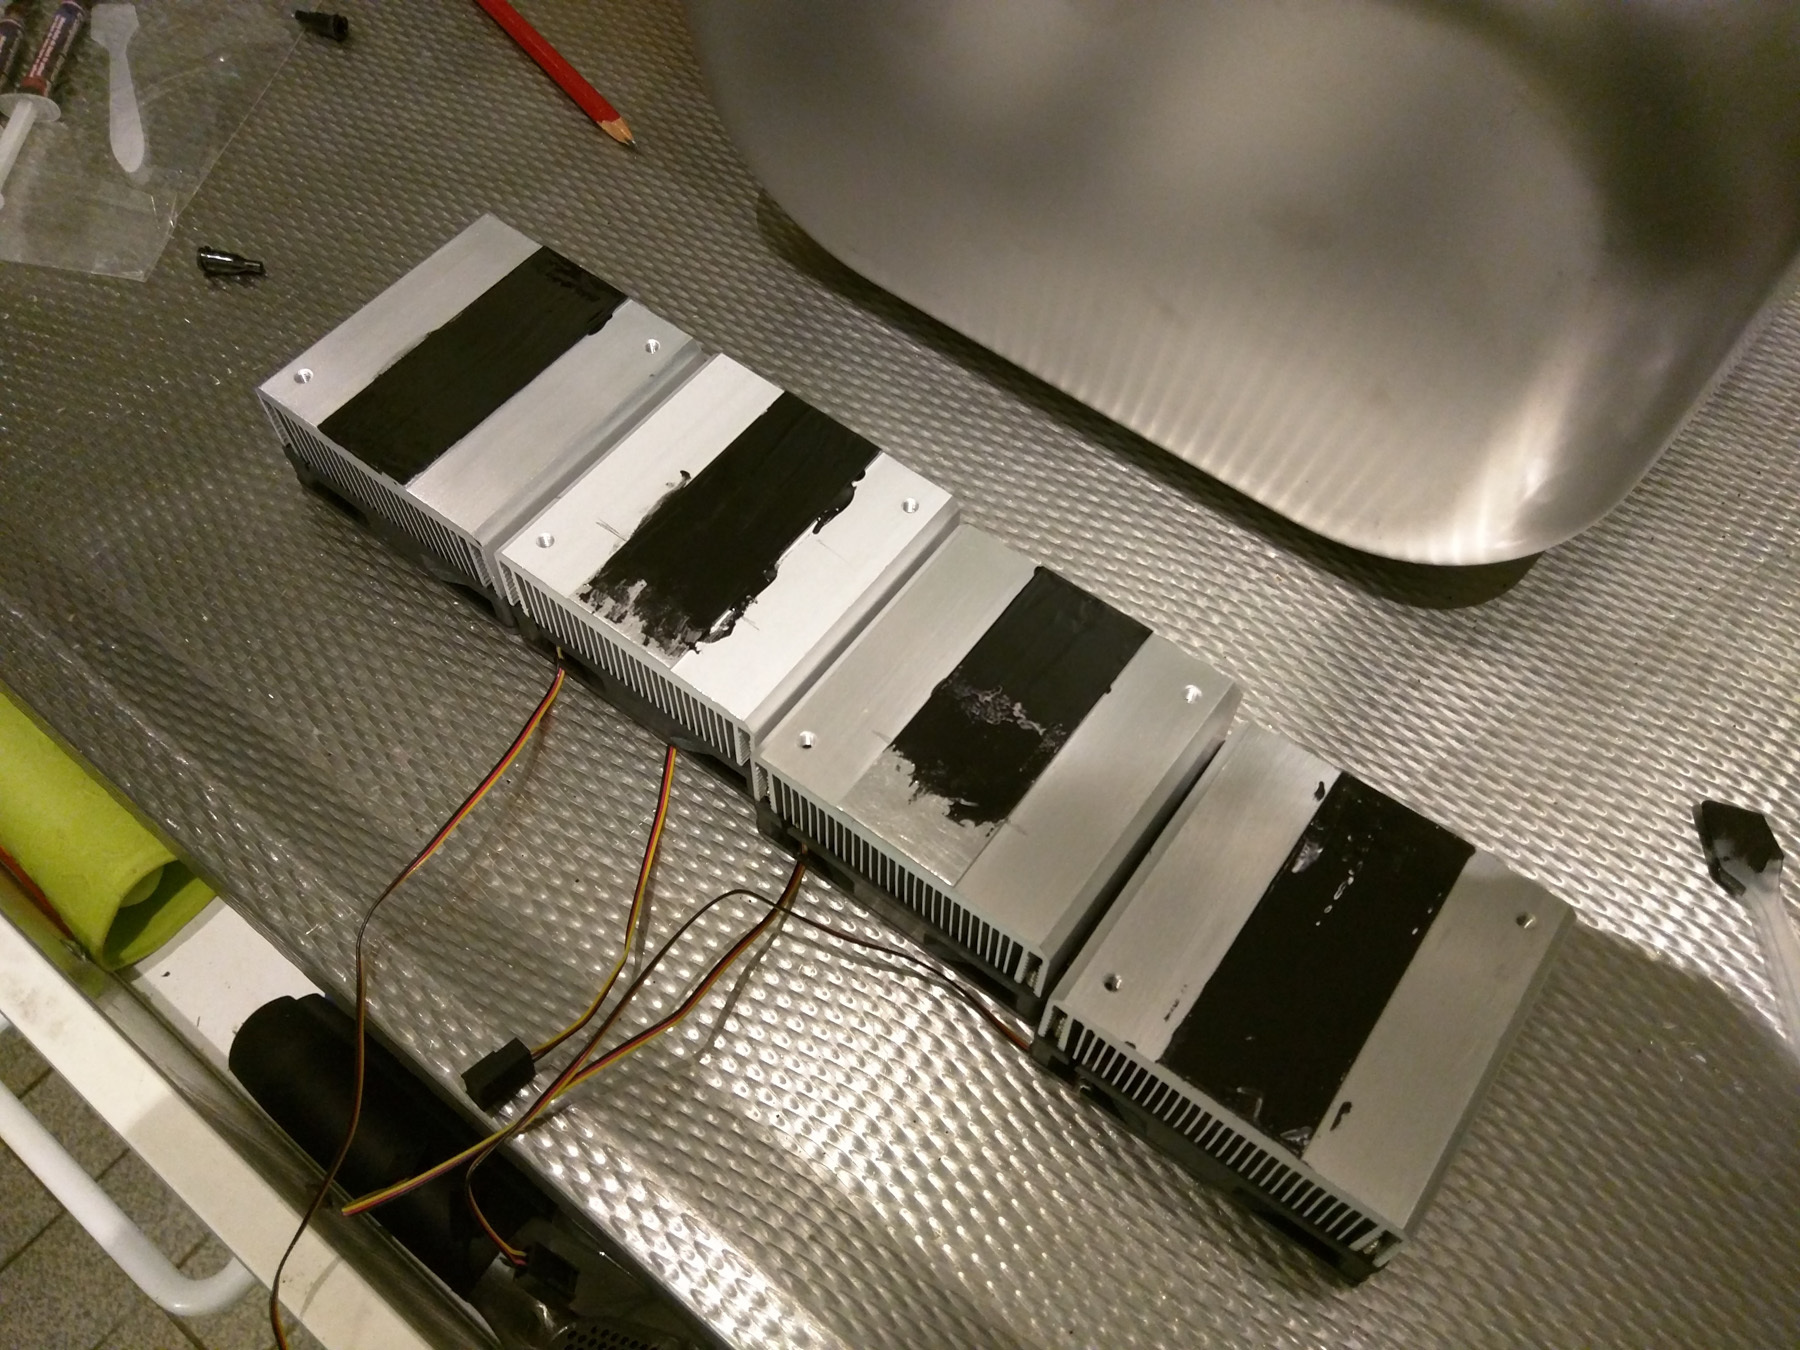
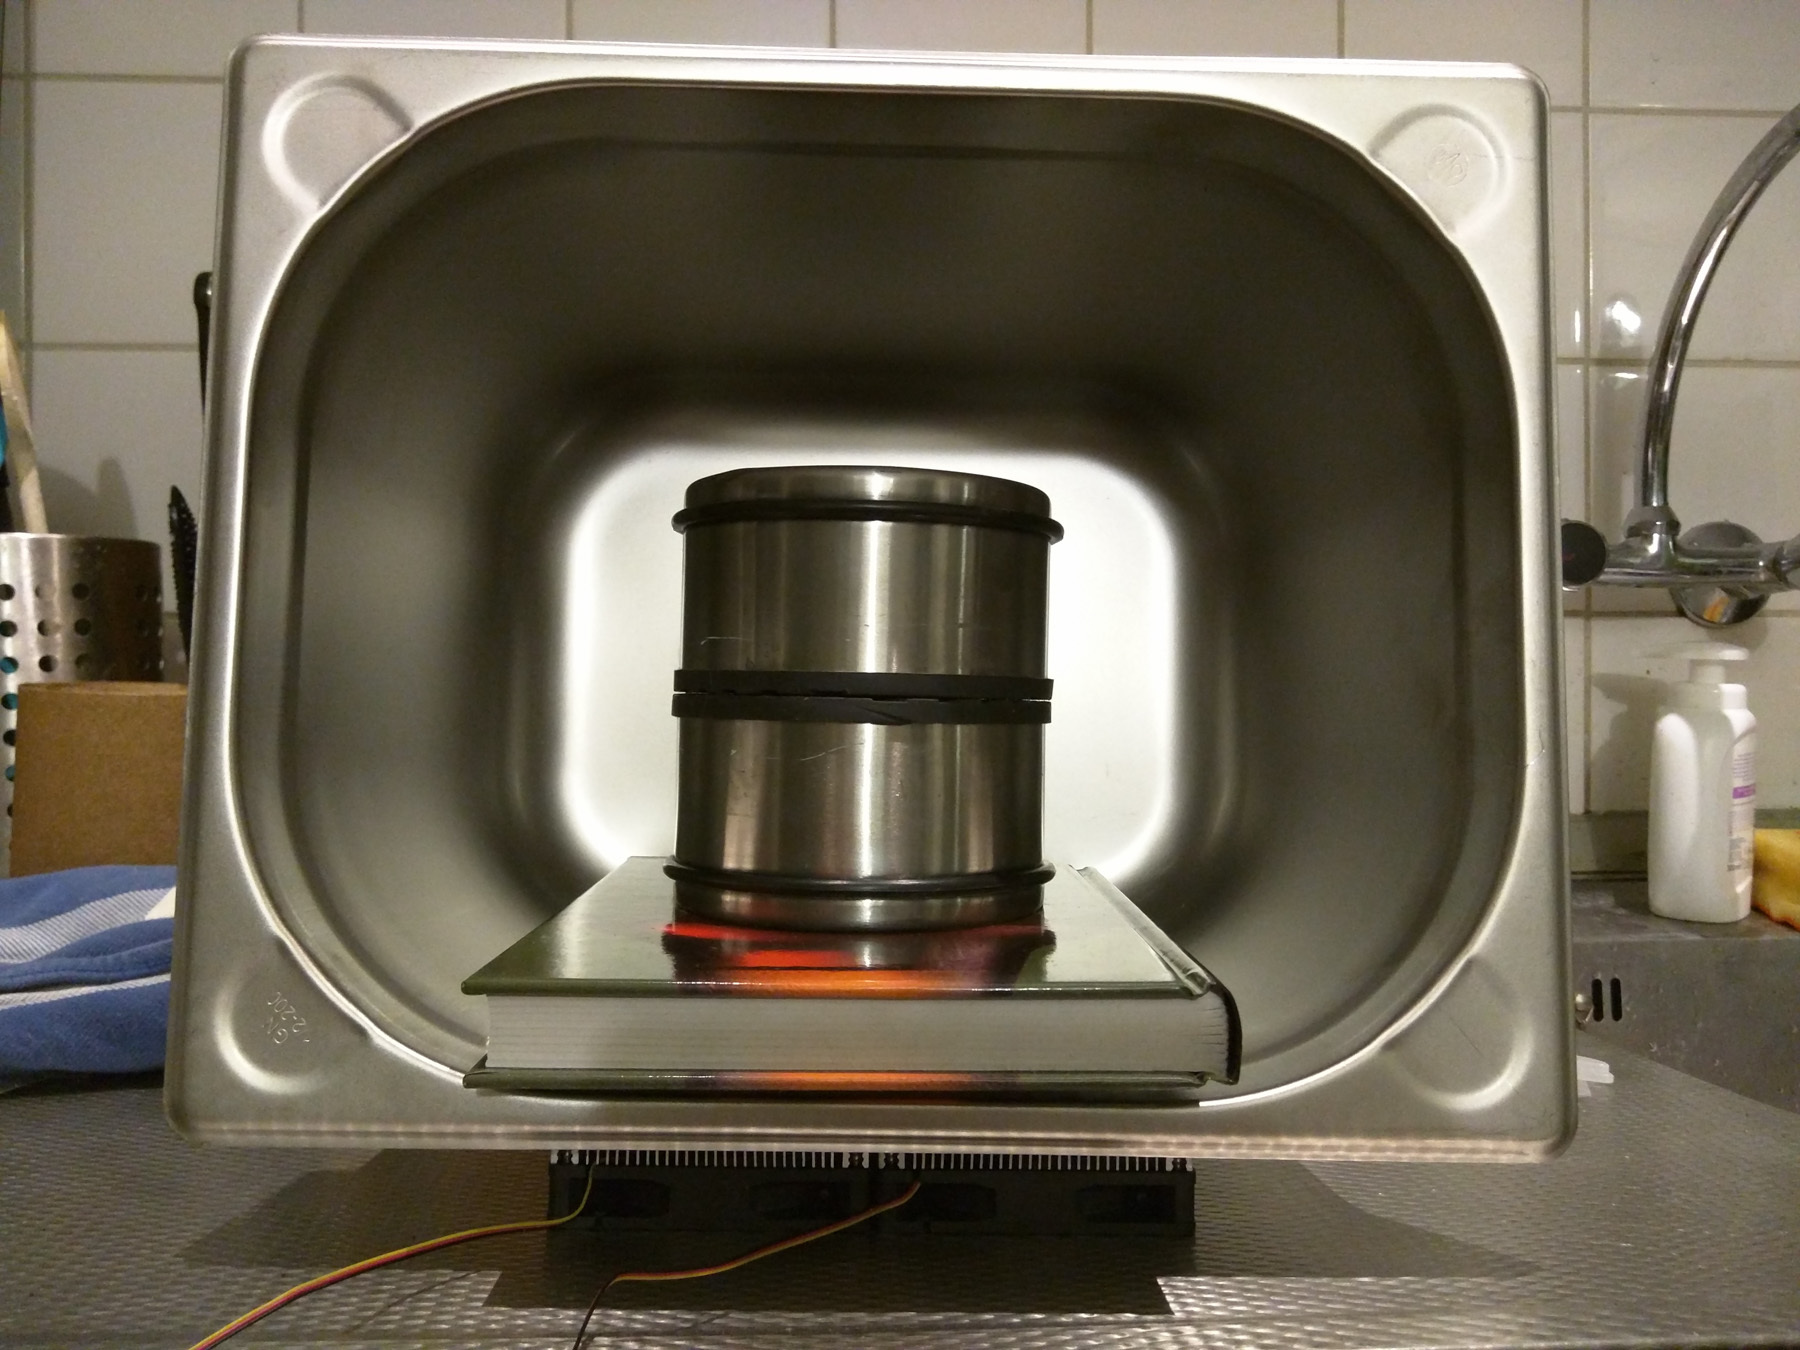
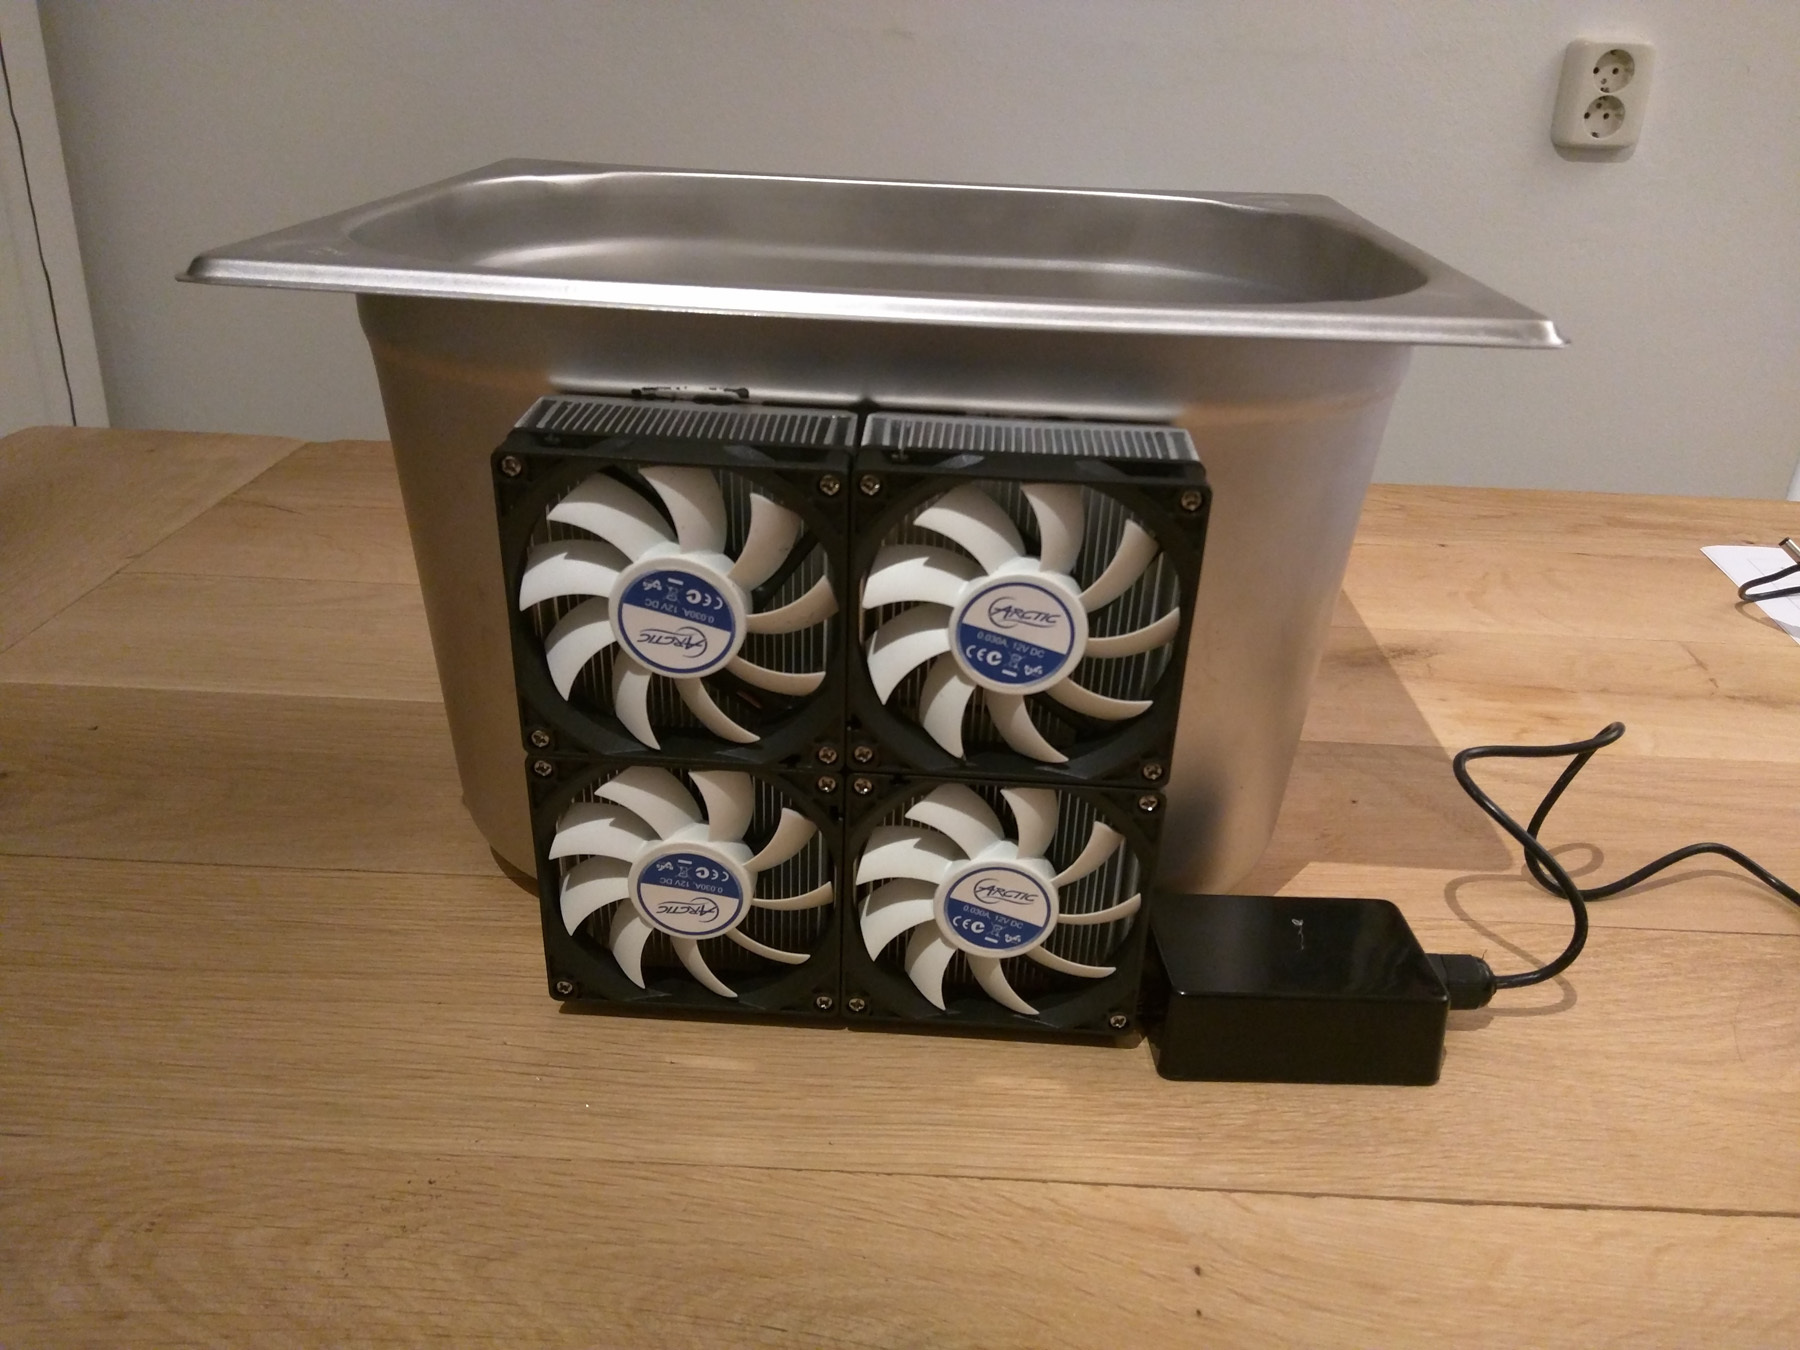
4 x Arctic Alpine M1 CPU fan on a stainless Gastronorm 2/3 container, 20cm high.
Metal container, lots of fans, should conduct the heat just fine 
2 Likes
The fridge:
Glass door display freezer, plenty of power. More details in a future blog post.
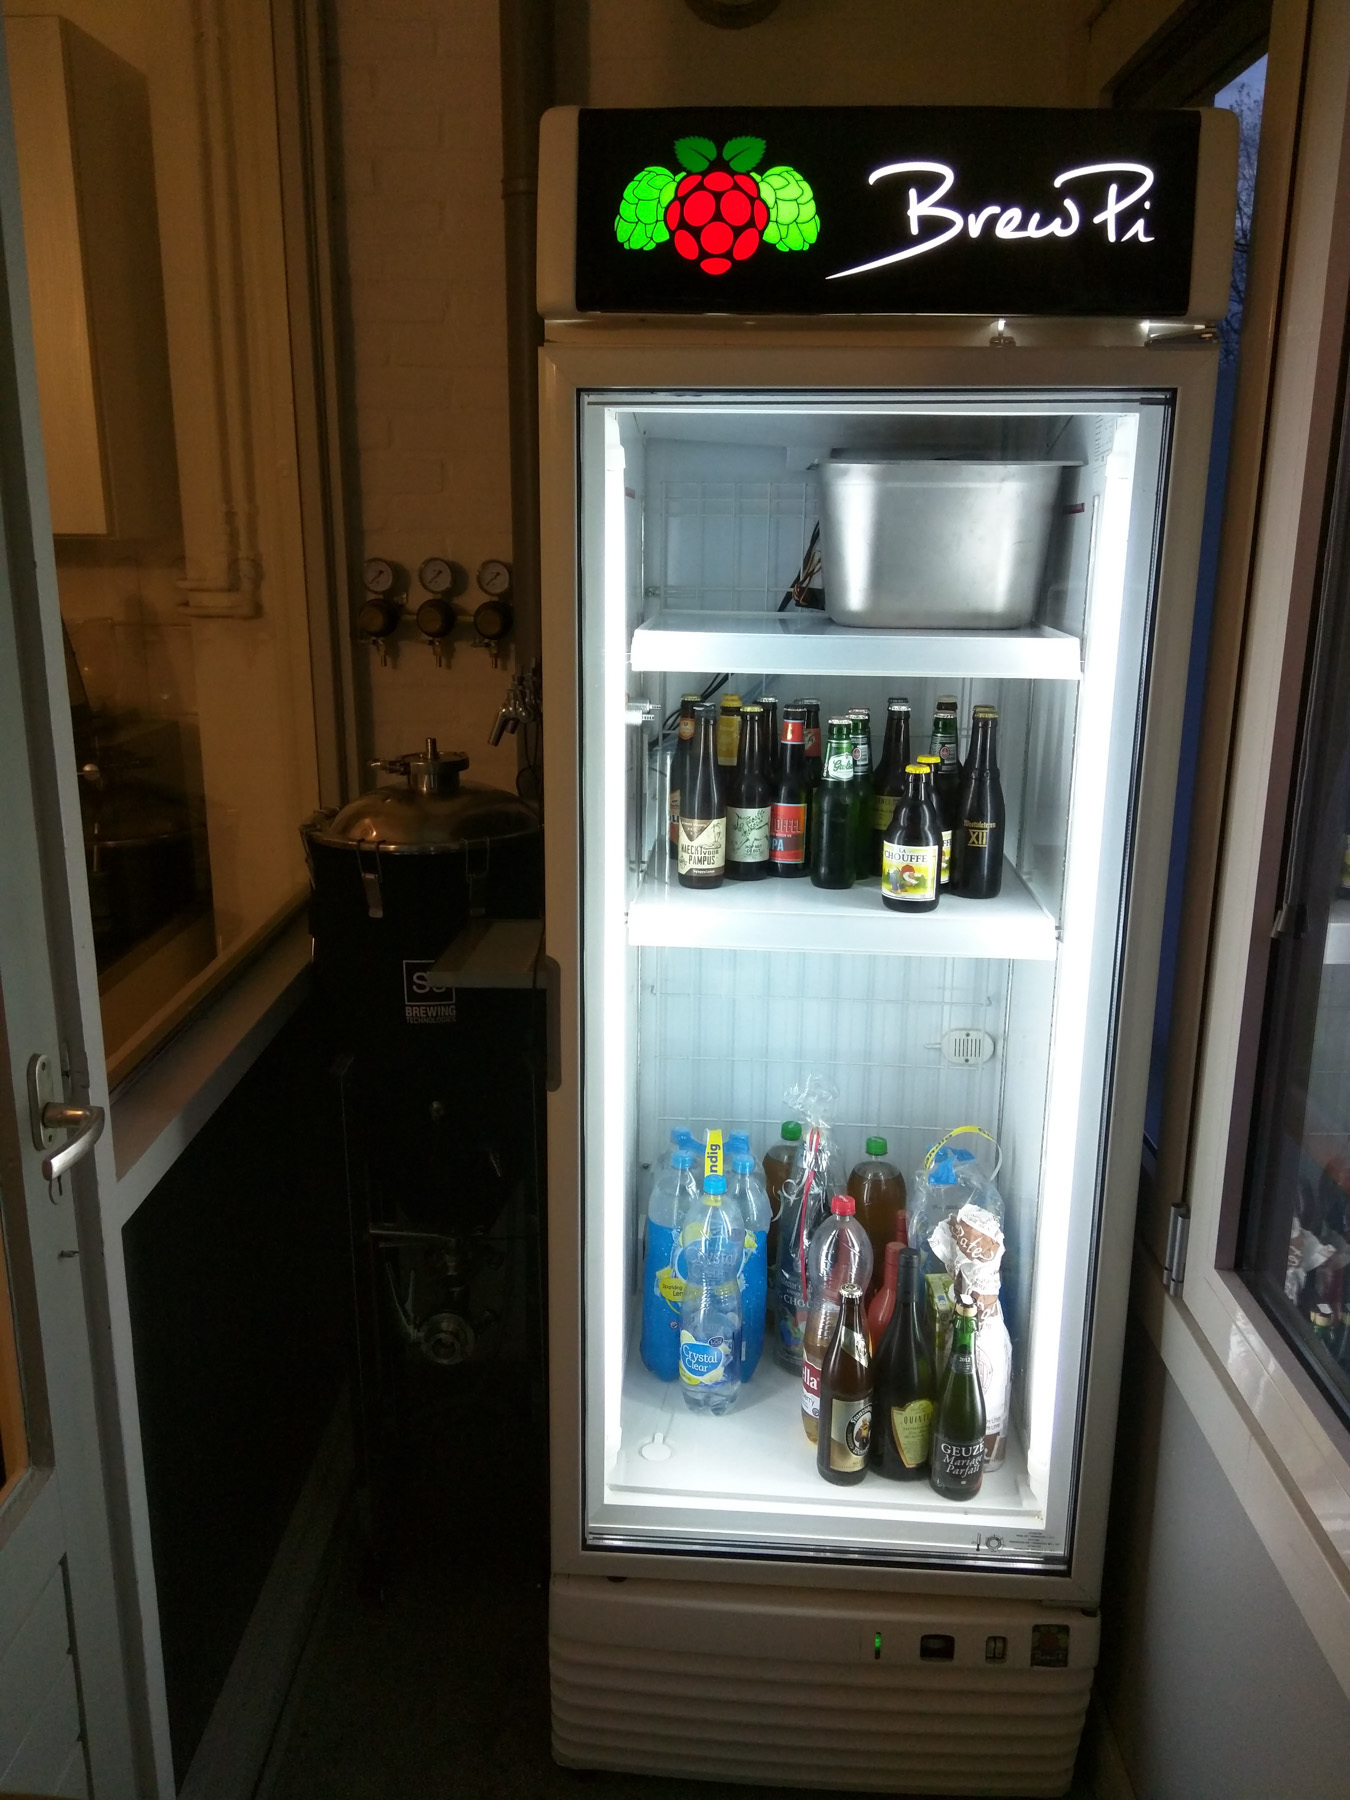
Conical with 40L of water next to it.
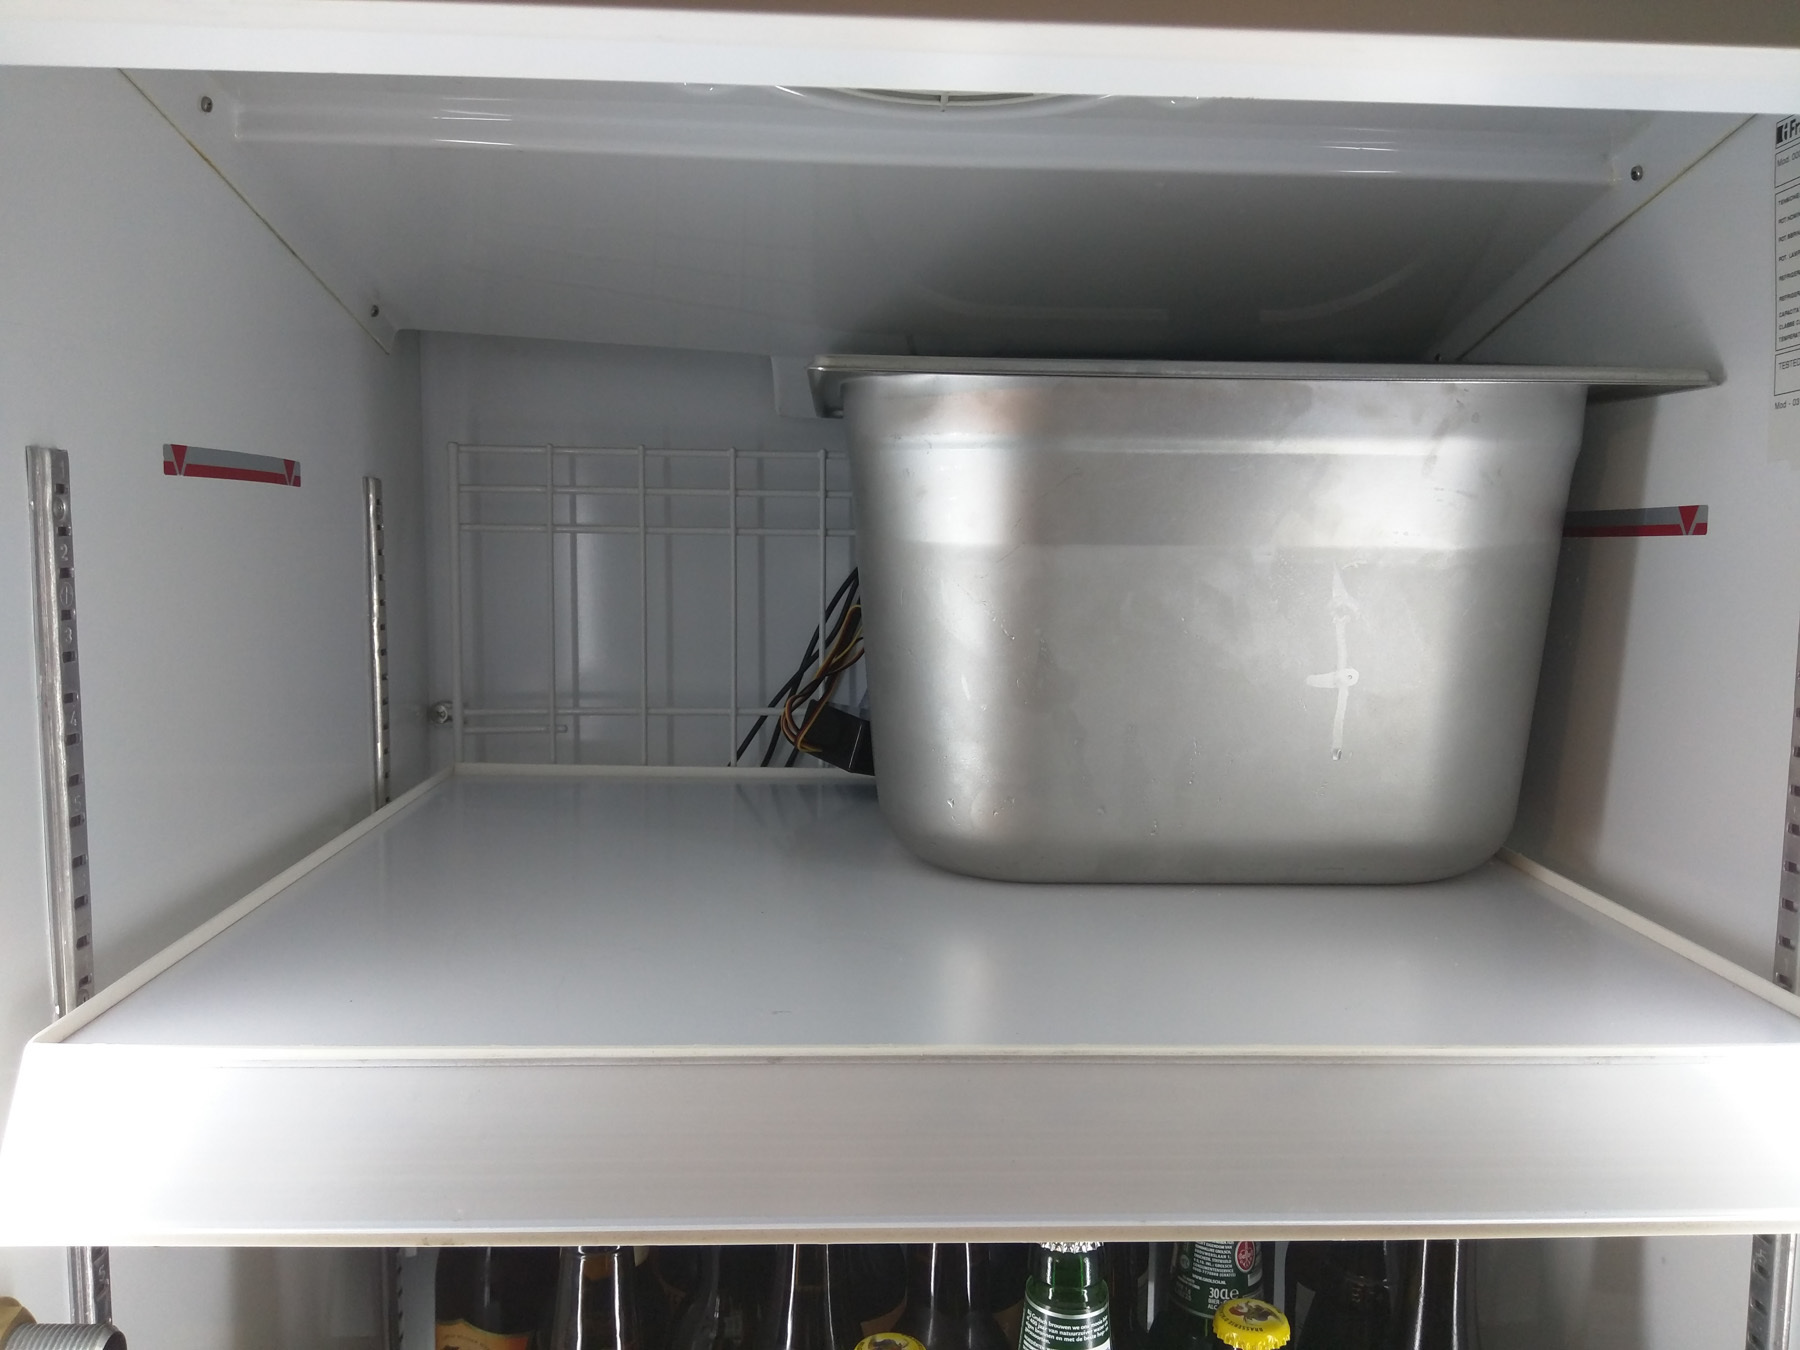
8L stainless container for glycol on the top shelve.
The heat sinks were glued to the container with thermal adhesive.
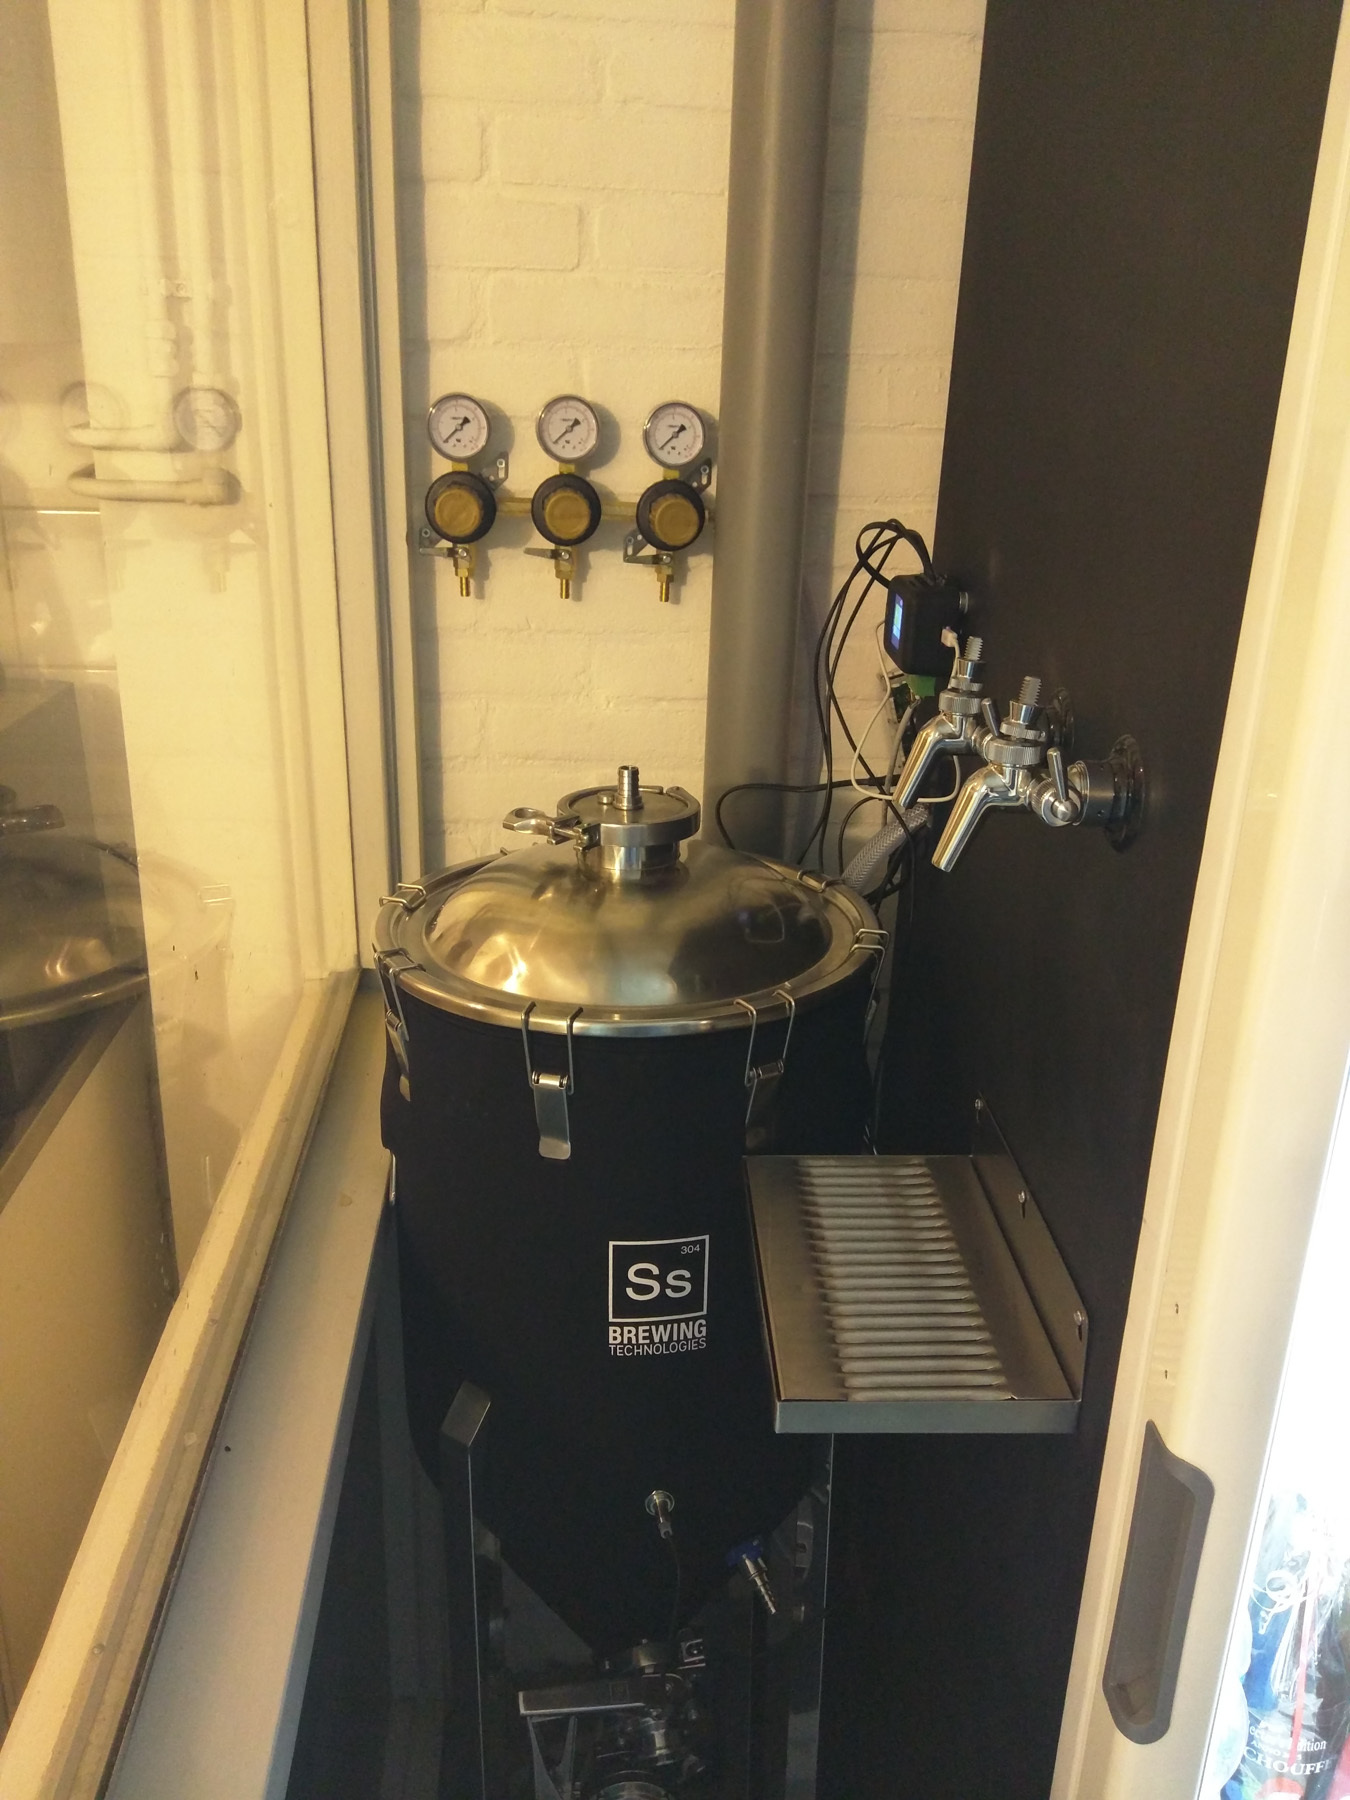
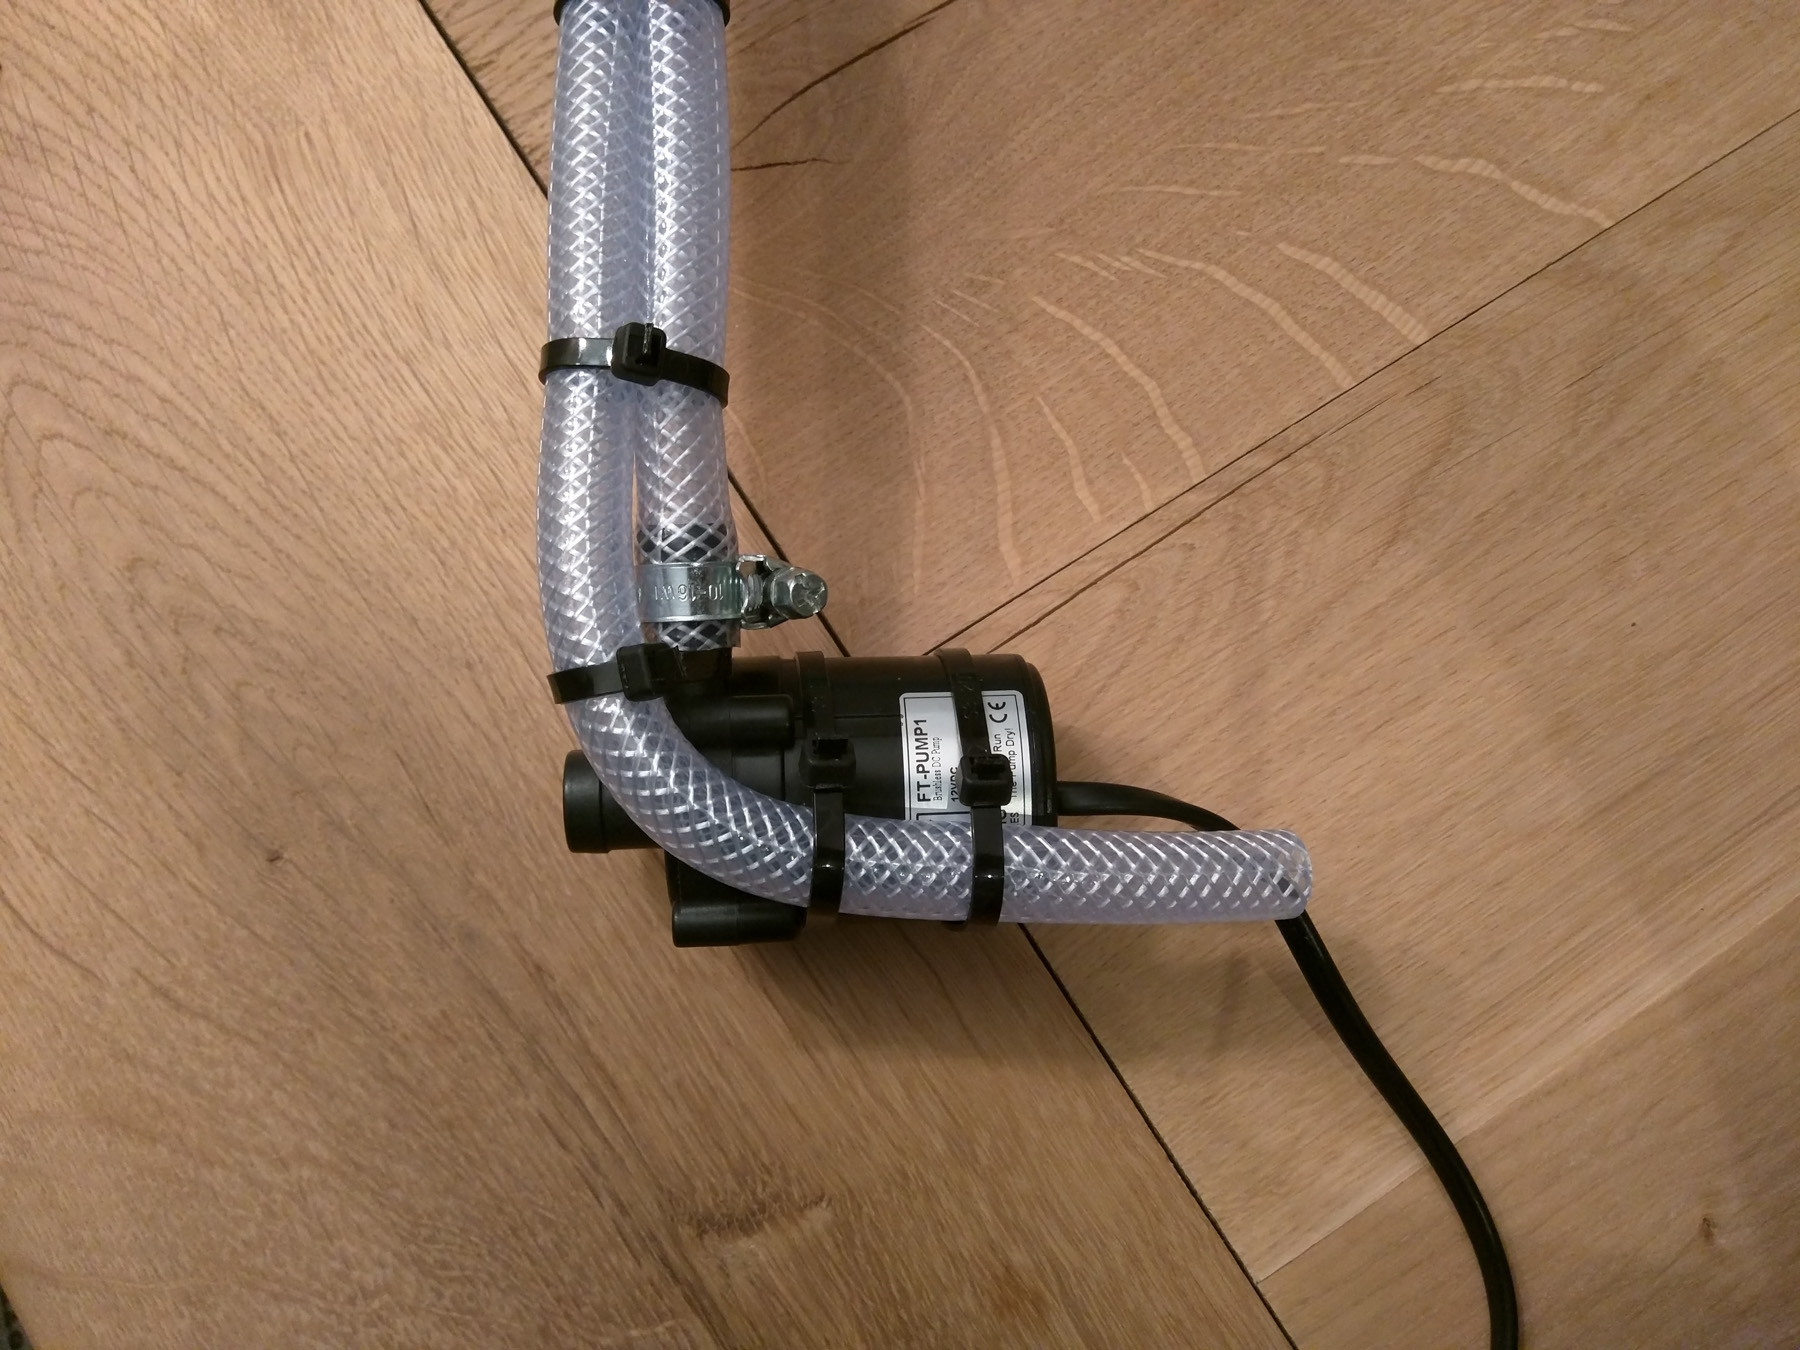
The small SS brewtech pump recirculates cold water through the conical.
Update with first results:
Cooling 8L of water in the tank (without conical connected):
The fans that came with the heat sinks were disappointing. I replaced them with more powerful ones.
Test for cold crashing the conical, a bit disappointing:

I disabled the pump to see what the effect was around 21:00. With no heat exchange, the beer heats up pretty quickly, and the glycol cools pretty quickly.
It seems that an equilibrium is reached when the conical is about in the middle between ambient temp and fridge temp.
In other words:
- The conical is not that well isolated and heats up quite a bit by ambient air.
- The heat transfer between fridge air and the water container is worse than I expected.
I am now looking for a more effective way to cool the cold water / glycol. I do not want to set the freezer much colder, because I am also keeping my kegs in there.
A possible solution could be to keep the first shelve colder than the rest of the fridge and seal it off from the rest of the fridge. I would prefer to try to get a better heat exchange though.
The current setup is fine for regulating the brew, just not for cold crashing. Suggestions are welcome
Update: I inserted a small temp sensor between the heat sink and the container. It drops below 6 degrees while the fridge/freezer is cooling.
Update2: Decided the top shelve will be a sealed off separate climate zone
I still don’t believe your heat transfer will ever be high enough to cool this conical reliably. Remember my setup (posted further up in this thread) was with a heat exchanger from a motorcycle which was in freezer at -24 Celsius. I was never happy with the result and my conical had much better isolation (7cm pe foam).
Also you will have a considerable amount of energy from the fermentation which you did not have to cool during the test, especially during primary. On the diagrams from one of my conical you can actually see the activity of the fermentation just by how many times the cooler is running: http://brewbit.com/dashboard/devices/656/sessions/13628?token=76dd3d3585b3a22ea85082a20f087444
I think the only option to get the heat transfer fast enough is directly from the cooling element of the fridge through metal directly to the glycol without having the air in between. One idea would be to stick cpu-watercoolers directly to the coldest part of the fridge with thermopaste and run the glycol through (example). Maybe you could also add some “heat pipes” to your current setup, these are cheap and would sure help to make heat exchange faster.
Edit: I can’t take the wait for multichamber no longer. I went ahead and ordered my second BrewPi 
The difference between my freezer and yours is that mine has a big fan in the ceiling to recirculate air through the condensor. I hope that will work in my advantage to cool the glycol.
That water cooling unit you posted looks very nice, and cheap. I’ll revert to that if my 2 compartiment approach does not work.
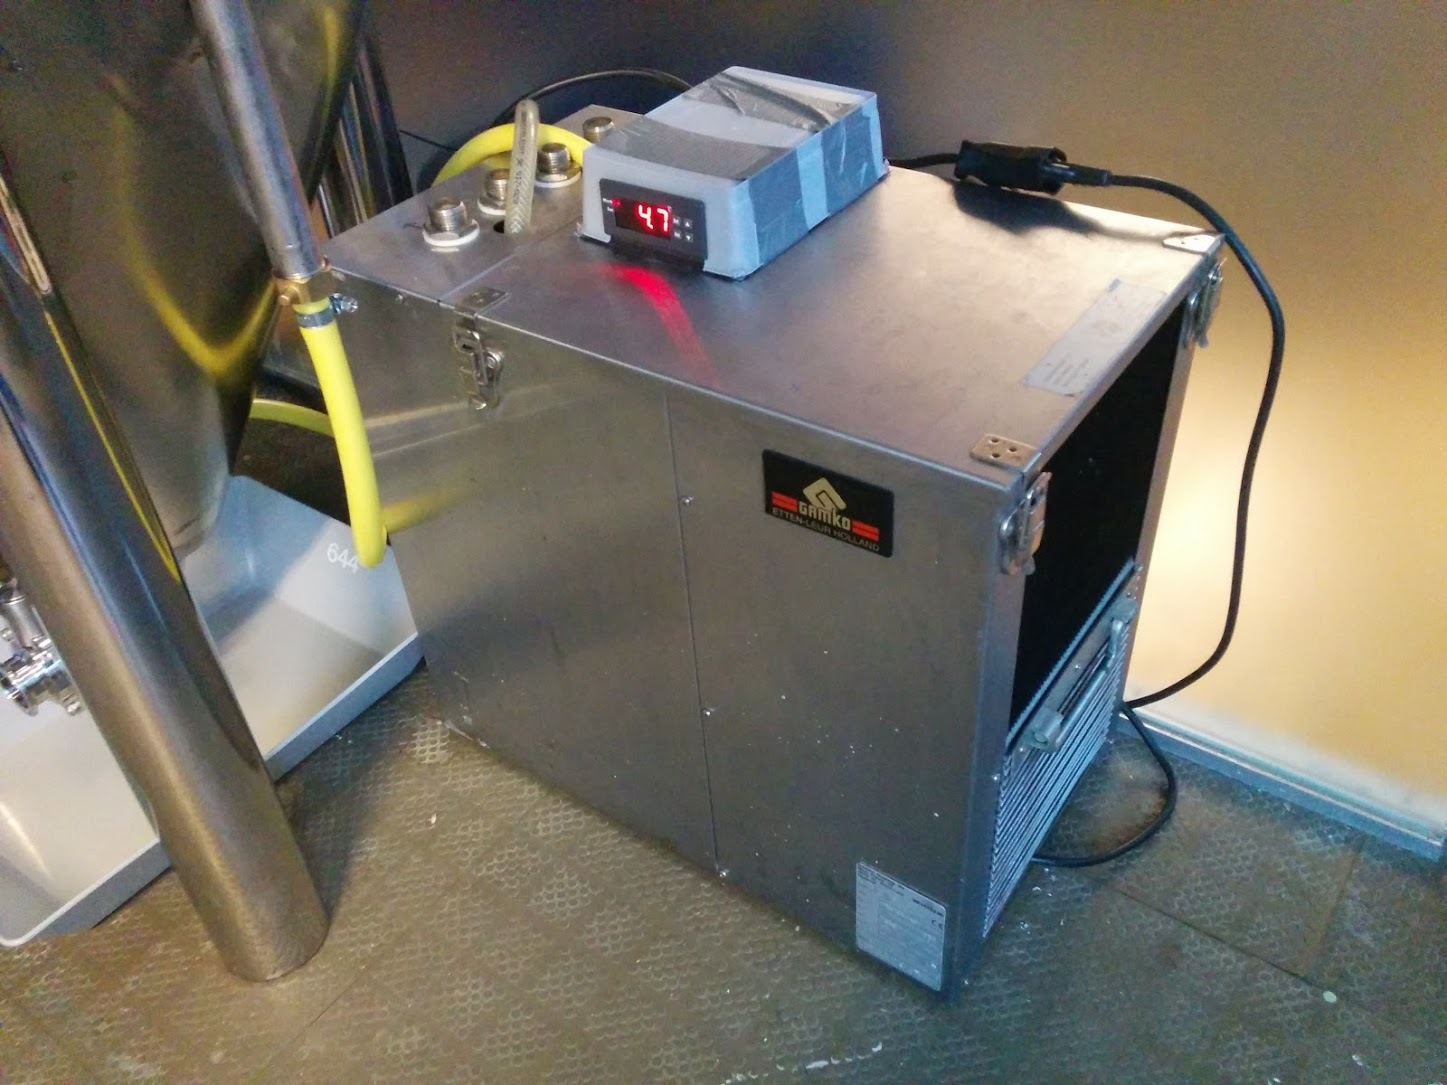
I got a second such cooler for the new conical, I bought it used for 150 swiss francs. It is basically a two line tap wet cooler with integrated pump for cooling the tap lines. Works perfectly, including cold crash. On the right in this image:
Currently my BrewPi is only controlling my kegerator. The new one coming will be controlling the conical on the right.
@chixxi; yéah, I looked into those beer line coolers but they seem impossible to find in The Netherlands…
SS Brewtech told me they were coming with a glycol cooling setup soon… I haven’t gotten my freezer to work but looking at Elco’s initial tests, that doesn’t seem like my plan will work…
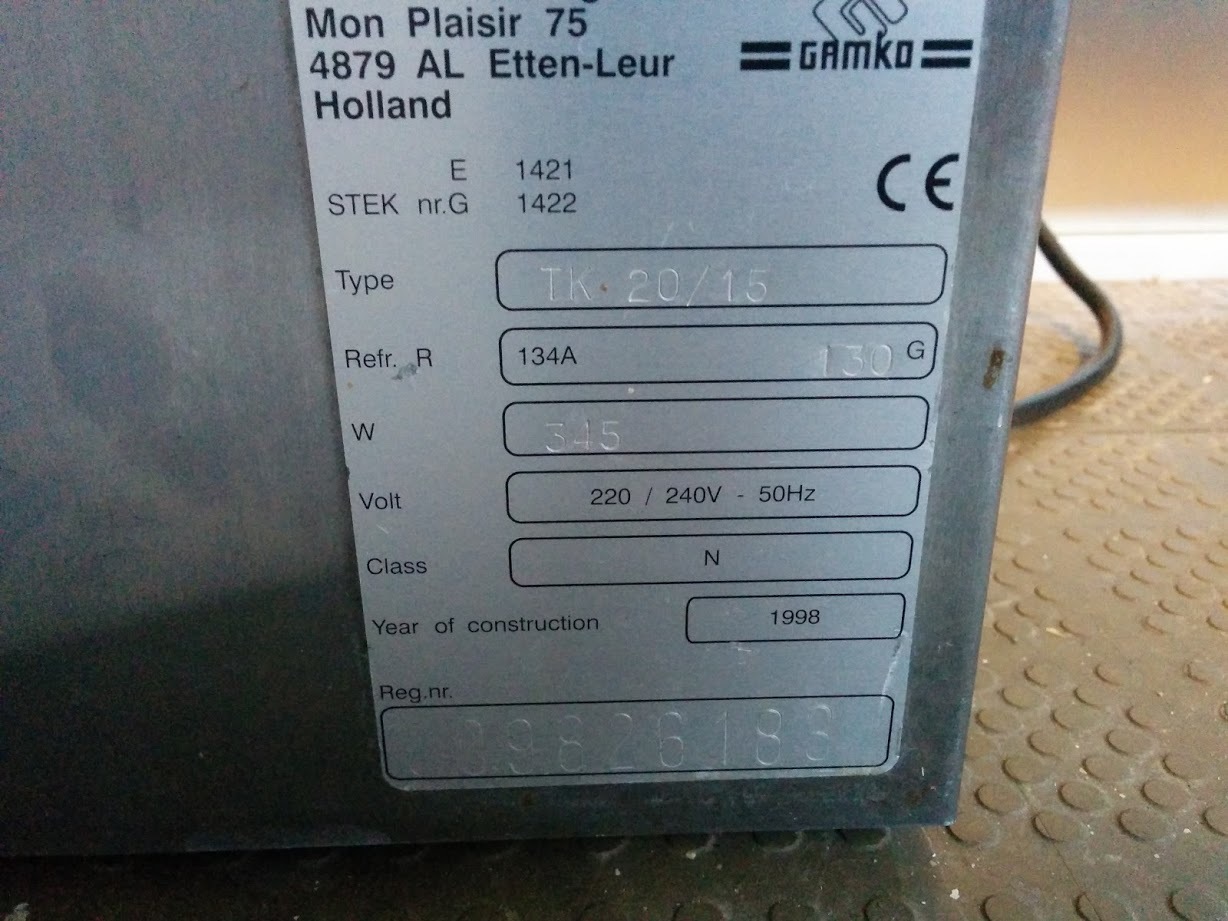
Actually the one on the right is from a company in the netherlands, the company is “Gamko” (http://www.gamko.com/).
yeah, been trying to source one… would it be something like this? http://link.marktplaats.nl/m1038257913
Yes exactly. There are some good offers on that page if you look for bierkoeler. Like these:
http://www.marktplaats.nl/a/witgoed-en-apparatuur/koelkasten-en-ijskasten/m1036824572-bierkoeler-gamko.html?c=8c285449651fa109c354bbabe740c1b&previousPage=lr
http://www.marktplaats.nl/a/witgoed-en-apparatuur/thuistaps/m1035515936-bierkoeler.html?c=8c285449651fa109c354bbabe740c1b&previousPage=lr
Ask if they got an integrated pump, but often they don’t know. Most of the “wet coolers” do. “Wet” meaning the energy is transported by cold water. If you see a motor they are usually with water, the motor is for moving the water by stirring it and pumping it on the same time. The pump usually circles the water through a line to cool the pipes from the cooler up to the taps. Such a line with multiple beer lines and two cooling lines are often called python.
Edit:
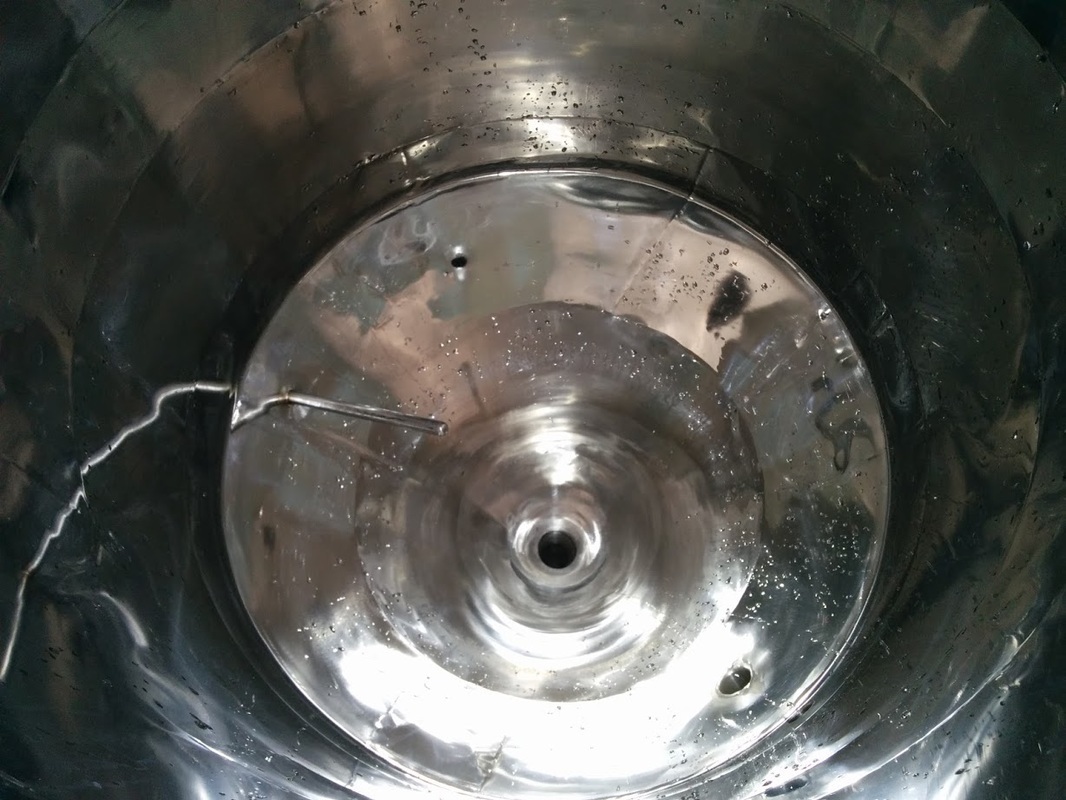
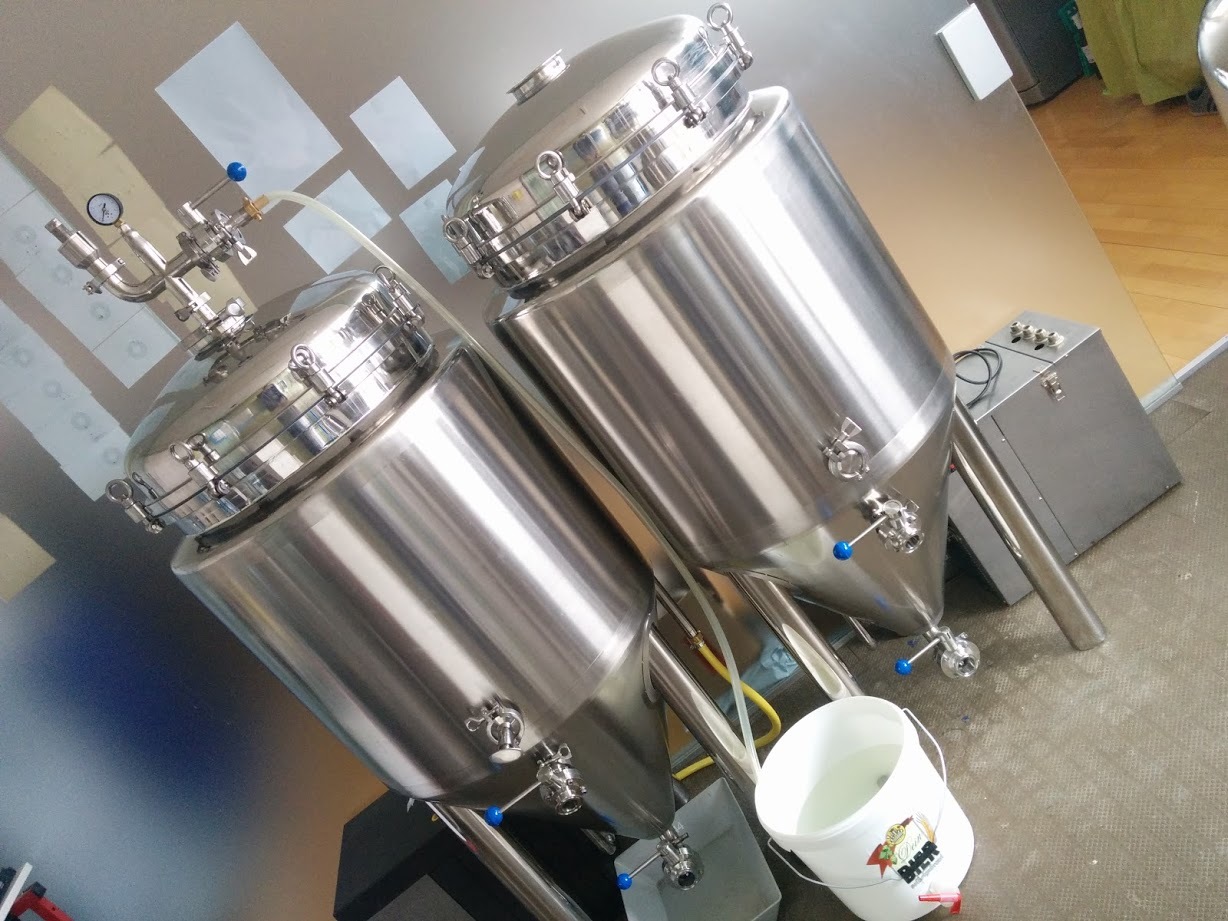
I went ahead and took some pictures of the cooler so you can understand how they work. Here is one of my coolers, I use one cooler per conical, but with pumps you could also cool mutliple fermenters with one coolers by using the beer lines:
This is how it looks from the inside. On the right you see the ventilation, below that is the compressor. On the left is the tank/reservoir and the motor which stirs the water and is a pump at the same time:
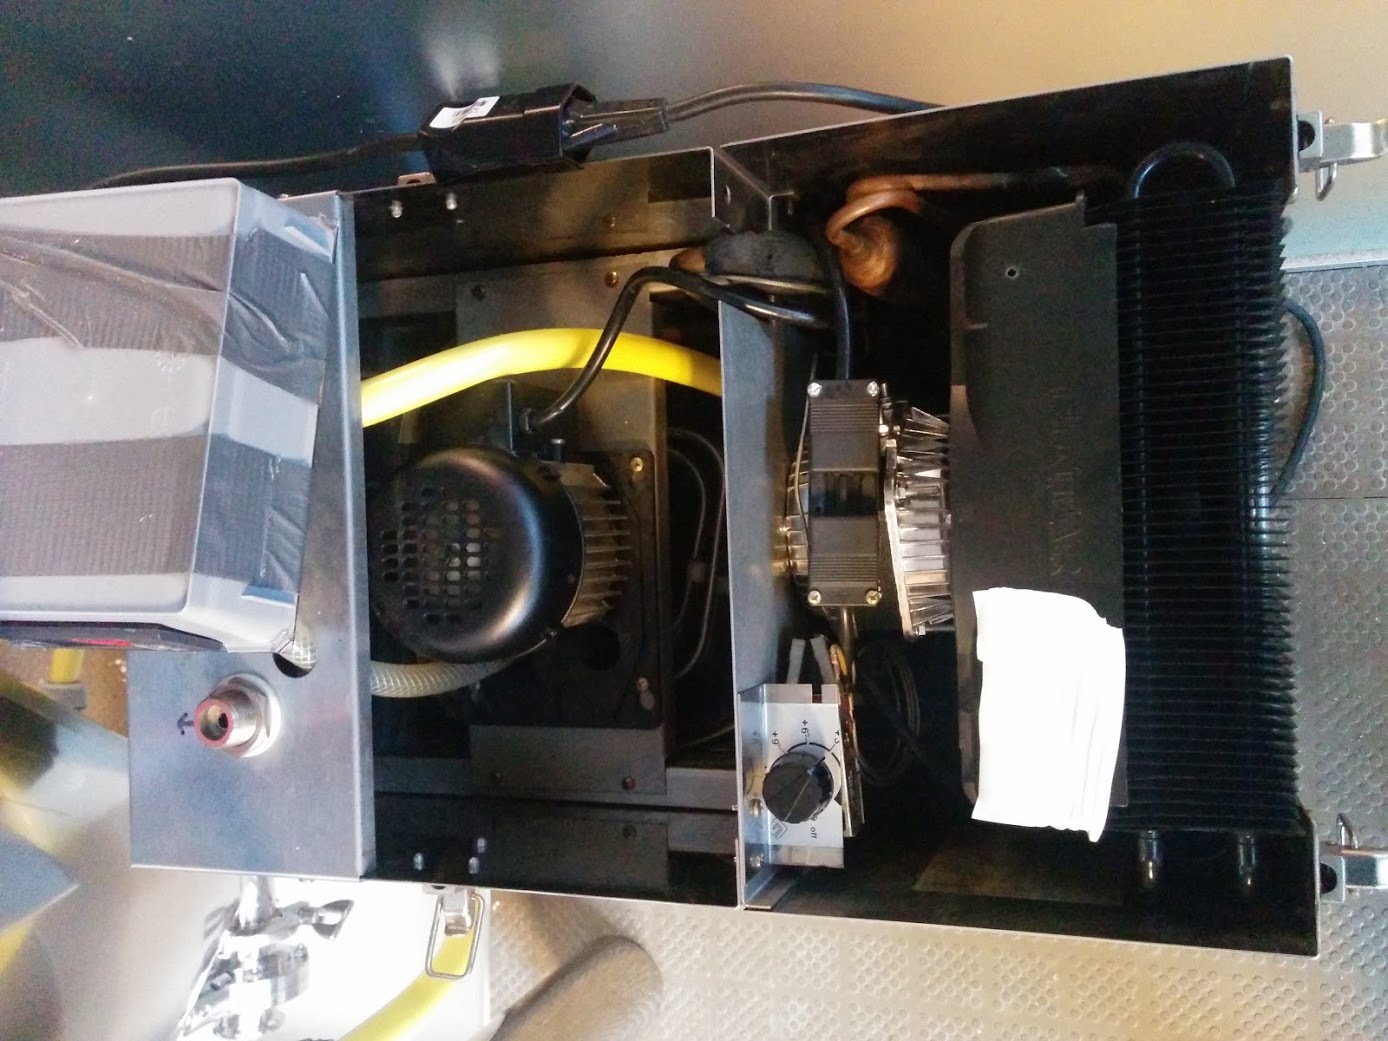
Here you can see the motor, the transparent/white hose is the output of the pump, yellow is back. You can also see the water tank with the cooler from the compressor (copper) and the submerged beer cooling lines (stainless):

The power of the cooler:
Some tipps:
- Submerge the hose which brings the water back from the cooler, this way it will no go empty and overflow the tank
- If ever a fan breaks down, get the cheap ones from china and not the same ones from the originals supplier which also come from china but cost about 1000%
- The tank has an upper limit and an overflow protection. If you put to much water it will come out on the bottom of the cooler.
- When you start the cooler the first time, have some spare water ready, the tank level will go down since the conical is beeing filled.
- Once in a while you need to add some water
can you let me know the type of the chiller you have? like a product number?
YEh, @Elco - My recommendation would be to try and ceiling mount a chiller and not waste your time trying to utilise the freezer. Get the chiller up high in that space not utilised.
I already went ahead and made a custom shelve to close off the upper part of the fridge from the rest.
Basically, I created a freezer compartment.
First tests today or tommorrow