Using BrewPi 0.4 for mashing

I have been testing the new version of BrewPi a lot on my HERMS setup.
The new controller code has been tweaked a lot to work well when controlling mash temperatures.

The user interface is still very much fermentation oriented, but by changing a few settings, it will work well when mashing.

There are 2 options:

  • Controlling a heater directly, based on your mash sensor
  • Cascaded control: your HLT setpoint is adjusted automatically based on your mash temperature.

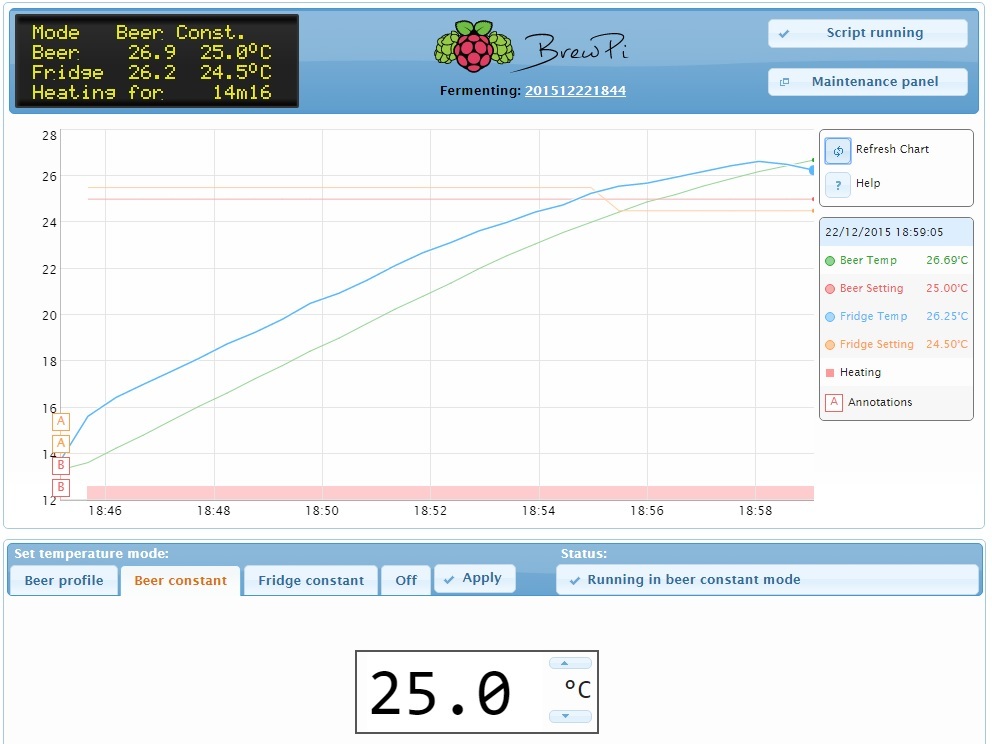
I used the second option in my tests. You can see the results in this chart:

http://chart.brewpi.com/?beername=mash-test6-0.4.0

Unfortunately, in my rental apartment I cannot use heating elements above 3200W, so it is a bit slow to ramp.
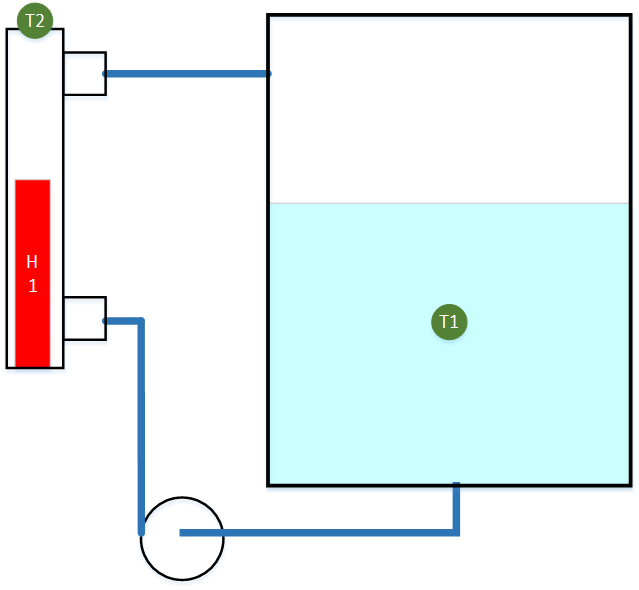
This water test was with 36 liter in the HLT and 18 liter in the mash tun, recircling through a 40cm stainless herms coil and with our 17V brewing pump at maximum speed.

The mash temperature is measured at the MT output, in a tee with our threaded temperature sensor, and displayed as beer temperature.
The HLT temperature is also measured at the output and displayed as fridge temperature.
The MT input temperature is shown as room temperature.


The settings I used are as follows.

Devices:

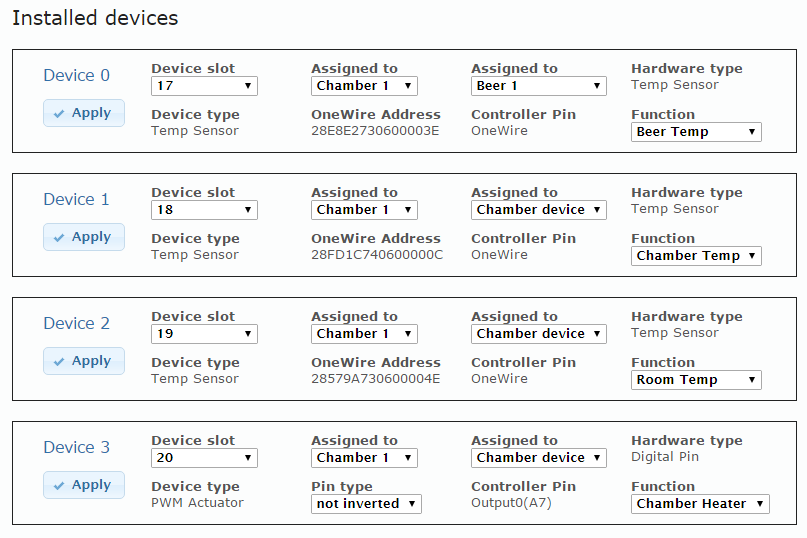
I used these high slots, because I want install my motorized valves to 1-12.


Advanced settings
Here you will tweak your controller to work well for mashing.

Beer-to-Fridge proportional gain (Kp) = 0.5
If you want no overshoot, this value should be MT volume / HLT volume.
If the mash temperature is 2 degrees too low, it will raise the HLT temperature to 1 degree above the mash setpoint.

Beer-to-Fridge integral time constant (Ti) = 300
This determines how quickly the integral will raise your HLT setpoint if the mash temperature stays too low. I find 3 minutes works well.

Beer-to-Fridge derivative time constant (Td) = 120
This prevents overshoot. A too high value will create a very slow approach to your mash setpoint. A too low value might cause overshoot.

Maximum difference between fridge and beer set point = 5 C
This will prevent your HLT from going higher than 5 degrees above your beer setting. This also prevents your HLT from going too high and destroying enzymes while the wort goes through.

Beer-to-Fridge Input filter delay time = 18 seconds
A bit of filtering on the beer temperature creates a nice slow setpoint for the HLT

Beer-to-Fridge Derivative filter delay time = 18 seconds
A bit of filtering on the beer temperature creates a nice slow setpoint for the HLT


The cooler and heater2 settings are not used.

Heater 1 proportional gain (Kp) = 50
1 degree Celsius difference will set the heater to 50%. If you have a very powerful heating element, you could go lower. In my tests, you can go pretty high without overshooting.

Heater 1 integral time constant (Ti) = 300
It will take 3 minutes to adjust for temperature losses. The integral keeps my element at around 40% to keep the HLT at temperature.

Heater 1 derivative time constant (Td) = 30
When you turn off the heater suddenly, how long does the temperatue keep rising? I think 60s might be a bit much already.

Heater 1 Input filter delay time = 18 seconds
A bit of filtering on the beer temperature creates a nice slow setpoint for the HLT

Heater 1 Derivative filter delay time = 18 seconds
A bit of filtering on the beer temperature creates a nice slow setpoint for the HLT

Dead time when switching between actuators = 0
There is no switching between actuators, but I have seen a strange event where my mashing setup thought it was cooling for a second. I will investigate this further. Just set it to zero to make sure it does not affect you.

4 Likes

I assume using a RIMS-tube is equivalent to option 1. What would the appropriate settings be for that option?

Hey @Elco I’m with @HDTVdevil it would be cool to get some values for option 1.

Doesn’t need to be based on your experience, just in theory what should work.

I’m trying a few things out in a biab setup at the moment and the PID values for heater1 help somewhat but I’m overshooting more than I think is achievable.

Thanks in advance.

Any help with this would be usefull as I’m getting terrible overshoot with these settings and option 1.

A couple of questions:

  • Do you have version 0.4.1?
  • What are your current settings for heater1? If you only have 1 sensor, you should run in fridge constant mode and only heater 1 will be active.
  • Do you have a temperature sensor that measures your RIMS temperature? In that case you could run in beer constant/profile mode.
1 Like

I’m running 0.4.1.

Did a reset to defaults and then all the above settings.

I have 3 sensors installed:

  • on the output of the mashtun (T between tun and valve with a sensor)
  • on the output of the RIMS-tube
  • waterproof sensor

For the current test with water, I have 2 sensors active:

  • output of RIMS-tube as ‘beer temp’
  • waterproof hanging on the inside of the tun

Any suggestions on which sensors to set as which temperature?

Ah, I would switch those.

See, how the algorithm works is as follows:

  • A PID value is calculated from the beer temperature. Say if it was only proportional, if the beer temperature is 2 degrees too low, and Kp is 5, the output of the beer2fridge PID is 10.
  • This value is added to the fridge setpoint.
  • The heater1 PID brings the fridge temperature to the fridge setpoint.

So if you swap your sensors, and let the fridge sensor be the output of the RIMS, then if your beer temp is 2 degrees too low, the output of the RIMS will be 10 degrees above the beer setpoint.

I have switched them around. I will do another test.

Probably, because you have a RIMS, you have a lot less volume inside your ‘fridge’, so you can use a higher beer2fridge gain Kp and smaller time constants.

1 Like

Had to fix a leaking connection between the element and the tube first …

I tried it like this but the water went way too high. For the mashing, it should be in beer-profile mode but when I do that, it went all the way to boiling point. Hopefully, the next edition will have an adapted UI to properly select the sensors and heaters for the mashing.

Can you please describe in detail how you have things connected and how your flows are?
Which temperature went too high?

The heater1 PID settings are very high (Kp=50), which is fine for a big HLT, but for a RIMS, you probably want to have these a lot lower. My guess is 10 would be a good value for Kp.

T1 is a waterproof sensor hanging in the water. This one I would prefer to remove in final configuration.(or if essential, replace with a thermowell model).
T2 is on the output of the RIMS-tube
H1 is the heating element.

T1,T2 and H1 are connected to BrewSpark.

I will receive very nice thermowell sensors tomorrow, a new design with flange.

I would stick to using 2 sensors. That way you can let T2 be the fridge temperature, and let it be a bit above your target mash temperature to reach your setpoint quicker.

Assign T1 as beer temperature. The beer-to-fridge PID will determine your fridge/RIMS setpoint, so the target for T2.
You can set the maximum difference with the beer setpoint in advanced settings.

Your heater H1 will be driven by the fridge setpoint and T2. Because you are only heating a very small volume, make Kp smaller than the default, my guess is about 10. I think Ti 300 and Td 60 would be a good first try.

1 Like

Interesting info on the thermowell. A sensor with a longer tip would also be very useful to measure deeper inside the tun.

In beer constant mode, it goes above the temperatures and keeps on heating.

running fridge constant mode now to check

waterproof sensor isn’t measuring correctly. going to replace it.

Was this a waterproof sensor you bought from us?

Replaced it by installing a thermowell sensor (hole was there already). Will try to do a test this evening.

So I got my first mash nailed today, and evererything went pretty smooth.

There was a bit of overshooting, but not anything to worry about.

ORANGE is target temp, BLUE is temp sensor at pump, which is used to control the heating element, and GREEN is a sensor submerged in the grain bed.

The green spike at 14:50 was when I removed the sensor, for adding the grains, the blue spike at 16:05 was when I applied a gas burner as supplementary heating, and has nothing to do with the software.

Overall I am really pleased. Now I just need to figure out how to used the BrewPI for controlling the intensity of my boil also.